




How to Calibrate a Dental Milling Machine

Calibrating your dental milling machine ensures precise restorations and reduces errors like poor fit or chipped margins. Here’s the process in a nutshell:
- Why It Matters: Calibration ensures accurate milling, reduces remakes, and extends machine life. Signs your machine needs calibration include uneven surfaces or ill-fitting crowns.
- Tools Needed: High-precision micrometers, calibration blanks, and specific software (e.g., DentalCNC or MASSO CNC).
- Key Steps:
- Stabilise machine temperature (18–25 °C).
- Perform pre-cleaning and setup.
- Run calibration software to mill a test specimen.
- Measure the specimen and adjust axis offsets if needed.
- Verification: Re-mill and measure to confirm accuracy.
- Maintenance Tips: Clean regularly, monitor temperature, and keep logs to prevent future issues.
Annual calibration costs in Australia range from $2,000–$5,000, covering tools and service. Regular upkeep ensures consistent performance and saves time in the long run.
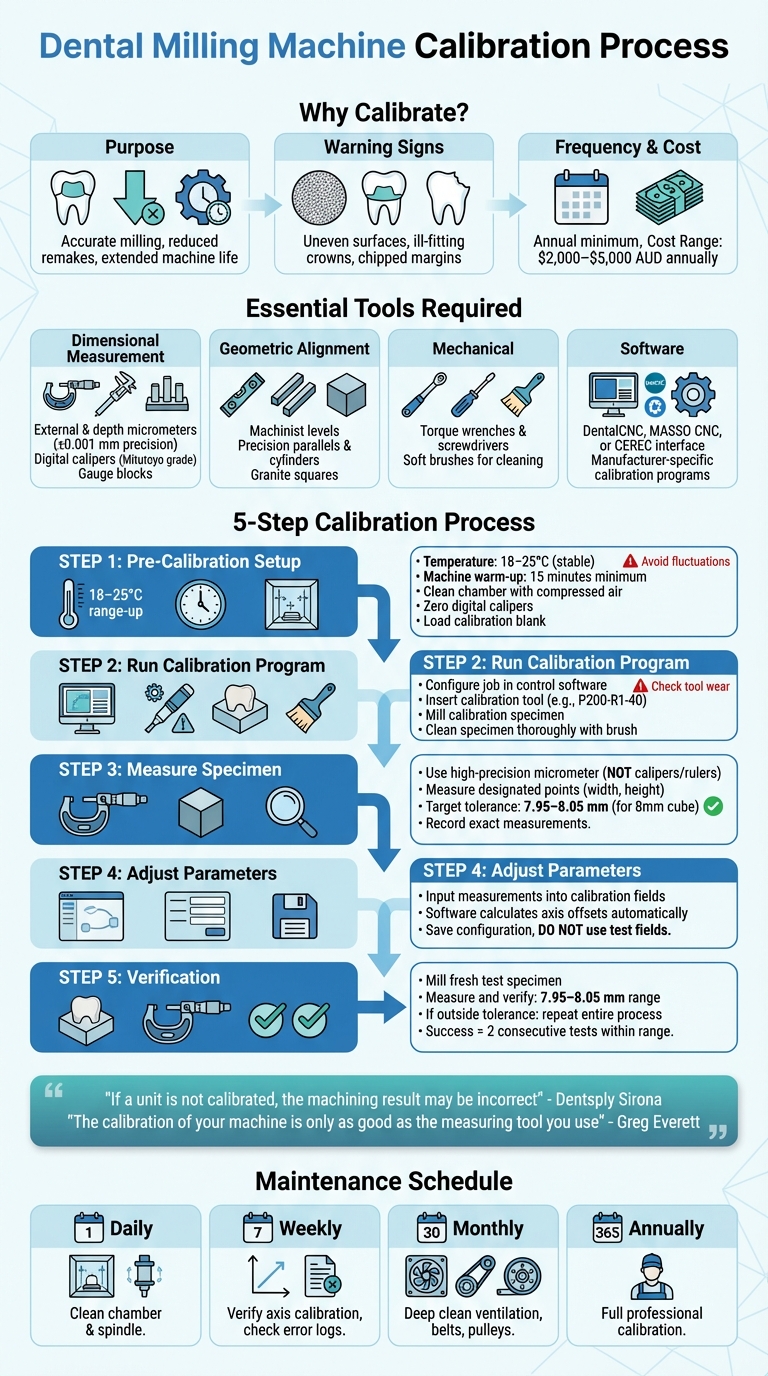
Dental Milling Machine Calibration Process: 5-Step Guide with Tools and Tolerances
vhf dental machines – Part 2/3 Machine Accuracy and Calibration
sbb-itb-2be92ed
Tools and Materials Required for Calibration
Getting calibration right starts with having the correct tools. The precision of your measuring instruments directly influences the accuracy of your calibration. It’s worth investing in professional-grade equipment that matches the precision capabilities of your milling machine. These tools are essential for both dimensional and geometric calibration.
For dimensional measurement, you’ll need tools like external and depth micrometers, precise vernier or digital callipers, and gauge blocks to check the accuracy of your machine’s axes. When it comes to geometric alignment, high-sensitivity machinist levels, precision parallels, cylinders, and granite squares are indispensable for confirming that axes remain straight and properly aligned. Don’t forget mechanical tools such as torque wrenches and torque screwdrivers. These ensure components are secured to the manufacturer’s specifications, reducing the risk of operational drift. For routine upkeep, keep soft brushes and specialised cleaning tools on hand to remove wax or PMMA debris from milling burs and flutes – buildup here can compromise precision.
In Australia, several providers cater to calibration needs. For instance, Micro Precision Calibration operates ISO 17025 accredited labs in Epping (VIC) and Mayfield West (NSW), offering calibration services for micrometers, torque wrenches, and gauge blocks. Meanwhile, ISTecnik supplies advanced geometrical calibration systems and CNC touch probes. Professional calibration services typically range from $500 to $1,000 per session. Factoring in calibration, tooling, and filter changes, annual maintenance costs generally fall between $2,000 and $5,000[5]. Alongside physical tools, calibration also depends on specialised software systems.
On the software side, manufacturer-specific programs and control interfaces play a key role. For example, MASSO CNC software offers dedicated screens for tasks like jogging and tool management, where offsets and tool diameters are configured. MASSO CNC Australia has introduced an "Edit Tool" window with a "Zero" button that calculates and stores the Z-offset value directly in the machine’s controller. Similarly, Yucera Dental Solutions provides automatic calibration instructions for their Yucera 5X, simplifying alignment for 5-axis systems. Always ensure your software version is compatible with your machine to avoid technical issues.
Before starting calibration, follow a preparation checklist. Make sure the machine is at room temperature – temperature swings of more than 8–11°C can cause components to expand or contract, affecting precision. Clean the milling chamber and spindle using compressed air while the machine is unplugged, and wipe down external surfaces. Check that water tanks are full, filters are clean, and moving parts are properly lubricated as per the user manual. Zero your digital callipers and verify you’re using the manufacturer-recommended calibration pins or phantoms. As noted in Dentsply Sirona‘s CEREC Primemill Operating Instructions:
"The machine must be at room temperature for the calibration and be switched on for at least 15 minutes."[2]
Completing these steps ensures your calibration process is both accurate and efficient, seamlessly integrating software and physical tools.
Step-by-Step Calibration Process
Pre-Calibration Cleaning and Setup
Start by ensuring your machine is thermally stable. This means it should be kept at a temperature between 18 °C and 25 °C. For accurate calibration, the machine must either be switched on for at least 15 minutes or, for certain E5 models, turned off for at least 2 hours before starting the process[2][3].
Next, open the machine’s control software, such as DentalCNC or the CEREC touch interface, and head to the maintenance or service menu. Load the calibration blank into the working chamber. This blank is a special material block designed specifically for calibration. You’ll also need to insert the correct calibration tool into both the physical and virtual tool magazine. The specific tool required depends on your machine model; for example, the P200-R1-40 is used for models like the K5, K5+, R5, S1, S2, and S5[3]. Once everything is set up, you can start the calibration program.
Running the Calibration Program
After the setup, configure the calibration job within the control software. Add it to the job list, and the machine will then mill a calibration specimen. This specimen is a small, precisely shaped geometric piece that the machine uses to check its accuracy. The calibration tool will be automatically selected, and the milling process will begin using the pre-set parameters.
When the milling is complete, remove the specimen from the chamber. Carefully clean it with a small brush to remove all machining residues and dust. Even tiny particles can interfere with measurements and lead to incorrect calibration data[3]. Once the specimen is cleaned, you’re ready to move on to measuring and adjusting parameters.
Measuring and Adjusting Parameters
To measure the calibration specimen, use a high-precision micrometer. Avoid using less precise tools like rulers or callipers, as they won’t provide the accuracy needed for this process[3]. Before taking any measurements, make sure the micrometer’s zero point is correctly set.
Place the specimen on a flat surface to allow for steady and precise handling. Measure the designated points on the specimen, such as the width and height of cubes or specific line segments on flat plates – this varies by machine model. For most machines in the E5, K4, K5, R5, and S series, an 8 mm cube should measure between 7.95 mm and 8.05 mm[3]. If your measurements fall within this range, further calibration may not be required. However, if they are outside this tolerance, input the exact values into the software’s calibration fields (not the test fields, as this could lead to manufacturing errors). The software will then calculate the necessary axis offsets and update the machine’s configuration automatically.
After saving these adjustments, mill another test specimen to confirm the calibration has restored the machine’s accuracy to within the acceptable range.
Verification and Troubleshooting
Verifying Calibration Accuracy
Once you’ve saved your adjustments, the next step is to mill a fresh test specimen to confirm the accuracy of the calibration. This specimen is different from the one used during the calibration process and is solely for verifying that the adjustments have worked. The dimensions of this test piece should align with the manufacturer’s tolerance ranges, which are typically ±0.05 mm for standard geometric shapes[3].
Before measuring, ensure the test specimen is free of machining debris by using a small brush to clean it thoroughly[3]. Zero your micrometer accurately and measure the designated points. For most E5, K5, R5, and S-series machines, calibration is considered successful if the measurements fall within 7.95–8.05 mm[3]. However, if significant adjustments were made during the initial calibration, it’s a good idea to repeat the entire process until you achieve consistent results across two consecutive tests[1]. Persistent discrepancies may indicate deeper issues, which you can address by following the troubleshooting steps below.
Common Calibration Problems and Solutions
If your verification process uncovers inaccuracies, there are a few common culprits to investigate. Signs of calibration issues include chipped margins, uneven surfaces, or incorrect dimensions[1]. These problems are often linked to environmental factors, tool wear, or mechanical misalignment. For example, temperature variations exceeding 8–11 °C can cause machine components to expand or contract, disrupting the calibration[1]. In environments prone to such fluctuations, more frequent calibration may be necessary.
Worn tools or tools that aren’t properly seated can also lead to poor accuracy and surface quality[6][4]. If issues persist even after recalibration, check for mechanical problems like axis misalignment, spindle runout, or worn bearings. These can result in vibrations – commonly referred to as "chatter" – and reduced precision[6].
"The first step in any troubleshooting process should be a clean calibration." – Greg Everett, Managed a milling centre for 10+ years[1]
The accuracy of your measuring tools plays a crucial role in calibration success. While budget digital callipers may provide an accuracy of ±0.02 mm, professional-grade tools like Mitutoyo callipers can achieve precision down to ±0.001 mm[1].
"The calibration of your machine is only as good as the measuring tool you use." – Greg Everett, Managed a milling centre for 10+ years[1]
When measuring, always use the same spot on the tool’s jaw and avoid applying excessive pressure, as this can distort the readings[1].
Maintenance Tips for Long-Term Calibration Stability
To ensure your machine stays calibrated over time, adopt a structured maintenance routine. Daily tasks should include cleaning the milling chamber and spindle with compressed air to remove dust and debris[4]. On a weekly basis, verify axis calibration and review error logs to catch potential issues early. Once a month, perform a deep clean of the milling chamber, ventilation system, belts, and pulleys to minimise mechanical drift[4].
Maintaining a stable operating temperature in your lab is also essential. Keep detailed records of all maintenance activities, calibration results, and error messages. These logs can help you identify patterns or recurring problems before they escalate. In high-volume labs, where machines experience greater wear and tear, more frequent calibration may be required[1]. Regular maintenance not only prevents errors but also extends the life of your equipment.
Conclusion
Precise calibration is key to ensuring your milling machine meets the exacting standards required for clinical applications. Proper calibration guarantees that your dental restorations adhere to micron-level tolerances. As Dentsply Sirona highlights:
"If a unit is not calibrated, the machining result may be incorrect" [2].
Calibration not only prevents costly remakes and reduces material waste but also ensures that the final milled pieces match the dimensions of your CAD designs with consistency.
It’s recommended to perform a full calibration at least once a year, or more often if production demands increase [7]. However, before committing to a full calibration, try milling and measuring a test specimen. If the measurements fall within the 7.95–8.05 mm tolerance range for standard test cubes, a complete recalibration may not be necessary [3]. This quick test can save time while maintaining the required accuracy.
Routine cleaning, verification, and diligent record-keeping can significantly extend the life of your equipment and improve your return on investment [4].
For the best results, use high-precision tools like a micrometer during calibration and ensure the room temperature is stable before starting [3]. Keep detailed logs of calibration and maintenance activities – these records can help you spot potential issues early and maintain optimal performance.
FAQs
How often should I calibrate my dental milling machine?
The frequency of calibration varies based on several factors, including how often the equipment is used, the surrounding conditions, and the overall performance of the machine. For instance, labs with high production demands, environments experiencing large temperature shifts (more than 8–11°C), or machines showing signs of performance issues may need calibration more often. To maintain accuracy and reliability, it’s essential to follow the recommendations provided by your reseller and adjust the schedule to suit your machine’s specific requirements and operating conditions.
What tolerance should my calibration test cube meet?
Your calibration test cube needs to maintain a tolerance of approximately 0.001 mm. Modern CNC machines are built for precision, and calibration plays a key role in ensuring accuracy by comparing the machine’s output to established standards. This fine level of precision is critical for achieving reliable performance in dental milling machines.
When should I call a technician instead of recalibrating?
If your dental milling machine continues to produce flawed results – like chipped margins or uneven lines – even after cleaning and basic recalibration, it’s time to bring in a technician. Persistent issues, such as significant calibration errors or hardware failures, go beyond routine maintenance and need professional attention. While regular recalibration is a key part of upkeep, ongoing problems signal the need for expert intervention to restore precision and reliability.
Related Blog Posts
- Digital Workflow Disruptions: Quick Fixes for CAD/CAM
- Digital Orthodontics: CAD/CAM Workflow Explained
- How to Calibrate Dental Equipment
- Key Insights into High-Precision Dental Milling
Important Notice: Any surgical or invasive procedure carries risks. Before proceeding, you should seek a second opinion from an appropriately qualified health practitioner.
Individual results may vary. The information provided in this article is for educational purposes only and does not constitute medical advice.
Checkout Related Blogs



Get in touch with us
For more information, call us now to start feeling better. Or fill the form below to make appointment
The Latest News from Complete Smiles
How to Clean Clear Plastic Retainers
Checklist for Choosing Wearable Dental Devices
Checklist for Choosing Cloud AI Platforms in Dentistry
Complete Smiles Bella VistaAccepts All Major Health Funds, Including