


How to Clean Clear Plastic Retainers

Clear plastic retainers, like Essix and Vivera, need proper care to stay clean, odour-free, and effective. Here’s a quick guide:
- Daily Cleaning: Rinse under lukewarm water after removal. Brush gently with a soft toothbrush and mild dish soap – avoid toothpaste as it scratches the plastic.
- Deep Cleaning: Soak weekly in a retainer-cleaning tablet solution, or use a mix of 3% hydrogen peroxide and water, or white vinegar and water (1:1 ratio). Rinse thoroughly afterward.
- Storage: Air-dry for 5–10 minutes before placing in a ventilated case. Never use tissues or leave retainers exposed. This is especially important for maintaining retainer hygiene while travelling.
- Avoid: Hot water, abrasive toothpaste, bleach, alcohol-based cleaners, and eating or drinking (except water) while wearing retainers.
- Replacement: Retainers typically last 6–12 months. Replace if cracked, warped, or persistently cloudy.
Following an ultimate guide to retainer cleaning prevents bacteria build-up, staining, and damage. If issues persist, consult your dentist or orthodontist for advice or replacement.
How to Clean Retainers (Hawley, Essix, Clear, etc)
sbb-itb-2be92ed
What Are Clear Plastic Retainers?
Clear plastic retainers, like Essix and Vivera, are thin, transparent trays custom-moulded to fit snugly over teeth after orthodontic treatment. Their near-invisible appearance makes them a popular choice for both adults and teenagers seeking discreet alignment support.
Materials Used
These retainers are made from thermoplastic or vacuum-formed plastic, which makes them lightweight but also quite sensitive. Regular toothpaste, for instance, can cause tiny scratches on the surface, leading to bacterial build-up and a cloudy appearance. As Premier Orthodontics explains:
"Many toothpastes contain abrasives that scratch plastic, inviting plaque and discoloration." [2]
Heat is another potential hazard. Hot water, dishwashers, or even leaving the retainer on a warm car dashboard can cause it to warp, affecting its fit and effectiveness.
Because of their delicate nature, clear plastic retainers require careful cleaning and handling.
| Feature | Clear Plastic (Essix/Vivera) | Hawley Retainer |
|---|---|---|
| Material | Thermoplastic / vacuum-formed plastic | Acrylic base with metal wires |
| Heat sensitivity | High – warps easily | Moderate |
| Abrasive sensitivity | High – scratches easily | Moderate |
| Visibility | Nearly invisible | Metal wire visible |
| Durability | Fragile; prone to cracking or warping | Highly durable |
These qualities highlight the need for extra care when cleaning and maintaining clear retainers.
Why Proper Cleaning Matters
Given their sensitivity to abrasives and heat, cleaning clear retainers properly is essential. Because they fully cover the teeth, they trap saliva, sugars, and plaque against the enamel. Without regular cleaning, this creates a warm, damp environment – ideal for bacteria to thrive. Over time, this can lead to unpleasant odours, a slimy surface, and visible yellowing or staining.
Additionally, minerals in saliva can harden into a chalky, white crust on the retainer. This build-up often requires a specialised soak to remove, as brushing alone won’t do the trick. Beyond just appearance, neglecting retainer care can cause it to lose its shape and fit, potentially undoing the hard work of orthodontic treatment.
"A well-maintained retainer stays comfortable, effective, and hygienic – while a neglected one can compromise your oral health and alignment." – Joanne M., Director of Telehealth Clinical Operations, NewSmile [3]
Typically, clear retainers last between 6 and 12 months, depending on how well they are cared for [1]. Starting good cleaning habits early can help maximise their lifespan and keep your smile looking its best.
Daily Cleaning Routine
Keeping your retainer fresh and clear doesn’t have to be a chore. A simple daily habit can make all the difference, and it only takes a few minutes.
Removing and Rinsing Your Retainer
A quick rinse is your first line of defence against plaque and mineral buildup. As soon as you take out your retainer, rinse it under lukewarm water to stop saliva, sugars, and plaque from hardening.
"A quick rinse under lukewarm water keeps saliva, plaque, and sugars from drying on the plastic, which makes buildup harder to remove and fuels odours." – Premier Orthodontics
Hold your retainer under lukewarm water for 10–20 seconds and gently rub both sides with clean fingers. Stick to lukewarm water – hot water can warp the plastic, which is a common concern for those undergoing orthodontics or Invisalign treatments. Make it a habit to rinse your retainer after every meal, snack, or drink before putting it back in.
Brushing With Mild Cleaners
Daily brushing is essential to keep your retainer clear and odour-free. Use a soft-bristled toothbrush (one dedicated to your retainer) and a drop of mild, unscented dish soap or liquid castile soap.
"A once‑a‑day, gentle brush keeps clear retainers from turning cloudy or smelly. Use a soft toothbrush and a drop of mild, unscented dish soap – never toothpaste." – Premier Orthodontics
Carefully brush all surfaces – inside, outside, and along the edges – without pressing too hard. Rinse thoroughly with lukewarm water after brushing. Avoid toothpaste, as its abrasive ingredients can leave tiny scratches that trap bacteria.
How to Store Your Retainer
After cleaning, shake off any excess water and let your retainer air-dry for 5–10 minutes before storing it. Use a ventilated hard case to keep it safe. Never wrap it in tissues or napkins, as it could easily be thrown out by mistake. Keep the case out of reach of pets, and clean it weekly with mild dish soap.
| Do | Don’t |
|---|---|
| Use lukewarm water | Use hot or boiling water |
| Use mild dish or castile soap | Use toothpaste or bleach |
| Use a soft, dedicated brush | Use a stiff or shared brush |
| Store in a ventilated case | Wrap in tissues or leave loose |
| Air-dry before storing | Seal in a case while wet |
Deep Cleaning Methods
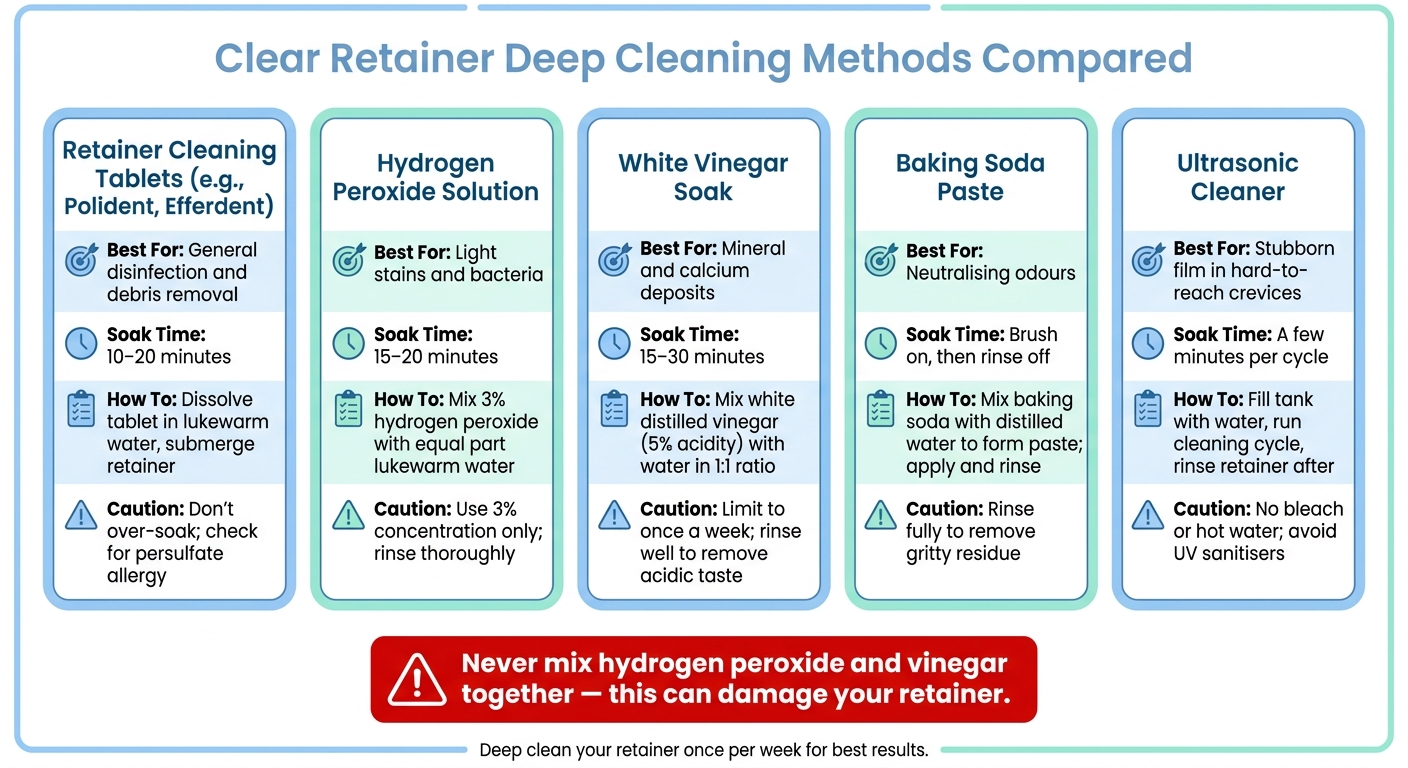
Clear Retainer Deep Cleaning Methods: Which One Is Right for You?
Weekly deep cleaning tackles the stubborn deposits, odours, and cloudiness that daily maintenance often misses. Each technique addresses a specific issue, so choose the one that best fits your retainer’s needs.
Using Retainer Cleaning Tablets
Retainer cleaning tablets – like Polident or Efferdent – offer a simple and efficient deep cleaning option. To use, dissolve a tablet in a glass of lukewarm water, submerge your retainer, and let it soak for 10–20 minutes once a week [2]. The fizzing action works to lift bacteria and debris from those hard-to-reach crevices that a toothbrush might miss.
"The AAO recommends a 10–20 minute soak with a retainer-cleaning tablet/solution… to reduce stains and bacteria." – American Association of Orthodontists (via Remi Care Guide) [2]
Avoid soaking your retainer overnight, as extended exposure can degrade the plastic [6]. Additionally, many tablets contain persulfate, an allergen that could cause irritation. If you experience sensitivity, consider switching to a persulfate-free option [5].
For those who prefer household alternatives, hydrogen peroxide or white vinegar can also be effective.
Hydrogen Peroxide and White Vinegar Solutions
Hydrogen peroxide and white vinegar are excellent for tackling stains and calcium deposits. Use 3% hydrogen peroxide mixed with an equal amount of lukewarm water to address light stains and bacteria. Soak your retainer for 15–20 minutes, then rinse thoroughly [2][4]. For calcium deposits, mix white distilled vinegar (5% acidity) with water in a 1:1 ratio and soak for 15–30 minutes once a week [2].
"A short white vinegar soak dissolves the calcium so you can brush it away without scratching your clear retainer." – Premier Orthodontics [2]
Always rinse your retainer thoroughly after soaking to remove any lingering acidic taste. And remember: never mix hydrogen peroxide and vinegar together in the same solution, as this can damage your retainer [2].
For odour control or a chemical-free option, consider baking soda or ultrasonic cleaners.
Baking Soda Soaks and Ultrasonic Cleaners
Baking soda is a great option for neutralising odours. Mix it with distilled water to create a gentle cleaning solution, then rinse thoroughly to remove any residue [5][6].
Ultrasonic cleaners, on the other hand, are a high-tech way to clean without chemicals. These devices use sound waves to dislodge debris from deep crevices quickly [4][5].
"Ultrasonic vibration helps dislodge stubborn film quickly; rinse and air-dry after." – Remi Care Guide [2]
Simply fill the tank with water, run a cleaning cycle, and rinse your retainer once done. Avoid using bleach or hot water in the cleaner, and skip UV sanitisers – UV light can damage the acrylic material in clear retainers [5].
| Method | Best For | Soak Time | Key Caution |
|---|---|---|---|
| Cleaning tablets | General disinfection and debris | 10–20 mins | Don’t over-soak; check for persulfate allergy [2][5] |
| Hydrogen peroxide | Light stains and bacteria | 15–20 mins | Use 3% concentration only; rinse thoroughly [2] |
| White vinegar | Mineral/calcium deposits | 15–30 mins | Limit to once a week; rinse well [2] |
| Baking soda paste | Neutralising odours | Brush on/rinse off | Rinse fully to remove gritty residue [2] |
| Ultrasonic cleaner | Stubborn film in crevices | A few minutes | No bleach or hot water in the tank [2] |
Products and Practices to Avoid
Taking care of your retainer is just as important as cleaning it. Here are some habits and products to steer clear of to keep your clear retainer in top shape and maintain your oral health.
Avoid Heat and Abrasives
Clear retainers are highly sensitive to heat, which means exposing them to hot water, dishwashers, or even leaving them on a sunny car dashboard can warp the plastic.
"Hot water, dishwashers, or even a sunny dashboard can warp the plastic." – Joanne M., Director of Telehealth Clinical Operations, NewSmile [3]
Similarly, harsh or abrasive cleaning tools like hard-bristled brushes and gritty toothpaste can scratch the surface of your retainer. These scratches can trap bacteria, making it harder to keep your retainer clean. Stick to mild cleansers and soft-bristled brushes for a gentler approach.
Harsh Chemicals to Avoid
Certain cleaning products can weaken or damage the plastic of your retainer. Avoid using undiluted vinegar, bleach, or alcohol-based mouthwashes, as these can degrade the material over time [2]. Also, never mix cleaning agents together – chemical reactions can cause further harm to your retainer [2]. By steering clear of these harsh substances, you’ll help your retainer last longer and stay effective.
Eating and Drinking With Retainers In
Always remove your retainer before eating or drinking anything other than plain water. Food particles and sugars can get trapped, increasing the risk of tooth decay [4]. Plus, chewing while wearing your retainer could crack or distort the plastic.
As for drinks, stick to plain water while your retainer is in. Hot beverages like tea or coffee can warp the plastic, and sugary or acidic drinks – such as soft drinks, juice, or sports drinks – can encourage bacteria growth. Remove your retainer before enjoying these beverages, brush your teeth afterward, and then put it back in. This simple habit protects both your retainer and your oral health.
When to See a Dental Professional
Even with diligent daily and deep cleaning habits, there are times when your retainer might need a professional evaluation.
Signs Your Retainer Needs Attention
If your retainer remains cloudy despite deep cleaning, has persistent odours even after using cleaning tablets, or shows signs of bacterial build-up that won’t go away, it could mean the material has started to break down [1][3].
Physical damage is another red flag. Cracks, chips, or sharp edges can trap bacteria and irritate your gums [3]. Additionally, if your retainer feels warped, too tight, too loose, or no longer snaps into place as it should, it may not be doing its job of preventing orthodontic relapse [1][3].
"If your retainer still looks cloudy or smells off even after cleaning, it might be time for a replacement." – Joanne M., Director of Telehealth Clinical Operations, NewSmile [1]
Clear retainers generally last between 6 and 12 months [1]. If yours is nearing the end of its lifespan and showing these signs, it’s best to have it checked. In Australia, replacing a clear retainer typically costs between A$100 and A$500 [8]. Recognising these warning signs early can save you from more significant issues later, making professional advice essential when home care isn’t enough.
Talking to Your Dentist or Orthodontist
Make it a habit to have your retainer assessed during routine dental check-ups. Dentists and orthodontists can detect micro-cracks or hygiene problems that might not be visible to you and confirm whether your retainer is still effective [7]. If you’re experiencing persistent issues despite proper cleaning or notice changes in how your retainer fits – or if your teeth feel like they’ve shifted – don’t wait for your next scheduled visit. Book an appointment as soon as possible.
Practices like Complete Smiles Bella Vista can provide tailored advice on retainer care, helping you decide if your current one is still functional or if it’s time to invest in a new, custom-moulded set [7]. As Joanne M. from NewSmile explains, "A well-maintained retainer stays comfortable, effective, and hygienic – while a neglected one can compromise your oral health and alignment" [3].
Conclusion
Keeping your clear plastic retainer in top shape is all about following a simple, consistent cleaning routine. Rinse it with lukewarm water every time you take it out, brush it daily using a soft-bristled toothbrush and mild dish soap, and give it a weekly deep clean with a recommended solution. For those stubborn white mineral deposits, soaking your retainer in a mixture of white vinegar and lukewarm water for 15–20 minutes can work wonders without causing damage. These straightforward steps help maintain your retainer’s effectiveness and cleanliness.
Steer clear of harmful practices like using hot water, abrasive toothpaste, bleach, or alcohol-based mouthwashes. These can warp or scratch the plastic, making it harder to clean and more prone to bacteria buildup. Always store your retainer in a clean, ventilated case – not wrapped in tissue or left lying around.
"Clarity and freshness come from consistency, not harsh hacks." – Remi [2]
Plan to replace your retainer every 6–12 months, or sooner if it cracks, warps, or no longer fits correctly. If you notice any issues, consult your dentist or orthodontist right away for advice and to discuss replacement costs.
FAQs
Can I use mouthwash to clean my clear retainer?
It’s best to avoid using mouthwash to clean your clear retainer, particularly if it contains alcohol or strong chemicals. These ingredients can weaken or damage the plastic. Instead, opt for gentler cleaning options like mild soap, retainer-specific cleaning solutions, or natural alternatives such as vinegar or hydrogen peroxide. Steer clear of harsh products like bleach or abrasive cleaners, as they can harm your retainer and reduce its lifespan.
What should I do if my retainer won’t stop smelling?
To keep odours at bay, rinse your retainer with cool or lukewarm water every time you remove it. Use a soft toothbrush and mild soap or a non-abrasive cleaner for gentle cleaning – don’t use toothpaste, as it can scratch the plastic. For a more thorough clean, soak your retainer once a week in a solution made from white vinegar, baking soda, or hydrogen peroxide. Always store it in a vented case, away from heat and pets, to avoid odour buildup and potential damage.
How can I remove white limescale buildup without scratching it?
To clean white limescale buildup off your retainer, try soaking it in a 50/50 mix of warm water and white vinegar for up to 30 minutes. This method gently breaks down mineral deposits without harming the retainer’s surface. Steer clear of abrasive cleaners or scrubbing tools, as they can cause scratches. For ongoing care, stick to retainer-safe options like hydrogen peroxide or vinegar to keep it clean and in good shape.
Related Blog Posts
- Natural Retainer Cleaning: Myths vs. Facts
- Ultimate Guide to Alcohol-Free Retainer Cleaning
- Ultimate Guide to Retainer Hygiene
- How To Clean Retainers Without Damaging Them
Important Notice: Any surgical or invasive procedure carries risks. Before proceeding, you should seek a second opinion from an appropriately qualified health practitioner.
Individual results may vary. The information provided in this article is for educational purposes only and does not constitute medical advice.
Checkout Related Blogs


Get in touch with us
For more information, call us now to start feeling better. Or fill the form below to make appointment
The Latest News from Complete Smiles
How to Clean Clear Plastic Retainers
Checklist for Choosing Wearable Dental Devices
Checklist for Choosing Cloud AI Platforms in Dentistry

Complete Smiles Bella VistaAccepts All Major Health Funds, Including


