




How Ultrasonic Devices Improve Irrigation Efficacy

Ultrasonic devices have transformed root canal therapy by significantly improving the cleaning process. These tools use high-frequency vibrations to create acoustic streaming and cavitation, which help irrigants reach and clean hard-to-access areas like lateral canals and isthmuses. Compared to conventional syringe irrigation, ultrasonic systems are more effective at removing biofilms, debris, and the smear layer, especially in the middle and coronal thirds of the canal.
Key points about ultrasonic irrigation:
- Mechanisms: Acoustic streaming and cavitation generate high shear stress and fluid movement to disrupt bacteria and biofilms.
- Advantages: Outperforms syringe irrigation in cleaning complex canal anatomies.
- Factors for Success: Optimal power settings (7.5–9.2 W) and effective heat management and proper file placement (1 mm short of the working length) are critical.
- Irrigants: Sodium hypochlorite (NaOCl) and EDTA work best with ultrasonic activation.
- Equipment: Piezoelectric devices are commonly used, with flexible tips like EDDY preferred for curved canals.
Ultrasonic irrigation is a practical solution for improving root canal cleaning, provided clinicians follow proper protocols and device settings.
How Ultrasonic Activation Works and Its Advantages
Core Physical Mechanisms
When an ultrasonic file vibrates within a filled canal, it triggers physical processes that go far beyond what syringe irrigation can achieve. The two main forces at play here are acoustic streaming and cavitation.
Acoustic streaming creates a steady, directional flow of fluid caused by the rapid oscillation of the file. This movement generates four symmetrical vortices around the file’s tip. As the power increases, these vortices merge and expand, eventually affecting the entire canal space [1]. Cavitation, on the other hand, involves the rapid formation and collapse of tiny bubbles. The strength of this effect depends on the irrigant used – sodium hypochlorite (NaOCl), for example, is far more effective at producing cavitation bubbles than plain water [1].
These forces generate high shear stress along the canal walls, which is key to disrupting bacterial biofilms. During ultrasonic activation, shear stresses usually range from 1 N/m² to 1.6 N/m², with peaks reaching as high as 4.8 N/m² [1]. This level of force targets areas that a needle tip alone could never physically reach.
Together, these mechanisms explain why ultrasonic systems outperform traditional methods in cleaning efficiency.
Advantages Over Conventional Irrigation
Conventional needle irrigation (CNI) has a fundamental drawback: fluid only moves where the needle directs it. Beyond the needle’s immediate reach, there’s essentially a "dead zone" with minimal fluid exchange. Ultrasonic activation solves this issue by creating chaotic, high-velocity flow throughout the canal.
Here’s a quick comparison between passive ultrasonic irrigation (PUI) and conventional methods:
| Feature | Conventional Needle Irrigation (CNI) | Passive Ultrasonic Irrigation (PUI) |
|---|---|---|
| Primary driver | Manual syringe pressure | Acoustic streaming & cavitation |
| Anatomical reach | Limited to needle tip proximity | Reaches lateral canals and isthmuses |
| Biofilm removal | Low to moderate | High (via shear stress) |
| Smear layer removal | Least effective, especially apically | Highly effective in middle and coronal thirds |
| Debris removal | Relies on flush volume | Relies on chaotic flow and microstreaming |
It’s worth mentioning that laser-activated irrigation methods, like PIPS and SWEEPS, have shown better smear layer removal in the apical third compared to PUI. According to Lasers in Medical Science, "At the apical level, the cleanest canal walls were observed when laser methods were used, while in the middle third, there was no difference in smear removal efficiencies between all groups except for the CNI" [3]. Despite this, PUI remains an effective and practical choice, particularly for cleaning the middle and coronal thirds of the canal.
The improvements in fluid dynamics brought by ultrasonic activation allow for better cleaning of complex canal anatomies.
Factors That Affect Efficacy
Not all ultrasonic activation techniques deliver the same results – several factors directly impact performance.
Higher power settings and deeper, centred file placement are key to improving shear stress and biofilm removal. Research suggests that a power range of 7.5 W to 9.2 W is critical in some devices. Once this threshold is crossed, the flow extends from the file tip to cover the entire canal [1].
"Ultrasonic irrigation will benefit from using a higher power setting as this does produce greater shear stresses near the walls of the root canal leading to the potential for increased biofilm removal." – Nature Scientific Reports [1]
File depth also plays a crucial role. Increasing insertion depth from 4 mm to 10 mm doubles the maximum velocity (from 10 cm/s to 20 cm/s) due to the confined canal effect [1]. This concentrates flow and amplifies shear stress along the canal walls.
Lastly, keeping the file centred is essential for optimal performance. If the file touches the canal wall, it dampens vibration and disrupts flow. This is especially important in narrow or curved canals, where careful preparation and tip selection are vital.
sbb-itb-2be92ed
Ultrasonic Irrigation Doesn’t Work the Way You Think
Selecting Ultrasonic Devices and Tips
Choosing the right ultrasonic device and tip is essential for effective irrigation. After exploring how ultrasonic activation works, this section focuses on selecting equipment that provides optimal cleaning outcomes.
Types of Ultrasonic Devices Available in Australia
In Australia, practitioners typically choose between piezoelectric and magnetostrictive transducer technologies. Piezoelectric units, which convert electrical signals into mechanical vibrations using quartz or ceramic crystals, are the most commonly used. They are versatile and effective across various output levels [4]. On the other hand, magnetostrictive devices rely on magnetic fields to generate vibrations and are often preferred for lower-frequency applications, such as ultrasonic cleaning [4].
Another important consideration is whether the device supports Passive Ultrasonic Irrigation (PUI) or Continuous Ultrasonic Irrigation (CUI). Research highlights that CUI, which delivers fresh irrigant during activation, can achieve better decontamination in dentinal tubules, even with simpler solutions like saline [5]. Many modern endodontic units offer both modes, allowing clinicians to adapt to different clinical needs.
Choosing the Right Tip for Irrigation
The choice of tip significantly affects both cleaning efficiency and patient safety. Non-cutting, flexible tips are ideal as they transmit ultrasonic energy to the irrigant without damaging dentine or increasing the risk of perforation.
For curved canals, polyamide tips like the EDDY are a great option. Unlike metallic tips, polyamide is flexible and eliminates the risk of fracture in curved anatomy [6]. As Dr. Geoff Young explains:
"The flexible polyamide EDDY tip can be safely used in curved root canals with no risk of breakage, unlike metallic ultrasonic tips which are fracture-prone." [6]
For canals with long oval or flattened shapes, nickel-titanium (NiTi) tips (e.g., Flatsonic or Clearsonic) work better than standard round tips. These specialised tips are designed to access fins and isthmuses more effectively [5]. Below is a quick comparison of available tip options:
| Tip Type | Material | Best Clinical Scenario |
|---|---|---|
| Standard K-File Tip | Stainless steel | Straight canals, general debris removal |
| EDDY | Polyamide | Curved canals, complex anatomy |
| Flatsonic / Clearsonic | NiTi / Steel | Long oval-shaped canals |
| Irrisonic | Stainless steel | Continuous ultrasonic irrigation (CUI) |
These tips are designed to integrate seamlessly with the irrigation systems commonly used in Australian clinics.
Compatibility with Irrigation Systems
Modern ultrasonic tips, such as the EDDY, are compatible with standard dental equipment used in Australia [6]. Most dedicated endodontic ultrasonic units operate at frequencies ranging from 25,000 to 40,000 Hz [7]. These units work well with widely used irrigants like sodium hypochlorite (NaOCl), EDTA, and chlorhexidine (CHX) [7].
However, it’s crucial to manage irrigant sequencing properly. For instance, NaOCl should not be mixed with CHX, as it forms a brown precipitate. Similarly, CHX and EDTA should not be combined, as they produce a white precipitate [7]. Thorough flushing between irrigant changes is key to maintaining an effective ultrasonic irrigation protocol.
Step-by-Step Ultrasonic Irrigation Protocol
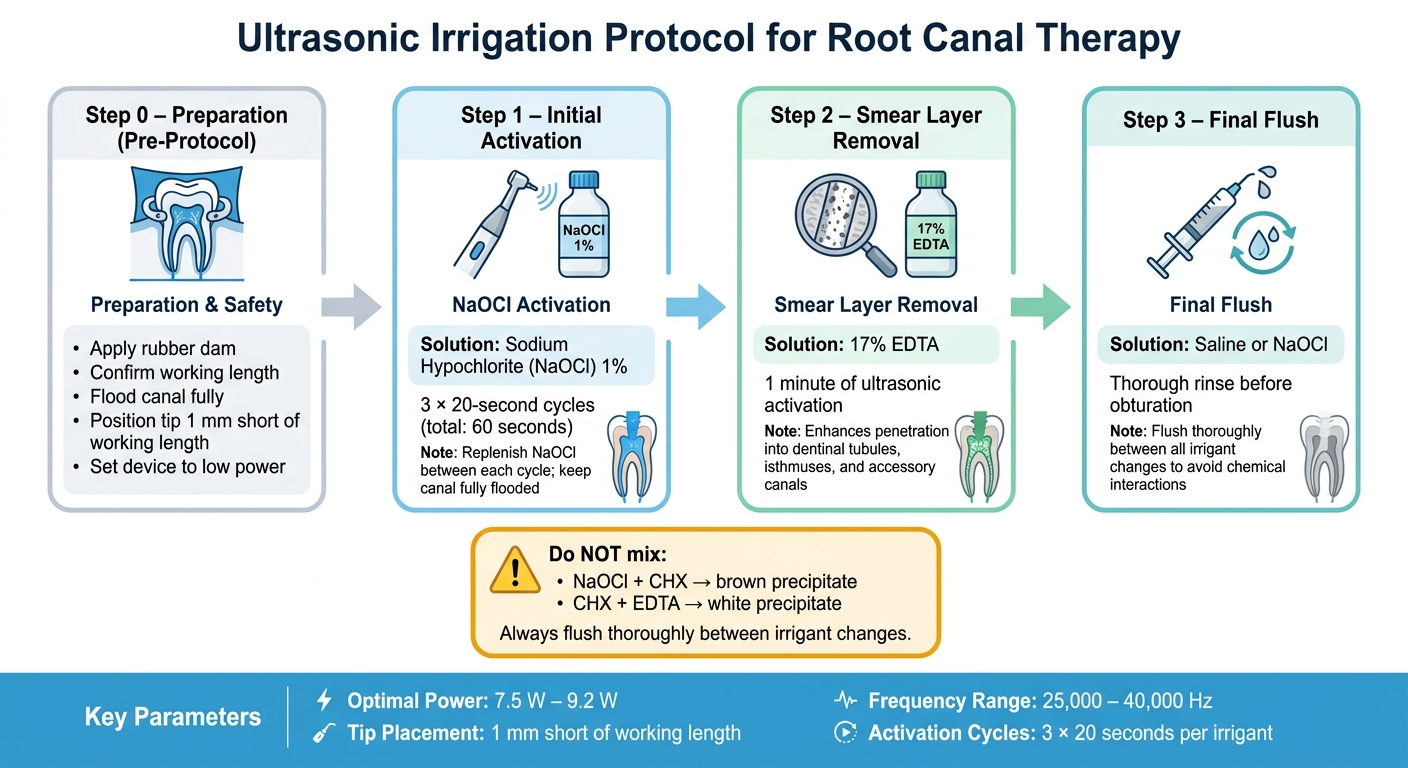
Ultrasonic Irrigation Protocol: Step-by-Step Guide for Root Canal Therapy
When using an ultrasonic device with the appropriate tip, follow this straightforward protocol to ensure effective irrigation.
Preparation and Safety Measures
Start by applying a rubber dam, confirming the working length, and ensuring the canal is properly shaped. Keep the canal fully flooded throughout the procedure to maximise the effects of acoustic streaming and cavitation.
"The ultimate goal of cleaning and shaping of the root canal system is the complete removal of the necrotic or vital tissue and disinfection of the root canal space for the placement of obturating materials." [8]
Position the ultrasonic tip 1 mm short of the working length. Operate the device on low power to minimise the risk of tip fracture and heat generation [8][9].
Activating Sodium Hypochlorite with Ultrasonic Devices
Activate the ultrasonic tip in three 20-second cycles (a total of 60 seconds), replenishing the sodium hypochlorite (NaOCl) solution after each cycle [9]. Maintaining fresh NaOCl ensures effective chlorine levels throughout the process [9].
Using a 1% NaOCl solution with ultrasonic activation reduces bacterial presence and minimises tissue toxicity [9]. Ensure the canal remains completely filled with the solution during activation, as full fluid contact is essential for acoustic streaming and cavitation to work effectively [9].
Once NaOCl activation is complete, proceed to remove the smear layer using chelators.
Using Ultrasonic Activation with Chelators and Other Solutions
For smear layer removal, ultrasonically activate a 17% EDTA solution for one minute [9]. Ultrasonic energy enhances the solution’s ability to penetrate dentinal tubules, including hard-to-reach areas like isthmuses and accessory canals [8][9].
To avoid chemical interactions, flush the canal thoroughly between irrigants, especially when switching between NaOCl, CHX, or EDTA.
Below is a quick-reference table outlining the recommended steps:
| Step | Solution | Protocol |
|---|---|---|
| 1. Initial Activation | NaOCl (1%) | 3 × 20-second cycles; replenish between cycles |
| 2. Smear Layer Removal | 17% EDTA | 1 minute; ultrasonic activation optional |
| 3. Final Flush | Saline or NaOCl | Thorough rinse before obturation |
Clinical Considerations and Australian Regulatory Context
Clinical Benefits and Limitations
Ultrasonic irrigation offers a sophisticated approach to root canal cleaning, thanks to its ability to generate microstreaming and cavitation. These mechanisms create shear stresses of up to 4.8 N/m² and instantaneous velocities reaching 54 cm/s, which are highly effective in disrupting biofilms, even in hard-to-access areas of the canal system [1].
However, the technique isn’t without its challenges. At power settings below 7.5 W, the high-velocity flow remains concentrated near the tip, restricting its reach across the full canal length [1]. While increasing the power boosts biofilm removal by enhancing shear stresses near the canal walls, it also raises the risk of instrument fatigue, especially when the tip comes into contact with curved canal walls. Additionally, the performance of cavitation varies depending on the irrigant used. For instance, sodium hypochlorite (NaOCl) generates significantly more cavitation compared to water [1].
"Ultrasonic irrigation will benefit from using a higher power setting as this does produce greater shear stresses near the walls of the root canal leading to the potential for increased biofilm removal." – Nature Scientific Reports [1]
While these technical advantages are promising, they must be weighed against practical limitations and specific clinical scenarios.
Implementation in Australian Dental Clinics
For Australian dental clinics, adopting ultrasonic irrigation requires both technical proficiency and compliance with strict regulatory standards.
In local practice, the standard protocol involves a sequence of irrigants – NaOCl, EDTA, and CHX – to ensure thorough disinfection and smear layer removal [10]. A critical step is flushing the canal with sterile water to prevent adverse interactions, such as those between NaOCl and CHX [10].
Clinicians must use equipment approved by the Therapeutic Goods Administration (TGA), such as the Woodpecker DTE S6, and understand the optimal power settings for their devices. This ensures a balance between effective cleaning and prolonging the life of the instruments [1]. Clinics like Complete Smiles Bella Vista can implement these protocols effectively by training staff in proper power calibration and device handling [1].
Beyond technical execution, successful clinical implementation also requires clear and empathetic communication with patients.
Patient-Centred Care and Communication
While advanced techniques like ultrasonic irrigation enhance treatment outcomes, patient understanding and trust remain at the heart of effective care.
Under AHPRA guidelines, clear and transparent communication is essential. Patients undergoing root canal therapy should be informed about the role of ultrasonic activation in improving the reach and effectiveness of irrigants, especially in areas inaccessible to standard syringe delivery [1]. It’s equally important to discuss the minor risk of instrument separation, particularly in curved canals or when higher power settings are used. Presenting these risks factually – without minimising or overstating them – helps patients make informed decisions and fosters trust.
Tailoring treatment plans to each patient’s unique canal anatomy, medical history, and clinical needs further reinforces a patient-centred approach. This balance of technical precision and open communication ensures that ultrasonic irrigation is not just a clinical tool but a part of comprehensive, ethical care.
Conclusion: Improving Irrigation Efficacy with Ultrasonic Devices
Recap of Key Points
Ultrasonic irrigation has transformed root canal therapy by effectively addressing biofilms in the intricate structures of canal systems. These devices utilise microstreaming and cavitation to create high velocities – up to 54 cm/s – and shear stresses of 4.8 N/m². These forces are powerful enough to disrupt biofilms even in hard-to-reach areas like isthmuses and lateral canals, where traditional syringe irrigation falls short [1].
The success of ultrasonic irrigation hinges on two main factors: power setting and file insertion depth. Power is the more critical element, with optimal performance achieved at approximately 7.5 W to 9.2 W. At this level, high-velocity flow extends beyond the tip to encompass the entire canal. File insertion depth, while less influential, still plays a role – extending the file from 4 mm to 10 mm can significantly increase velocity. However, higher power settings must be balanced with the risk of file fatigue. For best results, ultrasonic activation should be paired with sodium hypochlorite and chelators like EDTA, as no single component can achieve complete disinfection on its own.
While these advancements are already benefiting clinical practice, ongoing research aims to further optimise techniques and protocols.
Staying Current with Emerging Evidence
The field of ultrasonic irrigation continues to advance. Researchers are working to improve our understanding of how ultrasonic flow interacts within dentinal tubules, using more precise temporal and spatial analyses to refine clinical applications [1].
"Complete disinfection of the pulp space cannot be achieved with most sophisticated instrumentation techniques. The role of irrigants in obtaining this goal cannot be underestimated." – Dr. Surya Narayan Rai, International Journal of Applied Dental Sciences [2]
To stay informed, practitioners should follow key journals like Nature Scientific Reports, the Journal of Endodontics, and the International Endodontic Journal. Randomised controlled trials assessing long-term radiographic healing outcomes are particularly valuable. Additionally, keeping an eye on innovations, such as specialised tip designs like Flatsonic and Clearsonic for managing oval or flattened canals [5], can help ensure that clinical practices remain evidence-based and effective.
FAQs
Is ultrasonic irrigation safer than syringe irrigation?
Ultrasonic irrigation is often seen as a safer and more efficient alternative to syringe irrigation. By improving the penetration of irrigants, it enhances the cleaning process and reduces the chances of incomplete debridement. This makes it a dependable choice for achieving improved outcomes in root canal procedures.
Will ultrasonic activation make my root canal less painful or faster?
Ultrasonic activation improves the cleaning and disinfection of root canals, making the procedure more thorough and efficient. While it enhances the effectiveness of the process, it doesn’t necessarily minimise pain during treatment. Its main advantage is ensuring a deeper and more comprehensive cleaning.
Why can’t all irrigants be used together during ultrasonic irrigation?
Not all irrigants work well together during ultrasonic irrigation. Some combinations can cause chemical reactions that diminish their effectiveness. Worse, certain mixtures may result in issues like fluid extrusion from the root canal, which can pose risks. To achieve the best outcomes, it’s crucial to choose irrigants that are proven to be both safe and effective when used together.
Related Blog Posts
- Benefits of Ultrasonic Activation in Dentistry
- Passive Ultrasonic Irrigation: Faster Root Canal Cleaning
- Sonic vs. Ultrasonic: Root Canal Cleaning Comparison
- Ultrasonic Activation for Biofilm Removal: Research Insights
Important Notice: Any surgical or invasive procedure carries risks. Before proceeding, you should seek a second opinion from an appropriately qualified health practitioner.
Individual results may vary. The information provided in this article is for educational purposes only and does not constitute medical advice.
Checkout Related Blogs



Get in touch with us
For more information, call us now to start feeling better. Or fill the form below to make appointment
The Latest News from Complete Smiles
How to Clean Clear Plastic Retainers
Checklist for Choosing Wearable Dental Devices
Checklist for Choosing Cloud AI Platforms in Dentistry
Complete Smiles Bella VistaAccepts All Major Health Funds, Including