


Intraoral Scanner Firmware Troubleshooting Tips

Firmware issues with intraoral scanners can disrupt your dental practice, causing connectivity problems, calibration failures, or distorted scans. These issues often stem from outdated firmware, interrupted updates, or software glitches – not hardware failures or outdated technology. Here’s what you need to know to resolve them quickly:
- Common Problems: Error codes like "Device unreachable" or "Calibration Warning" often indicate firmware issues. Sudden shutdowns, freezing, or distorted scans could also point to corrupted firmware.
- Basic Fixes: Start with a power cycle – turn off the scanner, reboot your PC, and reconnect. Check for firmware updates manually instead of relying on auto-updates.
- Advanced Fixes: If problems persist, try a factory reset or reinstall the firmware. Always use official tools and cables to avoid further issues.
- When to Seek Help: Persistent calibration errors, overheating, or physical damage may require professional support. Contact the manufacturer for diagnostics and repairs.
Pro Tip: Keep your scanner firmware updated, calibrate regularly, and use dedicated PCs for scanning tasks to avoid conflicts. If you encounter repeated issues, don’t hesitate to reach out to the manufacturer for assistance.
5 common Medit problems

sbb-itb-2be92ed
Common Firmware Error Codes
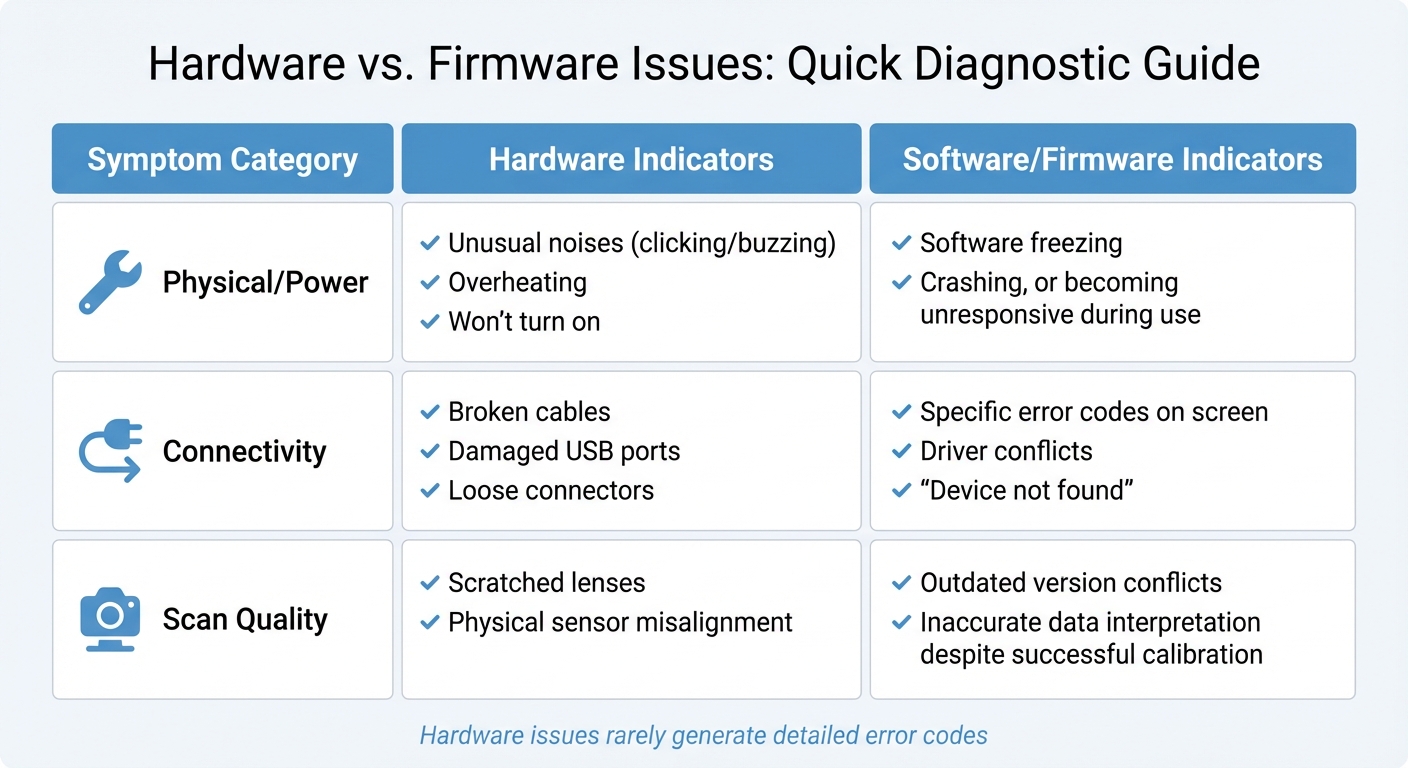
Hardware vs Firmware Issues in Intraoral Scanners: Diagnostic Guide
When your scanner starts acting up, figuring out whether the problem is firmware-related instead of hardware-based can save you a lot of time. Firmware error codes are like clues – they point to what’s going wrong. For example, messages like "Scanner not detected" or "Device unreachable" usually mean there’s a communication issue between the scanner and your computer. These errors often come from outdated firmware, driver problems, or even damaged USB ports [3][5].
Calibration errors are another common headache. If you keep seeing "Calibration Warning" messages or the calibration process fails completely, it means the scanner’s internal sensors aren’t syncing with the software. Even if calibration seems to finish, distorted scans or repeated mismatches often signal that the firmware needs an update or a reset [3][4][5].
Then there’s the dreaded "Firmware Corruption" error. This can happen when an update gets interrupted, leaving your scanner unresponsive or unable to boot. You might notice the device freezing during use, shutting down unexpectedly, or not showing up as connected at all [3].
Understanding these errors is crucial, and knowing how to interpret them can make fixing the problem a lot easier. This is especially true when managing orthodontic workflows with intraoral scanners, where precision is paramount.
How to Read Error Messages
Error messages can be more helpful than they seem – if you know how to decode them. Start by checking your scanner’s current firmware version. In most scanner software, you can find this by clicking the Gear Icon, selecting About, and then looking for the Full Software Version [1]. Once you have the error code, cross-check it with the troubleshooting guide provided by your scanner’s manufacturer, whether you’re using 3Shape, iTero, or another brand [3].
"Hardware issues rarely generate detailed error codes." – Repair.Dental Team [3]
This is important because firmware problems are often accompanied by specific error codes, which can usually be fixed with updates or resets. In contrast, hardware failures – like broken cables or scratched lenses – don’t provide such detailed notifications [3].
If you’re unsure whether the issue is with your scanner’s firmware or your computer, try connecting the scanner to a different PC. If the same error shows up, it’s likely a firmware or hardware issue. If the problem disappears, it’s probably something wrong with your original computer’s software setup [3].
Symptoms of Firmware Corruption
Firmware corruption doesn’t just show up as error codes – it also causes noticeable performance issues. For instance, sudden shutdowns during use are a major warning sign, as are distorted scans even when the optics are clean (a common issue when comparing intraoral scanners vs. impressions accuracy) [3][5]. You might also experience software freezes, unexpected crashes, or random restarts – all signs that the firmware isn’t processing data correctly [3][4].
Sometimes, performance lags during real-time scanning are mistaken for hardware problems. However, these issues are often tied to firmware glitches or even your PC’s configuration. For example, running your laptop on battery power can disable the dedicated GPU, leading to performance drops that mimic firmware issues [1].
Here’s another clue: an efficient scan should produce about 500–800 images per arch. If you’re consistently hitting over 1,000 images per arch, your firmware might not be optimising data capture properly, which can cause crashes and slowdowns [1].
Physical symptoms like overheating can also point to firmware-related issues. When a scanner gets too hot, its internal safety protocols might throttle performance or shut it down completely to prevent hardware damage [2][7]. If your scanner feels hot to the touch and then stops working, the firmware’s protective measures are likely at play – not necessarily a hardware failure.
| Symptom Category | Hardware Indicators | Software/Firmware Indicators |
|---|---|---|
| Physical/Power | Unusual noises (clicking/buzzing), overheating, won’t turn on [3] | Software freezing, crashing, or becoming unresponsive during use [4][3] |
| Connectivity | Broken cables, damaged USB ports, loose connectors [3] | Specific error codes on screen, driver conflicts, "Device not found" [3] |
| Scan Quality | Scratched lenses, physical sensor misalignment [3] | Outdated version conflicts, inaccurate data interpretation despite successful calibration [3] |
Before diving into firmware troubleshooting, it’s a good idea to clean your scanner lens with approved solutions. Dust or debris can cause image distortions that look like firmware problems but aren’t [2][5].
Firmware Reset Procedures
When firmware issues persist despite your best efforts, a reset can often resolve the problem. The good news? Resetting your scanner’s firmware won’t delete patient scans or data – it simply clears internal settings and fixes glitches [1]. Selecting the right reset type is key to addressing issues effectively without impacting patient information.
Before starting, make sure your workstation is plugged into a wall outlet. Running on battery power can disable your dedicated GPU, which might cause the reset process to fail or leave your scanner in an unstable state [1]. Stick to the manufacturer’s cables and accessories – using alternatives can lead to malfunctions or even permanent damage [11].
Basic Reset Steps
A basic power cycle is the simplest and safest way to reset your scanner. This process reboots both the scanner and your computer, refreshing their connection. Here’s how to do it:
- Close your dental scanning software.
- Turn off the scanner for at least 10 seconds.
- Reboot your PC.
- Reconnect the scanner [4][8].
This method often resolves connection drops and freezes [4][8].
For faster fixes, many systems offer a software-level reboot through the system control or manager window. This approach is quicker than a full hardware reset and works well for software-related hangs or console crashes [8]. However, if your scanner is entirely unresponsive or showing "Watchdog" errors, a full hardware power cycle is necessary [8].
After any reset, you’ll likely need to re-select your scanner in the software settings. To do this, navigate to the Gear Icon, then About, then Device, and manually choose your scanner from the list. This step re-establishes the connection between the software and hardware [1]. Also, confirm that your system is set to use the high-performance NVIDIA GPU rather than integrated graphics – this prevents lag that could be mistaken for firmware issues [1].
If these steps don’t solve the problem, advanced reset options may be required.
Advanced Reset Options
When basic resets don’t work, advanced methods like factory resets or manual firmware reinstallations might be necessary. For some models, such as the Virtuo Vivo, a factory reset requires a specific USB recovery key provided by the manufacturer’s support team [6]. In September 2023, Dental Wings updated the recovery protocol for this scanner, making this USB key essential for restoring factory settings [6].
For Shining 3D Aoralscan devices, advanced troubleshooting is handled through the "IntraoralScan" software, accessible via the "Dental Launcher" desktop application [9][7]. These systems also include hardware calibrators, which can reset accuracy and brightness settings if firmware updates fail to resolve performance issues. Regular calibration – every two weeks or after any drops or vibrations – is recommended [10].
Manual firmware reinstallation is often the most dependable solution for persistent glitches. Download the latest firmware version directly from the manufacturer’s official software resource page – don’t rely solely on auto-updates, as they can sometimes fail [1]. Save these installers in a dedicated recovery folder (e.g., C:\SystemRecovery) on your scanning PC for easy access during future troubleshooting [1]. Before reinstalling, make sure your Windows operating system and NVIDIA GPU drivers are up to date, and temporarily disable any third-party antivirus software that could interfere with the process [1].
Here’s a quick comparison of reset methods and when to use them:
| Reset Type | When to Use | Data Impact |
|---|---|---|
| Basic Restart | Connection drops, software freezing, or lag [4][2] | None; refreshes active memory |
| Software Reboot | Software-specific errors or console crashes [8] | None; reloads operating software |
| Manual Firmware Reinstall | Persistent glitches or failed auto-updates [1] | Safe; patient data and scans are preserved [1] |
| Hardware Power Cycle | Unresponsive hardware or "Watchdog" errors [8] | None; resets internal hardware state |
How to Update Firmware Correctly
Updating firmware the right way can save you from unnecessary troubleshooting headaches. By following a structured approach, you can avoid failures that might require time-consuming manual reinstalls. Firmware updates also work hand in hand with reset procedures to prevent recurring issues.
Preparing for Firmware Updates
Before diving into the update process, check the firmware version currently installed on your device. You can do this by navigating to the Gear Icon > About > Full Software Version. Compare this version with the latest one available on your manufacturer’s official support page. This step ensures you won’t accidentally downgrade or reinstall the same version, which could lead to system instability.
Make sure your PC is plugged into AC power. Running on battery mode can disable the dedicated GPU, which might cause the update process to fail. Your internet connection should also be stable, with upload and download speeds of at least 25 Mbps to ensure smooth downloading of firmware files. Additionally, update your Windows operating system and NVIDIA GPU drivers manually through the NVIDIA Control Panel before proceeding with the firmware download.
Temporarily disable any third-party antivirus software, especially BitDefender, as it can interfere with the update process. Close other scanning applications and turn off screen mirroring or streaming tools that may compete for system resources. Always use the original USB 3.0 cables and accessories provided by your manufacturer. Third-party cables can sometimes lead to communication errors during installation.
"Digital dentistry demands digital discipline. As the future of intraoral scanners in orthodontics evolves, maintaining these high standards becomes even more critical. Your intraoral scanner is a powerful device – but only if used correctly and supported by the right software, hardware, and scanning habits." – Osseo Group [1]
When downloading the firmware, it’s better to grab it manually from the manufacturer’s official resource page rather than relying on auto-update features. Auto-updates can occasionally fail mid-process, leading to complications. Once everything is ready, you’re set to begin the installation.
Installing Updates
With all preparations complete, start the installation process. Keep your scanner connected throughout the update – disconnecting it or experiencing a power outage during this stage could cause permanent damage to the control unit.
To ensure the update runs smoothly, configure your NVIDIA Control Panel to use the high-performance GPU. Right-click on your desktop, open the NVIDIA Control Panel, and navigate to Manage 3D Settings. This prevents the system from defaulting to integrated graphics, which might not have enough processing power for the firmware installation.
Once the update is complete, reconnect your scanner by navigating to Gear Icon > About > Device. This step ensures the updated firmware syncs properly with the scanning software. Perform a test scan to verify that real-time feedback and data processing are working as expected. If you notice any lag or irregularities, double-check that your GPU is still set to high-performance mode.
Fixing Failed Firmware Updates
When firmware updates go wrong, they can leave your scanner unresponsive, unable to connect, or showing error messages. Common culprits include power interruptions, unstable connections, or interference from security software. Identifying the problem quickly is crucial to avoid long-term damage to your device.
Fixing Connection and Power Problems
Power interruptions during installation are a leading cause of firmware issues, sometimes leaving devices unusable [12]. To minimise risks, always plug your PC directly into a wall outlet before starting an update – never rely on battery power. Running on battery can disable the dedicated GPU and throttle performance, which might cause the update to fail [1]. If an update stops midway, restart both the scanner and PC as described earlier, and double-check that all cables are firmly connected.
For wired scanners, use a USB 3.0 repeater to maintain signal strength [7]. Stick to the original manufacturer cables during updates to avoid signal loss [7]. If you’re using a wireless scanner, place it on a dedicated Wi-Fi network to reduce interference from other devices. Make sure both the scanner and PC are on the same network and have the correct permissions [2].
Pay attention to the scanner’s LED indicators: an orange light points to a connection problem, while green signals normal operation [13]. If the scanner overheats, allow it to cool down before attempting the update again [7].
If these steps don’t resolve the issue, it’s time to turn to the manufacturer’s diagnostic tools.
Using Manufacturer Diagnostic Tools
When basic fixes fall short, manufacturer-provided recovery tools can help. For example, systems like the Virtuo Vivo offer a USB recovery key, available through customer support, to perform a factory reset on unresponsive scanners. After manually updating the firmware, go to Gear Icon > About > Device in your software to re-select the scanner and confirm that the update was successful [1].
If the software freezes after an update, clearing the scanner’s cache or temporary files can free up memory. Disable third-party antivirus programs, such as BitDefender, or screen-mirroring tools that might interfere with firmware stability [1]. If the device is still frozen, hold the scan/power button for 5 seconds to force a shutdown. After restarting, check whether the firmware update completed or if you need to download and install it again from the manufacturer’s official support page.
When to Contact Professional Support
Sometimes, even after trying firmware resets and updates, problems persist. These could hint at deeper hardware issues that need professional attention. Knowing when to stop troubleshooting on your own and reach out for expert help can save time, prevent further damage, and ensure your warranty remains valid.
Hardware-Related Firmware Issues
If your device keeps failing calibration – even when placed on a stable surface and running the latest software – there’s a good chance the problem lies with internal optics or sensors [4][5]. Similarly, if scans appear blurry or distorted despite cleaning the lens, the issue could be sensor misalignment or scratches [3][5]. Strange noises, like clicking, buzzing, or grinding, often point to mechanical problems [3]. Persistent overheating, even in a well-ventilated setup, might indicate a cooling system failure [2][5].
A key difference between hardware and software issues is consistency. Hardware problems tend to occur regardless of the software or computer setup, while software issues are often tied to specific systems or configurations [3].
Connectivity issues that persist across multiple PCs and cables might signal a fault in the internal circuit board [3][4]. For instance, if a Primescan shows an "Encoder Error" even after reseating cables and restarting, it likely means the encoder component needs replacing [14]. According to Patterson Support:
"A Primescan encoder error during Dr. Primescan execution indicates a problem with the Primescan intraoral scanner’s encoder… requiring repair or replacement" [14].
Physical damage, like cracks in the casing, is another clear sign to stop using the device immediately. Continuing to use it could worsen the damage or create safety risks [4][5]. If these signs persist, it’s time to contact the manufacturer for further diagnostics.
Manufacturer Support and Warranty
Once internal faults are identified, reaching out to the manufacturer’s support team is the next step. Providing detailed information, including error logs from diagnostic tools like Dr. Primescan, can help technicians pinpoint the issue faster [14]. Also, check your subscription or service plan – options like TRIOS Care might cover support costs, while others may charge a fee per case [15].
Stick to manufacturer-approved recovery tools and genuine parts to avoid voiding your warranty. Using unauthorised tools or software can invalidate coverage [15]. For complex issues like circuit board damage or sensor misalignment, professional repairs are essential [3]. Attempting to fix these internal components yourself can lead to further damage and loss of warranty protection.
Knowing when to call in the experts can save you from unnecessary downtime and ensure your equipment stays in top working condition.
Conclusion
Firmware troubleshooting becomes much easier when you understand the basics. Spotting error codes and knowing how to differentiate between software hiccups and hardware malfunctions can save you a lot of time and effort [14].
As mentioned earlier, common problems – like sluggish performance or connectivity issues – are often caused by loose cables, outdated firmware, or incorrect GPU settings, rather than severe internal damage [1][5]. Following proper update and reset protocols is key. Make it a habit to manually check for firmware updates instead of relying solely on auto-updates. Also, keep your scanning PC plugged into a power source to avoid GPU throttling during use [1][2]. Stick to the scanner’s recommended settings, regularly calibrate it, and clean the lens before jumping to conclusions about a firmware issue [1][2][5].
"Digital orthodontic systems and other digital dentistry tools demand digital discipline. Your intraoral scanner is a powerful device – but only if used correctly and supported by the right software, hardware, and scanning habits" [1].
To minimise software conflicts, dedicate your scanning PC exclusively to its scanning tasks [1][2][5].
For persistent problems like calibration errors, strange noises, or overheating – even with proper ventilation – reach out to the manufacturer’s support team [3][5]. Use diagnostic tools like Dr. Primescan to log errors, and always rely on manufacturer-approved recovery options to safeguard your warranty [14][6]. Stick to these best practices to ensure your scanner delivers consistent and dependable performance.
FAQs
How do I tell if it’s firmware or hardware?
To figure out whether your intraoral scanner problem stems from hardware or firmware, start by examining the symptoms. Hardware problems are often tied to physical issues, such as loose or damaged cables, broken parts, or the scanner not powering on at all. On the other hand, firmware problems may present as error messages, sluggish performance, incomplete scans, or calibration errors. These are often fixable by updating or reinstalling the software. If there’s visible physical damage, it’s likely a hardware issue.
What should I do before updating firmware?
Before updating the firmware on your intraoral scanner, it’s important to make sure the device is ready to avoid any problems during the process. Start by inspecting the scanner for any physical damage and ensure it’s clean and working properly. Take a moment to review the manufacturer’s manual for any specific warnings or instructions related to firmware updates.
If the update requires an online download, make sure you have a stable power source and a reliable internet connection. Most importantly, follow the manufacturer’s step-by-step guide to complete the update safely and correctly.
How can I recover after a failed update?
To get your intraoral scanner back in working order after a failed update, you can try a factory reset or reinstall the software using the recovery folder on your computer. Here’s how:
- Unplug the scanner’s USB cable, but ensure it stays powered on.
- Close the scanning software completely.
- Open the
SystemRecoveryfolder located on yourC:/drive. - Find and run the file named
IntraoralScanVx.x.x.xxxx.EXEto reinstall the software.
If these steps don’t resolve the issue, reach out to support for further assistance.
Related Blog Posts
- Training Programs for Intraoral Scanners in Australia
- Digital Workflow Disruptions: Quick Fixes for CAD/CAM
- Troubleshooting CAD/CAM Errors: Guide
- Recent Advances in Intraoral Scanning Technology
Important Notice: Any surgical or invasive procedure carries risks. Before proceeding, you should seek a second opinion from an appropriately qualified health practitioner.
Individual results may vary. The information provided in this article is for educational purposes only and does not constitute medical advice.
Checkout Related Blogs


Get in touch with us
For more information, call us now to start feeling better. Or fill the form below to make appointment
The Latest News from Complete Smiles
How to Clean Clear Plastic Retainers
Checklist for Choosing Wearable Dental Devices
Checklist for Choosing Cloud AI Platforms in Dentistry

Complete Smiles Bella VistaAccepts All Major Health Funds, Including


