


In-Chair vs. Take-Home Whitening Kits: Comparison
If you want whiter teeth, you’ve got two professional vs at-home teeth whitening methods: in-chair whitening at a dental clinic or take-home whitening kits provided by your dentist. Here’s the short version:
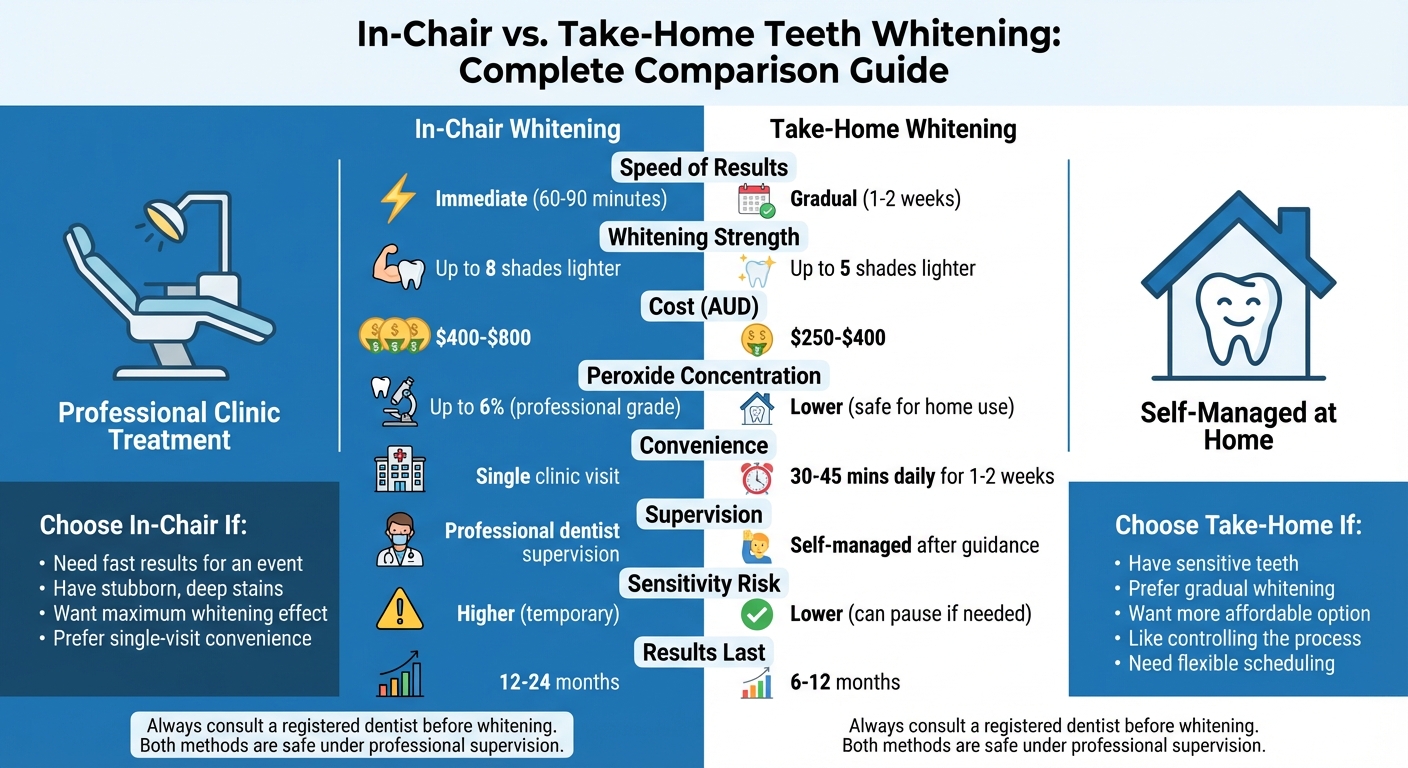
- In-Chair Whitening: Delivers fast results (up to 8 shades lighter in 60–90 minutes). Costs $400–$800 AUD. Ideal for quick transformations but may cause temporary sensitivity.
- Take-Home Kits: Gradual whitening (up to 5 shades lighter in 1–2 weeks). Costs $250–$400 AUD. Gentler on sensitive teeth and more budget-friendly but requires daily effort.
Quick Comparison
| Feature | In-Chair Whitening | Take-Home Whitening Kits |
|---|---|---|
| Speed of Results | Immediate (60–90 mins) | Gradual (1–2 weeks) |
| Whitening Strength | Up to 8 shades lighter | Up to 5 shades lighter |
| Cost | $400–$800 AUD | $250–$400 AUD |
| Convenience | Single clinic visit | Self-managed at home |
| Sensitivity Risk | Higher (temporary) | Lower (gentler option) |
| Result Longevity | 12–24 months | 6–12 months |
In-chair whitening is perfect if you’re short on time or need dramatic results for an event. Take-home kits are better if you prefer a slower, more affordable option. Always consult a dentist to choose the right method for your teeth. You can also use our teeth whitening safety checker to see which treatment suits your dental history.
In-Chair vs Take-Home Teeth Whitening: Complete Comparison Guide
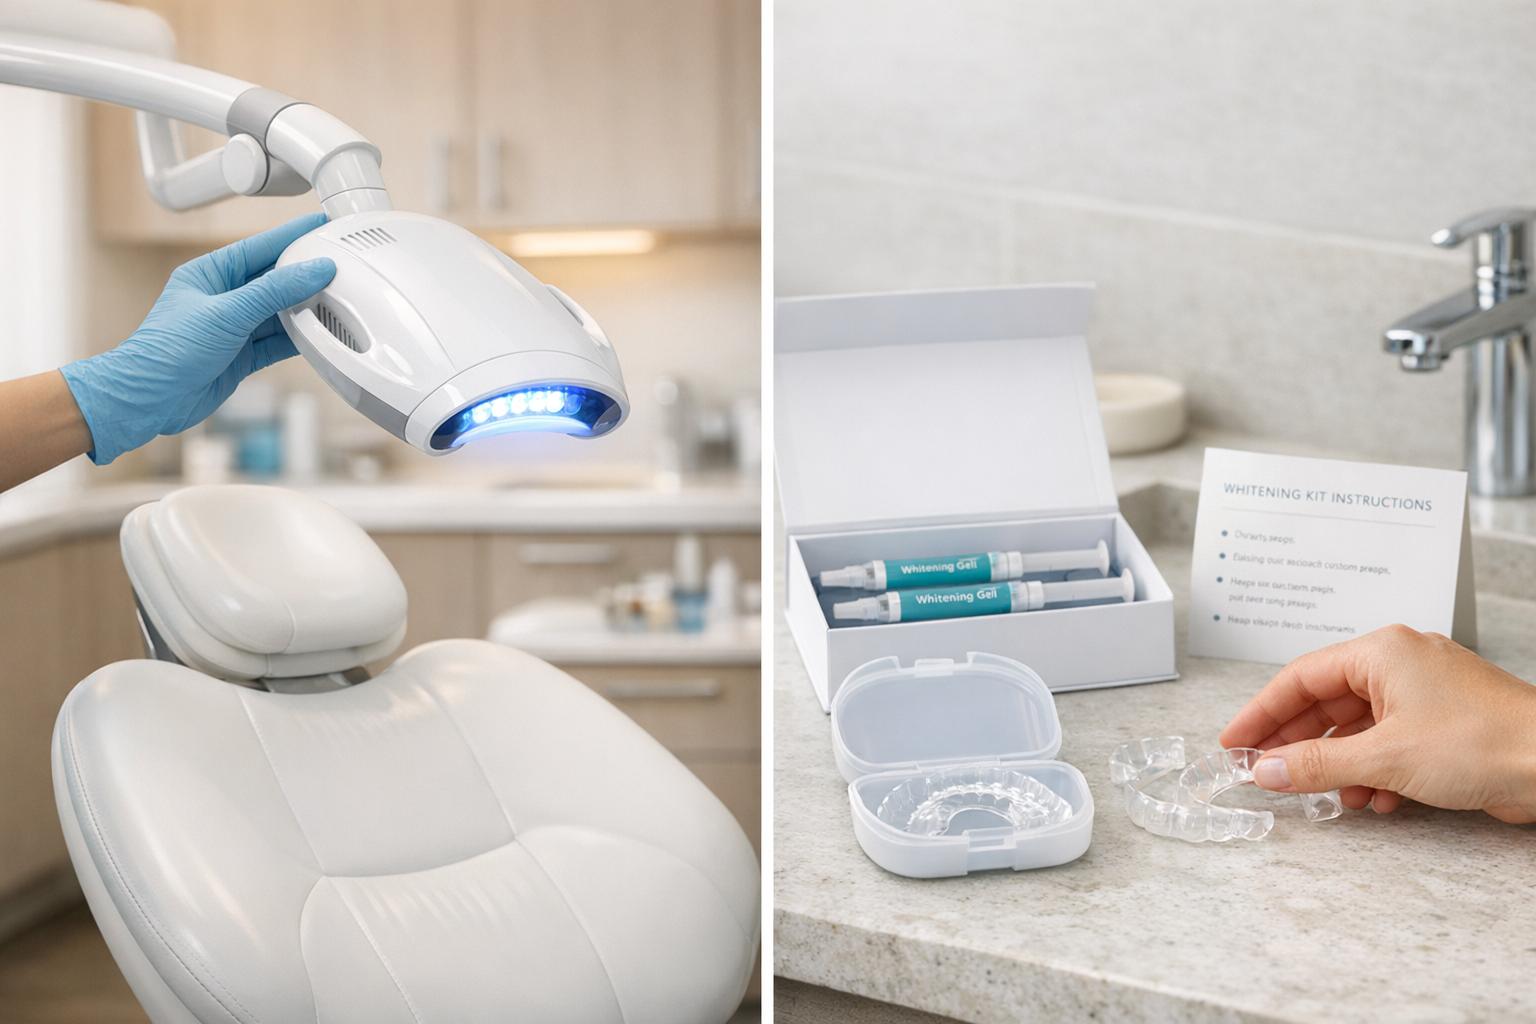
In-Chair Whitening: How It Works and What to Expect
The In-Chair Whitening Procedure
The process begins with a dental check-up and cleaning to remove plaque and tartar that could interfere with the whitening treatment [8][9]. After this, your dentist will carefully apply a protective barrier – such as a rubber shield, resin, or gauze – to safeguard your gums, lips, and tongue from the bleaching agent [8][10][11].
A whitening gel containing hydrogen peroxide (up to 6% concentration in Australia) is then applied to the surfaces of your teeth [2][9]. Many clinics enhance the process by using LED, UV light, or lasers to activate the gel, speeding up the chemical reaction that breaks down deep-set stains [6][8][9]. The gel is typically applied in three to four cycles, each lasting 10–15 minutes, during a single session that takes about 60–90 minutes [10][11]. Once the desired level of whiteness is achieved, the gel is rinsed off, and some dentists might apply a desensitising agent to help with any post-treatment sensitivity [9][10]. This entire procedure is completed in one visit, making it an efficient choice for those with busy schedules. With the steps outlined, let’s dive into the benefits of this treatment.
Benefits of In-Chair Whitening
One of the biggest advantages of in-chair whitening is its ability to provide instant results, brightening teeth by up to eight shades in just one session [2]. This makes it a go-to option for anyone needing a quick transformation for events like weddings or job interviews.
Professional supervision ensures the treatment is applied evenly, reducing the likelihood of uneven results or gum irritation. Dr. James Hanna from Complete Smiles Bella Vista highlights the use of safety measures such as protective glasses, neutralising gels, and soft tissue barriers to make the process safer [1]. Additionally, the higher concentration of peroxide used in professional settings is particularly effective at removing tough stains caused by coffee, smoking, or the natural ageing process [1][6]. On top of that, results can last anywhere from 12 to 24 months, depending on factors like diet and oral hygiene habits [2].
Drawbacks of In-Chair Whitening
While the results are impressive, there are a few downsides to consider. Cost is one of the main concerns, with professional in-chair whitening typically costing between $400 and $800 AUD [2]. Temporary tooth sensitivity is another common issue, as the peroxide penetrates the enamel [13][15]. Thankfully, this sensitivity usually fades within 48 hours [12][14].
Another factor to keep in mind is the need for a dedicated clinic appointment, which might not fit into everyone’s schedule. There’s also a small risk of gum irritation or chemical burns if the whitening gel comes into contact with soft tissues, although protective barriers significantly reduce this risk [12][13]. Lastly, dental restorations, such as crowns or veneers, won’t change colour during the whitening process, which could result in a mismatch with the newly whitened teeth. For a more complete picture, let’s now take a closer look at take-home whitening kits.
sbb-itb-2be92ed
Take-Home Whitening Kits: How They Work and What to Expect
The Take-Home Whitening Process
Take-home whitening kits are a more gradual alternative to in-chair treatments, requiring daily effort for noticeable, long-lasting results. The process begins with a dental check-up to ensure your teeth and gums are healthy and to identify any restorations that won’t whiten during treatment [3][4][7]. Your dentist then creates custom trays using either physical impressions or 3D scans. These trays are designed to hold the whitening gel securely against your teeth while shielding your gums [3][4][10].
The whitening gels in these kits typically contain carbamide peroxide (10% to 22%) or lower concentrations of hydrogen peroxide. Carbamide peroxide breaks down slowly into hydrogen peroxide and urea, which helps reduce sensitivity during the process [16]. To use, you apply a small amount of gel to the trays and wear them for 30–45 minutes daily or overnight, depending on the system. There are two common options: "Day White", with approximately 9.5% hydrogen peroxide, worn for 30 minutes a day, and "Night White", with about 16% carbamide peroxide, worn overnight [17].
For best results, daily applications are needed over 1 to 2 weeks [2][3]. To maintain the effectiveness of the treatment, avoid consuming highly pigmented foods and drinks like coffee, tea, red wine, and curries during this period [3][10]. As Gentle Dental Hawthorn puts it:
Anything that can stain a white t-shirt, can stain teeth; so avoid drinks and food such as coffee, tea, red wine and curries. [10]
This method provides a tailored approach, offering a gradual whitening experience that’s often gentler on sensitive teeth.
Benefits of Take-Home Whitening Kits
Take-home whitening kits are a great choice for those who prefer a slower, more controlled whitening process. Their lower concentration of bleaching agents makes them a gentler option for individuals with sensitive teeth, reducing the likelihood of discomfort compared to in-chair treatments [2][6]. These kits can whiten teeth by up to 5 shades, with results typically lasting 6 to 12 months [2][7].
Another advantage is their affordability. They offer professional-level results at a lower cost, and the custom-fitted trays help minimise gel waste and reduce gum irritation compared to generic store-bought kits [4]. Chomp Dental highlights this benefit:
With take-home teeth whitening, you have more control over how white your teeth get, and results tend to be more stable. [4]
Additionally, the custom trays can be reused for future touch-ups, which are generally needed every 6 to 12 months to maintain your smile.
Drawbacks of Take-Home Whitening Kits
Despite their benefits, take-home kits come with some limitations. They require a consistent daily or nightly routine for 10–14 days, and skipping sessions can impact the final results [18][19]. The whitening effect is also less dramatic compared to in-chair treatments, which can brighten teeth by up to 8 shades in just one visit [2][10].
Because the process is self-administered, following the instructions precisely is crucial. Overfilling the trays or wearing them longer than recommended can lead to heightened sensitivity or sharp, sudden pains known as "zingers" [4][10]. Dr. Aran Moorthy from Mills Road Dental explains:
Take-home kits are particularly beneficial for those who are too busy to go to the dentist or have sensitive teeth and would prefer to bleach their teeth gradually. [20]
It’s also important to note that these kits only work on natural tooth enamel and external stains [10]. They won’t whiten restorations like crowns, veneers, or dentures [2][20] and aren’t suitable for pregnant or breastfeeding women [10]. Additionally, for deep stains caused by heavy smoking or years of coffee drinking, take-home kits may not be as effective as in-chair treatments [1][18].
Now that we’ve broken down the details of take-home whitening kits, it’s time to directly compare them with in-chair options.
5 Teeth Whitening Treatments Explained And Compared – Stellar Dental
In-Chair Whitening vs. Take-Home Kits: Side-by-Side Comparison
When it comes to teeth whitening, in-chair treatments and take-home kits each have their own strengths, depending on your priorities: speed, cost, or convenience.
In-chair whitening relies on higher concentrations of hydrogen peroxide (up to 6%, as per TGA regulations) combined with LED or laser activation to accelerate results [2]. It can brighten teeth by up to 8 shades in just 60 to 90 minutes [2]. However, this convenience comes at a price, with treatments typically costing between $400 and $1,000 AUD [2].
On the other hand, take-home kits use lower peroxide levels, making them safe for unsupervised use. These kits require daily application for 30 to 45 minutes over one to two weeks. While they are less expensive – ranging from $250 to $400 AUD – they offer more moderate results, typically up to 5 shades lighter [2][4]. According to Leederville Dental:
Take‐home kits offer more control and are typically better for patients with existing sensitivity [2].
Here’s a quick comparison to help you decide which option might suit you best:
Comparison Table: Key Factors
| Feature | In-Chair Whitening | Take-Home Whitening Kits |
|---|---|---|
| Speed of Results | Immediate (60–90 minutes) | Gradual (1–2 weeks) |
| Whitening Strength | Up to 8 shades lighter | Up to 5 shades lighter |
| Peroxide Concentration | Higher (professional grade, up to 6%) | Lower (safe for home use) |
| Cost | $400–$1,000 AUD | $250–$400 AUD |
| Convenience | Single clinic visit | Self-managed at home (30–45 mins daily) |
| Supervision | Professional dentist supervision | Self-managed after initial guidance |
| Sensitivity Risk | Higher (temporary "zingers") | Lower (treatment can be paused if needed) |
| Result Longevity | Typically 12–24 months (up to 4 years in some cases) | Generally 6–12 months |
In-chair whitening is ideal if you’re after fast results or need to tackle stubborn stains caused by habits like smoking or heavy coffee drinking [6]. Take-home kits, however, provide a slower yet more flexible option, especially for those who prefer to manage the process at their own pace [4]. Use the details above to weigh your priorities For more expert advice on maintaining your smile, visit our dental tips and news blog before diving into the discussion on result longevity in the next section.
How Long Results Last
Teeth whitening results, whether achieved through in-chair treatments or take-home kits, naturally fade over time unless maintained. The main difference lies in how long each method keeps your teeth bright. Let’s take a closer look at the longevity of each option.
In-Chair Whitening Results Duration
In-chair whitening often lasts the longest, with results typically holding up for 12 to 24 months [2]. With excellent oral care, you could even enjoy your brighter smile for one to four years [7]. The professional-grade peroxide treatments penetrates deeper into the teeth, which helps extend the whitening effect.
That said, lifestyle habits can significantly impact how long your results last. Regularly drinking coffee, red wine, or smoking can cause stains to reappear faster. To maximise your results, avoid foods and drinks that stain teeth during the first 48 hours after treatment [21][22]. Using a straw for dark beverages and rinsing your mouth with water after meals can also help keep new stains at bay [21][22].
Now, let’s explore how long you can expect results from take-home kits.
Take-Home Whitening Results Duration
With take-home whitening kits, results generally last between 6 and 12 months but can stretch to two years if you maintain excellent oral hygiene [2][7][21]. Since these kits use a lower concentration of peroxide compared to in-chair treatments, they don’t reach as deep into the tooth structure, which means the whitening effect may fade sooner.
A major advantage of take-home kits is their reusability. You can easily perform touch-ups whenever your teeth start to lose their brightness [21]. Many people use their kits every six months to maintain the shade achieved through an initial in-chair treatment. Sticking to the full 7 to 14-day treatment plan as recommended ensures better and longer-lasting results [4][21]. Regular professional cleanings also go a long way in preserving your bright smile [21][22].
Safety and Who Should Use Each Option
Both in-chair and take-home whitening treatments are considered safe when performed under the supervision of a registered dental practitioner.
Safety Regulations in Australia
In Australia, teeth whitening products are tightly regulated by the Therapeutic Goods Administration (TGA) and must adhere to the clinical standards set by the Australian Dental Association (ADA) [24][25]. According to the Australian Poisons Standard, only registered dental practitioners are permitted to sell, supply, or use products containing more than 6% hydrogen peroxide or 18% carbamide peroxide [23][26]. This restriction is in place because hydrogen peroxide concentrations above 5% are classified as hazardous substances by WorkSafe Australia [23].
"Only registered dental practitioners who are educated, trained and competent in teeth whitening (bleaching) procedures should use or supply teeth bleaching products containing more than 3% hydrogen peroxide or equivalent." – Australian Dental Association [23]
Professional in-chair treatments can safely use hydrogen peroxide concentrations up to 38% [24]. In contrast, over-the-counter kits are legally limited to a maximum of 6% hydrogen peroxide [23][24]. Take-home kits provided by professionals include custom-fitted trays designed to keep the whitening gel on your teeth and away from sensitive areas like your gums, which significantly reduces the risk of chemical burns compared to generic trays sold in stores [25][27].
Before undergoing any whitening treatment, it’s crucial to have a restorative dental check-up. Whitening should be avoided if you’re pregnant, breastfeeding, or have untreated dental issues such as cavities or gum disease. Additionally, restorations like crowns or veneers will not whiten, which could lead to uneven results [26]. Treatments offered outside of dental practices, such as in beauty salons or kiosks, should be avoided, as practitioners in these settings lack the necessary training to assess your oral health or handle any complications [23][26].
These strict guidelines ensure the safe use of whitening treatments and help determine which method is best for individual needs.
Who Should Choose In-Chair Whitening?
In-chair whitening is ideal for anyone needing fast and dramatic results, such as for a wedding, job interview, or other important event [6][2]. This method delivers noticeable results – up to 8 shades whiter – in just 60 to 90 minutes [2][17]. It’s especially effective for tackling stubborn stains caused by coffee, smoking, or deep internal discolouration that requires stronger bleaching agents [1][6][17]. However, the higher peroxide concentration used in this method may cause temporary tooth sensitivity during or after the procedure [17].
Who Should Choose Take-Home Kits?
For those prioritising gentler treatment or a more budget-friendly option, take-home kits are a great choice. With lower peroxide concentrations, these kits are milder on teeth, and you can pause treatment if you experience any discomfort [6][17][2]. They’re perfect for individuals who prefer the convenience of whitening at home and at their own pace [6].
Take-home kits are also an excellent way to maintain results from a previous professional treatment. These kits generally cost between $250 and $400, making them more affordable than in-chair treatments, which typically range from $400 to $800 [2]. Over one to two weeks, they can brighten your teeth by up to 5 shades [2], making them a controlled and gradual option for those who aren’t in a rush to see results.
Choosing the Right Whitening Option
Key Takeaways
When deciding between in-chair and take-home teeth whitening, it all comes down to what suits your timeline, budget, and sensitivity levels. In-chair whitening delivers fast results – up to 8 shades brighter in just one session – making it a great choice if you’re prepping for a big event or have a packed schedule [2]. On the flip side, it tends to cost more and may cause temporary sensitivity [2]. Take-home whitening kits, on the other hand, brighten teeth by up to 5 shades over one to two weeks. They’re kinder on your wallet and give you more control over the final shade [4].
"Understanding the nature of both in-chair and take-home options will aid in making the most suitable choice for your needs." – Dr. Asmita Premsegar [6]
For stubborn, deep stains, in-chair treatments are often the better option due to their higher peroxide concentrations [1][5]. Meanwhile, take-home kits are perfect for tackling surface stains or maintaining results. In-chair whitening results typically last 12 to 24 months, while take-home kits may need touch-ups after 6 to 12 months [2].
These factors can help guide your decision, but consulting a professional ensures the best outcome.
Getting Professional Advice
Before starting any whitening treatment, it’s wise to consult a qualified dentist [4][7]. They can check your oral health, assess any dental restorations that won’t respond to whitening, and address untreated cavities or gum issues [4][7]. A professional clean beforehand can also remove plaque and tartar, allowing the whitening gel to work directly on your enamel for better results [4][5].
"For the safety of your teeth and gums, we recommend getting it done by professionals or getting your whitening kit from an accredited dentist." – Chomp Dental [4]
Discuss the pros and cons of each whitening option with your dentist to ensure the treatment matches your needs. At Complete Smiles Bella Vista, you’ll find both in-chair and take-home whitening options. Dr. James Hanna and the team specialise in creating personalised plans, helping you decide between quick, dramatic results or a gradual, cost-effective approach. Either way, you can achieve a brighter smile safely and confidently.
FAQs
Which option is best if I have sensitive teeth?
For those with sensitive teeth, take-home whitening kits are often the preferred choice. These kits use lower concentrations of peroxide, which allows for a slower, more controlled whitening process. This gradual approach helps reduce the likelihood of discomfort or sensitivity. On the other hand, in-chair treatments typically involve stronger bleaching agents, which can sometimes lead to temporary sensitivity. A take-home kit provides a gentler and more manageable solution for individuals prone to sensitivity issues.
Can whitening change the colour of crowns or veneers?
No, teeth whitening does not alter the colour of crowns or veneers. These dental restorations are crafted from materials like porcelain or composite resin, which don’t react to whitening agents. If you’re thinking about whitening your teeth, it’s worth discussing with your dentist how it could impact the overall look, especially in contrast to your existing dental work.
How do I maintain whitening results for longer?
To keep your teeth looking bright after whitening, steer clear of foods and drinks that can cause stains – think coffee, tea, red wine, and dark sauces – for the first 48 hours. Maintain good oral hygiene by brushing twice daily with fluoride toothpaste and flossing regularly. Stick to lighter-coloured foods and beverages during this period, and consider speaking with your dentist about touch-up treatments to extend your whitening results.
Related Blog Posts
- Professional vs At-Home Teeth Whitening Methods
- Advances in Laser Whitening Technology 2025
- How Long Does Laser Teeth Whitening Last?
- Laser Whitening vs At-Home Kits: Cost Breakdown
Important Notice: Any surgical or invasive procedure carries risks. Before proceeding, you should seek a second opinion from an appropriately qualified health practitioner.
Individual results may vary. The information provided in this article is for educational purposes only and does not constitute medical advice.
Checkout Related Blogs


Get in touch with us
For more information, call us now to start feeling better. Or fill the form below to make appointment
The Latest News from Complete Smiles
How to Clean Clear Plastic Retainers
Checklist for Choosing Wearable Dental Devices
Checklist for Choosing Cloud AI Platforms in Dentistry

Complete Smiles Bella VistaAccepts All Major Health Funds, Including


