




Gracey Curettes: Design and Applications

Gracey curettes are precision dental instruments used for subgingival scaling and root planing. They are specifically designed for removing plaque and calculus from deep periodontal pockets while minimising tissue trauma. Unlike universal curettes, Gracey curettes are crafted for specific tooth surfaces, offering a single cutting edge and a blade angled at 70° to the shank for optimal use.
Key Features:
- Single Cutting Edge: Only the lower edge is functional, reducing unnecessary tissue contact.
- Blade Design: Curves in two planes for better access to complex root surfaces.
- Rounded Back and Toe: Ensures gentle subgingival insertion.
- Shank Variants: Available in standard, rigid, and extra rigid designs for different clinical needs.
Patterns:
- Anterior Teeth: Gracey 1/2, 3/4.
- Posterior Teeth: Gracey 5/6 to 17/18, each tailored for specific surfaces (e.g., mesial or distal).
Advanced Variations:
- After Five: Longer shank and thinner blade for deep pockets.
- Mini Five: Shorter, thinner blade for narrow areas.
- Micro Mini Five: Ultra-thin blade for tight furcations.
Proper technique involves a pen grasp, aligning the shank parallel to the tooth, and using short, controlled strokes. Selecting the right curette and maintaining sharpness ensures effective and precise periodontal care.
How to use the Gracey 11/12 Curette
sbb-itb-2be92ed
Design Features of Gracey Curettes
Gracey curettes come with specific design elements that improve their precision and adaptability in clinical settings. Let’s explore these features in more detail.
Offset Cutting Edge and Blade Curvature
The blade of a Gracey curette is offset at about 70° to the lower shank, making it self-angulating. This means that when the shank is parallel to the tooth surface, the cutting edge naturally aligns at an optimal working angle of 70–80° [1][2][5][6].
Only the lower edge of the blade is functional, while the upper edge remains non-cutting. To identify the cutting edge, hold the blade face horizontally; the outer curve, which is more pronounced, marks the cutting edge [5].
These curettes also feature a dual-plane curvature. The blade curves both from the shank to the toe and laterally along the cutting edge [5][6]. This design allows the instrument to adapt effectively to complex root shapes, such as convex surfaces, furcations, and developmental depressions. Importantly, only the lower third or half of the blade contacts the root surface, enabling precise control and targeted pressure [2][5].
The rounded back and toe make subgingival insertion gentle and patient-friendly. As noted in University of Adelaide practice materials:
"The rounded, convex back of the curette allows it to be placed within a periodontal pocket with minimal laceration or discomfort to the patient" [5].
Shank Types: Finishing vs. Rigid
Gracey curettes come in different shank designs to cater to various clinical needs.
- Finishing (Standard) Shanks: These have a standard diameter and a flexible construction, which enhances tactile sensitivity. This makes them ideal for detecting minor calculus deposits and root irregularities during the final stages of root planing [7].
- Rigid Shanks: With a thicker diameter, rigid shanks are stronger and less flexible, making them suitable for removing moderate to heavy calculus [7]. According to HuFriedyGroup, this type is particularly effective for such deposits [7].
- Extra Rigid Shanks: Designed for the toughest cases, these shanks handle gross scaling and initial debridement of heavy calculus [7].
Clinicians often start with rigid or extra rigid shanks for heavy deposits and then switch to finishing shanks for final root planing to achieve smooth surfaces [7].
| Feature | Finishing (Standard) Shank | Rigid Shank | Extra Rigid Shank |
|---|---|---|---|
| Shank Diameter | Standard | Increased | Significantly Increased |
| Flexibility | High (Flexible) | Low (Less Flexible) | Minimal |
| Tactile Sensitivity | Enhanced/Maximum | Reduced | Minimal |
| Primary Clinical Use | Fine calculus removal & root planing | Moderate to heavy calculus | Tenacious calculus & gross scaling |
| Clinical Stage | Final finishing/smoothing | Initial debridement | Initial debridement of heavy deposits |
Standard Gracey Curette Patterns
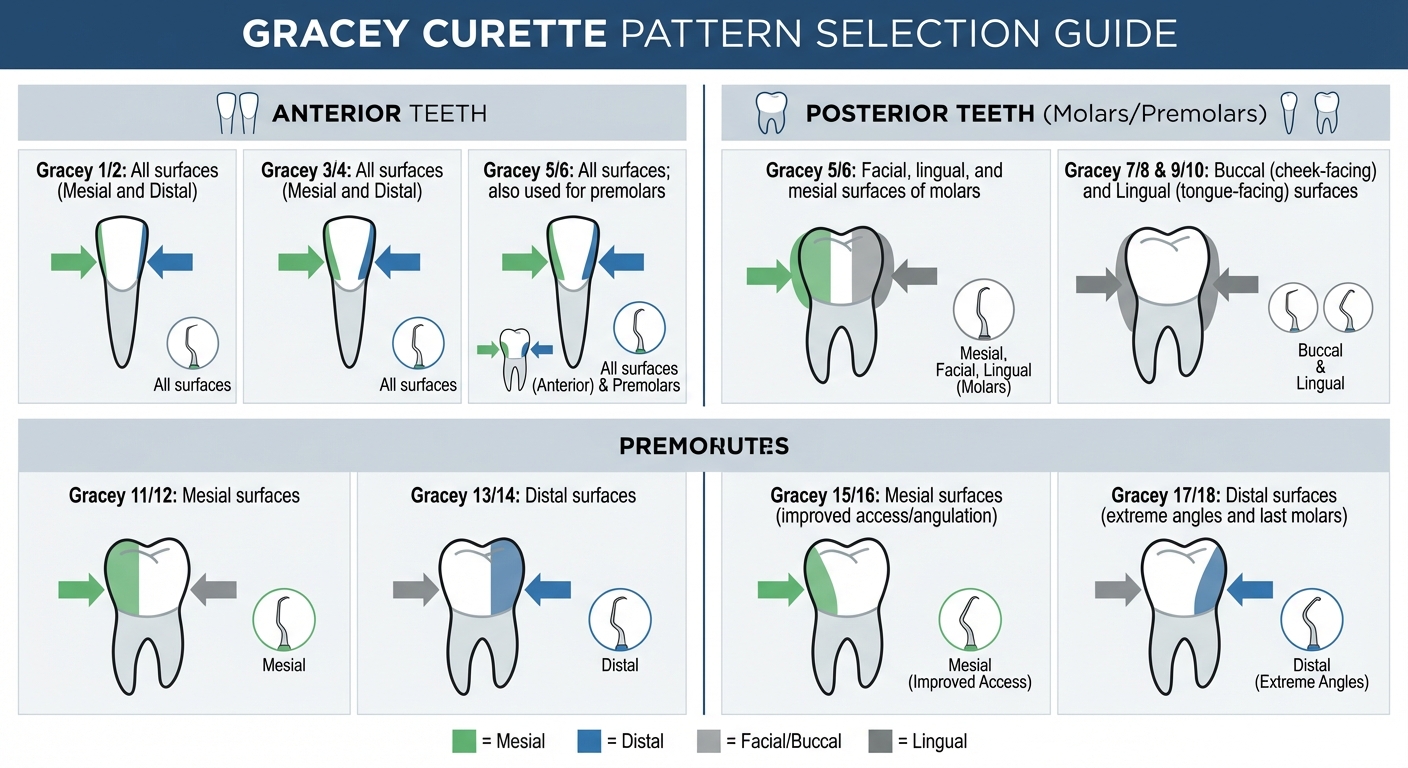
Gracey Curette Patterns Guide for Anterior and Posterior Teeth
Gracey curettes, numbered from 1/2 to 17/18, are specifically crafted to suit various tooth surfaces, considering both the anatomy and the depth of periodontal pockets [2].
Anterior Patterns: Gracey 1/2 and 3/4
The Gracey 1/2 and 3/4 are tailored for anterior teeth, addressing both mesial and distal surfaces. Their straight shank design and smaller blades make them ideal for navigating the tight spaces and relatively flat contours of front teeth. As the anatomy becomes more complex, posterior patterns are designed to tackle deeper and more intricate surfaces.
Posterior Patterns: Gracey 5/6 to 17/18
The Gracey 5/6 is a versatile tool that works well on anterior teeth, premolars, and select molar surfaces. Posterior patterns, on the other hand, feature more intricate shank designs to handle the contours of molar crowns and reach deep periodontal pockets. For example:
- Gracey 7/8 and 9/10: Designed for buccal (cheek-facing) and lingual (tongue-facing) surfaces of posterior teeth, with the 7/8 offering added ease of use.
- Gracey 11/12: Targets mesial surfaces of posterior teeth.
- Gracey 13/14: Focuses on distal surfaces of posterior teeth.
- Gracey 15/16: Provides enhanced angulation for mesial surfaces in more complex cases.
- Gracey 17/18: Features a pronounced shank curvature, allowing access to extreme angles and the distal surfaces of second and third molars [1][3].
Pattern Comparison Table
| Pattern Number | Primary Tooth Area | Specific Surfaces Treated |
|---|---|---|
| 1/2 | Anterior teeth | All surfaces (Mesial and Distal) |
| 3/4 | Anterior teeth | All surfaces (Mesial and Distal) |
| 5/6 | Anterior teeth and Premolars | All surfaces; also facial, lingual, and mesial of molars |
| 7/8 | Posterior teeth (Molars/Premolars) | Buccal (cheek-facing) and Lingual (tongue-facing) |
| 9/10 | Posterior teeth (Molars/Premolars) | Buccal (cheek-facing) and Lingual (tongue-facing) |
| 11/12 | Posterior teeth | Mesial surfaces |
| 13/14 | Posterior teeth | Distal surfaces |
| 15/16 | Posterior teeth | Mesial surfaces (with improved access/angulation) |
| 17/18 | Posterior teeth | Distal surfaces (extreme angles and last molars) |
Advanced Gracey Curette Variations
When standard designs aren’t enough for deep or confined pockets, these specialised modifications provide precise tools to tackle complex clinical situations.
After Five and Mini Five Curettes
After Five curettes are designed with a terminal shank that’s 3 mm longer and a blade that’s 10% thinner than standard options. This makes them ideal for reaching pockets deeper than 5 mm and addressing areas with marked gingival recession [7][8]. The extended design also minimises tissue stretching in tight spaces, improving patient comfort during procedures.
Mini Five curettes take it a step further by combining the longer terminal shank with a blade that’s 50% shorter and 10% thinner than standard designs [7]. This compact structure is particularly effective in deep, narrow pockets and furcation areas where a standard blade might be too bulky, reducing strain on soft tissues.
For even more restricted areas, an ultra-compact option is available.
Micro Mini Five Curettes
The Micro Mini Five curettes are the smallest in this range. Their blade is 20% thinner than the Mini Five and approximately 70% smaller than a standard blade [7][9]. These instruments are specifically crafted for tight pockets and furcation areas that larger tools can’t access. Many Micro Mini Five curettes also feature a slightly thicker shank, offering better control during calculus removal [7][10]. While straight vertical strokes are most effective, horizontal strokes can be used at the cementoenamel junction when needed [9][10].
Rigid and Hybrid Variants
For dealing with heavy calculus, rigid and hybrid curettes offer enhanced strength and versatility.
Rigid curettes are built with a thicker shank, providing the lateral strength needed for removing stubborn calculus. However, this added thickness can slightly reduce tactile sensitivity compared to standard finishing curettes [7]. Extra Rigid curettes go even further, featuring the strongest shank design for tackling tenacious calculus and performing gross scaling procedures [7][12].
Langer curettes combine the area-specific shank curvature of a Gracey curette with the dual cutting edges of universal curettes [11]. This hybrid design reduces the need for frequent instrument changes during procedures. However, precise angulation is crucial to avoid harming soft tissues [11][5].
| Curette Variant | Terminal Shank | Blade Characteristics | Primary Use |
|---|---|---|---|
| After Five | 3 mm longer | 10% thinner | Pockets >5 mm and recession areas [7][8] |
| Mini Five | 3 mm longer | 50% shorter, 10% thinner | Deep, narrow pockets and furcations [7] |
| Micro Mini Five | 3 mm longer | 50% shorter, 28% thinner | Tight pockets [7] |
| Rigid | Standard | Thicker shank | Moderate to heavy calculus [7] |
| Extra Rigid | Standard | Thickest shank | Tenacious calculus, gross scaling [7][12] |
Proper Use and Technique
Getting calculus removal right hinges on using the correct technique. This starts with proper hand positioning and extends to applying precise stroke methods.
Instrument Positioning and Grasp
Hold the curette in a pen grasp, using your thumb and index finger for secure control and tactile sensitivity [2][3]. Your ring finger should act as a fulcrum, resting firmly on a stable tooth surface. This setup provides stability and helps prevent the instrument from slipping into the gingival tissue [2][3]. For more complex procedures, keep your middle and fourth fingers together for additional support [6].
The terminal (lower) shank must remain parallel to the tooth surface being treated [2][5][13]. This alignment ensures the blade’s working angle is correctly set at 70–80°. As Gehrig explains:
"The terminal shank must be parallel to the surface being instrumented, and the functional shank goes up and over the tooth rather than down and around the tooth" [2].
When working, only the toe-third (the lower portion of the blade) should make contact with the root surface. This minimises tissue trauma while effectively removing deposits [2][5].
Scaling and Root Planing Strokes
Once your grip and alignment are in place, focus on your stroke technique.
Use short, overlapping pull strokes aimed away from the pocket base [6]. Avoid push strokes – they’re better suited for exploration and not ideal for removing calculus [6]. Apply lateral pressure using your thumb and index finger, while pressing your fulcrum finger against the tooth for added leverage [2].
Stroke direction depends on the area being treated: vertical strokes work best for anterior teeth and proximal surfaces of posterior teeth; oblique strokes are ideal for facial and lingual surfaces of posterior teeth; and horizontal strokes are most effective at line angles or midlines [2][6]. For stubborn calculus, remember to use the toe-third of the blade, starting at the lateral edge to break down deposits [6].
Selecting the Right Pattern
Once you’ve mastered handling and strokes, choosing the correct instrument pattern becomes crucial.
For anterior teeth, Gracey curettes 1/2, 3/4, or 5/6 are suitable for all surfaces – Gracey 5/6 can also be used for premolars [2][3][5]. For posterior buccal and lingual surfaces, Gracey 7/8 or 9/10 are ideal for wide, flat areas [3][5]. For posterior mesial surfaces, opt for Gracey 11/12 or 15/16 [2][3]. For posterior distal surfaces, Gracey 13/14 or 17/18 are excellent for tackling back corners and tight angles [2][3][5].
When working in deep pockets beyond 4 mm, consider After Five variants, which feature a 3 mm longer terminal shank. For narrow furcations, Mini Five or Micro-Mini Five options are more suitable [2][4]. For heavy calculus, rigid curettes provide the strength needed for effective removal, while standard patterns are better for lighter scaling and finishing [4].
These techniques align with the design features of curettes, ensuring effective and precise debridement.
Conclusion
Gracey curettes play a key role in periodontal care, thanks to their precise, area-specific design. Features like the 70-degree offset blade, rounded back, and semicircular cross-section make them ideal for safe subgingival work, allowing clinicians to navigate complex root anatomy and deep periodontal pockets with ease.
These tools come in various designs to suit different needs. Standard patterns (such as 1/2 and 3/4 for anterior teeth, or 13/14 and 17/18 for posterior teeth) and advanced options like After Five, Mini Five, and rigid curettes offer versatility for treating a wide range of periodontal conditions.
Using them effectively depends on proper technique. Holding the lower shank parallel to the tooth ensures the correct cutting angle, while a modified pen grasp and controlled strokes provide precision. As Deppeler highlights:
"Meticulous scaling and root planing with curettes has been scientifically proven to be very effective to improve periodontal health" [1].
Consistently sharpening curettes to a 30–40° angle is equally important. It maintains their cutting edge, reduces clinician fatigue, and ensures efficient biofilm removal and root debridement in both routine and complex cases.
Understanding the design, selecting the right patterns, and mastering handling techniques are essential skills for delivering effective non-surgical vs. surgical periodontal treatments. These instruments form the backbone of successful periodontal care.
FAQs
How do I pick the right Gracey curette for each tooth surface?
Each Gracey curette is tailored for specific areas of the teeth and their surfaces. Here’s how they are typically used:
- Gracey 1/2, 3/4: Ideal for all surfaces of anterior teeth.
- Gracey 7/8, 9/10: Best suited for buccal and lingual surfaces of molars and premolars.
- Gracey 5/6: Versatile for all surfaces of anterior teeth and premolars.
Selecting the right curette for the tooth’s location and surface ensures more precise and effective scaling.
When should I use After Five, Mini Five or Micro Mini Five curettes?
When selecting Gracey curettes, the choice between After Five, Mini Five, and Micro Mini Five depends on the depth and size of the periodontal pockets:
- After Five: Perfect for working in deeper pockets.
- Mini Five: Designed for narrower and deeper areas.
- Micro Mini Five: Best for tight, localised pockets where the thinnest blades are needed.
These specialised designs help ensure accurate and efficient manual scaling.
How can I tell if my Gracey curette is sharp enough to use?
To determine if your Gracey curette is sharp enough, test it by ensuring it produces a clean and smooth scrape without requiring too much pressure. Examine the cutting edge closely – it should maintain its original shape and show no signs of dullness or rounding. Regular sharpening and staying mindful of how it feels during use can also give you a good sense of its sharpness.
Related Blog Posts
- Cleaning Rotary Endodontic Instruments: Protocols
- 5 Steps of Flap Surgery Explained
- Charter’s Technique: Step-by-Step Guide
- Soft Tissue Grafting: New Techniques Explained
Important Notice: Any surgical or invasive procedure carries risks. Before proceeding, you should seek a second opinion from an appropriately qualified health practitioner.
Individual results may vary. The information provided in this article is for educational purposes only and does not constitute medical advice.
Checkout Related Blogs



Get in touch with us
For more information, call us now to start feeling better. Or fill the form below to make appointment
The Latest News from Complete Smiles
How to Clean Clear Plastic Retainers
Checklist for Choosing Wearable Dental Devices
Checklist for Choosing Cloud AI Platforms in Dentistry
Complete Smiles Bella VistaAccepts All Major Health Funds, Including