


Cycle Failures in Autoclaves: Problems and Fixes

Autoclave cycle failures can disrupt dental clinic operations and risk patient safety. Common causes include overloading, poor water quality, worn gaskets, and vacuum issues. These problems often stem from user errors rather than equipment faults.
Key Takeaways:
- Overloading: Keep chambers under 80% full and arrange items for proper steam circulation.
- Water Quality: Use distilled water to prevent scale buildup and corrosion.
- Gasket Maintenance: Clean weekly and replace every 12–24 months to ensure a proper seal.
- Vacuum Errors: Perform daily tests and inspect filters monthly.
Regular maintenance, proper staff training, and adherence to Australian standards like AS/NZS 4815:2006 are crucial for avoiding failures and ensuring effective sterilisation.
7 Common Autoclave Problems You Should be Aware of
Why Autoclave Cycles Fail
In dental clinics, autoclave failures are often caused by operator mistakes rather than faulty equipment. Identifying and addressing these errors can help avoid workflow interruptions and ensure compliance with Australian sterilisation standards. Below are some common issues and how to resolve them.
Overloading and Incorrect Loading
Improper loading is one of the most frequent mistakes. Overloading the chamber restricts steam flow, leading to air pockets that undermine sterilisation. To avoid this, keep the chamber no more than 80% full and arrange pouches upright, leaving a 10–20% gap between them. This setup ensures steam can circulate evenly [2].
Water Quality and Scale Buildup
Using tap water instead of distilled or demineralised water is a recipe for trouble. Tap water introduces minerals that form scale deposits on heating elements, which act as insulation. This forces the autoclave to work harder and slows the heating process. If the temperature ramp is more than 20% slower than usual, it could signal scale buildup or a deteriorating heating element [2].
Water hardness above 5 grains (85 mg/L) needs attention to protect your autoclave [8][10]. Hard water can not only cause scale but also lead to pitting corrosion in stainless steel chambers due to chlorides, creating tiny holes that weaken the structure and may cause leaks [9]. To prevent this, refill the reservoir weekly with distilled water [2].
Door Gasket and Seal Failures
A proper seal is critical for maintaining pressure and creating the vacuum necessary for effective sterilisation in Class B autoclaves. Worn or dirty gaskets can compromise the seal, leading to low-pressure errors and incomplete cycles.
Since gaskets are consumable parts, they typically need replacing every 12 to 24 months [2]. To prolong their lifespan, clean the door gasket weekly with a lint-free cloth and a mild, non-abrasive cleaner. Even small amounts of debris on the gasket or chamber surface can cause leaks, so regular maintenance is key.
Vacuum and Pressure Errors
Faulty seals or blockages can prevent the vacuum pump from fully removing air from the chamber, leaving air pockets that shield microorganisms from sterilising steam. Mineral deposits, clogged drains, or obstructed pressure valves and tubing can also disrupt air removal. To prevent these issues, inspect chamber filters and tubing monthly and run the Bowie-Dick test daily to ensure proper vacuum performance [2].
How to Fix Autoclave Cycle Failures
Autoclave failures often stem from operator mistakes, but the good news is that these issues can usually be resolved by tweaking protocols. Here’s how to address some of the most common problems.
Fixing Overloading and Loading Errors
Proper loading is key to a successful cycle. First, check if the chamber was more than 80% full [2]. If it was, remove some items and rearrange them. Place pouches upright in racks, ensuring the plastic side of one pouch faces the paper side of the next. This "paper-to-plastic" setup ensures steam can circulate freely, leaving about 10–20% of the space unoccupied [2]. For hinged instruments like scissors or forceps, make sure they’re open before loading to allow steam to access all surfaces [11].
Use perforated stainless steel or polypropylene trays to help steam flow evenly [1]. If instruments come out damp, extend the drying phase by 5–10 minutes [2]. After fixing the loading issue, re-run the cycle with a chemical indicator placed in the hardest-to-reach part of the load. This will confirm whether steam is properly penetrating [2].
Fixing Water Quality Problems
Water quality plays a big role in autoclave performance. Drain the water reservoir weekly and refill it with fresh distilled or de-ionised water [2]. If the autoclave takes 20% longer than usual to heat up, it might be time to descale the system. Use the recommended cleaning agent to remove any mineral buildup [2]. Clean the chamber daily with a soft cloth and mild detergent, and occasionally remove the bottom plate to clean the heating element directly [12].
Check and clean the chamber drain filter every week, and replace both water and air filters every six months [2]. For clinics using large amounts of distilled water, installing an in-office reverse osmosis or de-ionisation system could be a smart investment. These systems can remove up to 95% of dissolved minerals and salts from the water [13].
Fixing Seal and Gasket Problems
A tight door seal is critical for a successful cycle. Clean the door gasket weekly with a soft, lint-free cloth and a gentle, non-abrasive cleaner to prevent debris buildup that can lead to leaks [2]. If you hear a hissing sound during a cycle or see water residue around the door, it’s likely the seal is failing. Gaskets are consumable parts and should be replaced every 12 to 24 months to maintain performance [2].
Fixing Pressure and Vacuum Problems
Once loading and water quality issues are addressed, proper pressure and vacuum levels are essential. For Class B autoclaves, run a Bowie-Dick test daily to make sure the vacuum pump is working correctly [2]. Clear the chamber drain filters and vent lines if you encounter low-pressure errors [2]. If the door handle won’t turn and the pressure is around 100 kPa, try spinning it clockwise slightly before turning it anti-clockwise to open [14].
Inspect the safety valve in the water tank for blockages, and if pressure readings seem off, have the sensors professionally calibrated [2] [14]. Always conduct vacuum tests when the chamber is cold to ensure accurate results [14].
sbb-itb-2be92ed
Troubleshooting Guide
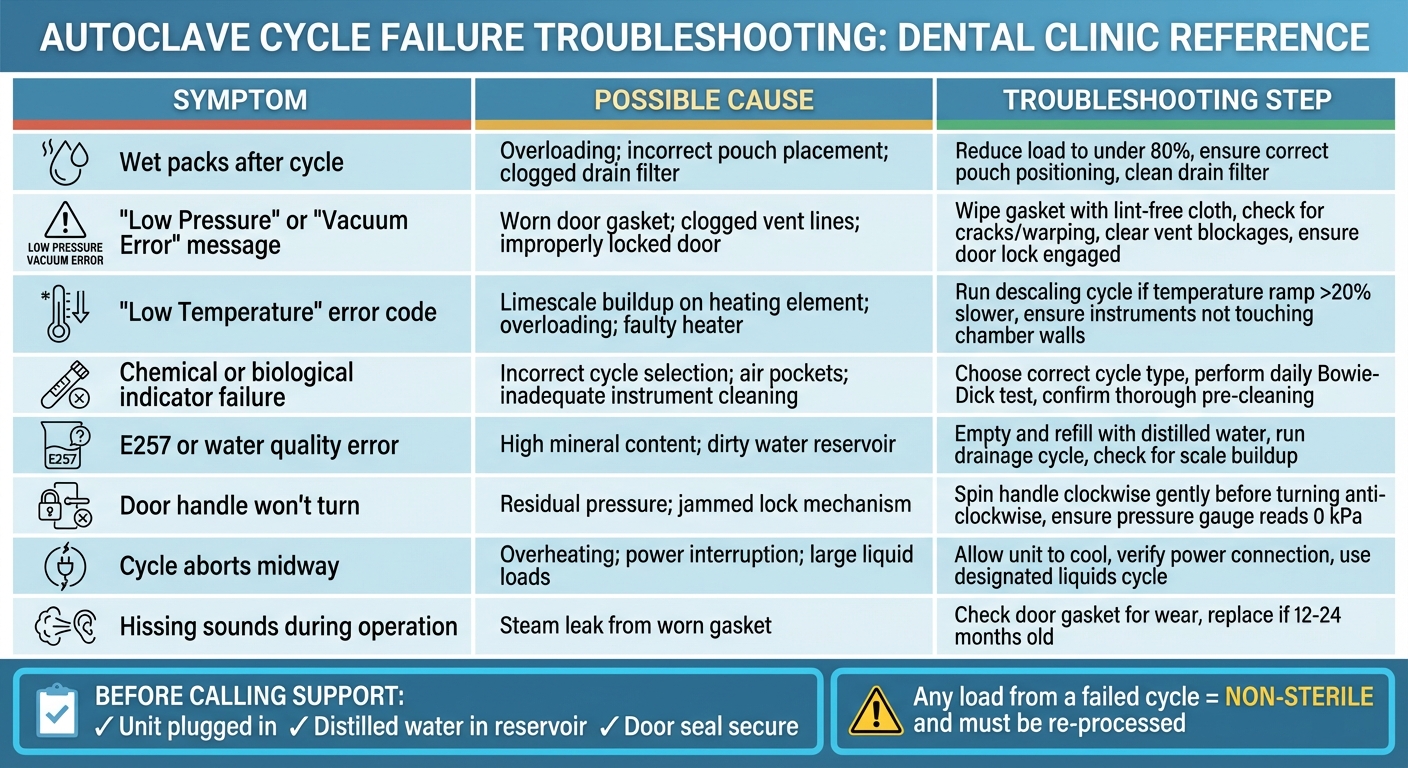
Autoclave Troubleshooting Guide: Common Symptoms, Causes and Fixes
Symptoms, Causes, and Fixes
Quickly identifying mid-cycle failures can save time and prevent prolonged downtime. Use the table below to pinpoint common issues, their likely causes, and the steps to resolve them. Keep this guide handy for reference.
| Symptom | Possible Cause | Troubleshooting Step |
|---|---|---|
| Wet packs after cycle | Overloading; incorrect pouch placement; clogged drain filter | Reduce the load to under 80%, ensure pouches are positioned correctly, and clean the chamber’s drain filter. |
| "Low Pressure" or "Vacuum Error" message | Worn door gasket; clogged vent lines; improperly locked door | Wipe the gasket with a lint-free cloth, check for cracks or warping, clear any vent line blockages, and make sure the door lock is engaged properly. |
| "Low Temperature" error code | Limescale buildup on the heating element; overloading; faulty heater | Run a descaling cycle if the temperature ramp is significantly slower (over 20%), and ensure instruments aren’t in direct contact with the chamber walls. |
| Chemical or biological indicator failure | Incorrect cycle selection; air pockets; inadequate instrument cleaning | Choose the correct cycle for the load type (hollow or solid), perform a daily Bowie-Dick test for vacuum-assisted units, and confirm instruments are thoroughly cleaned beforehand. |
| E257 or water quality error | High mineral content; dirty water reservoir | Empty and refill the reservoir with distilled water, run a drainage cycle, and check for visible scale buildup. |
| Door handle won’t turn | Residual pressure; jammed lock mechanism | Spin the handle clockwise gently before turning it anti-clockwise, and ensure the pressure gauge reads 0 kPa before attempting to open the door. |
| Cycle aborts midway | Overheating; power interruption; large liquid loads | Allow the unit to cool down, verify the power connection, and use the designated liquids cycle for heavier liquid loads. |
| Hissing sounds during operation | Steam leak from a worn gasket | Check the door gasket for wear and replace it if it’s between 12 and 24 months old. |
Before reaching out to technical support, perform these final checks: ensure the unit is plugged in, confirm the reservoir contains distilled water, and verify the door seal is secure. If you notice any error codes, unusual sounds, or odours, document them to help speed up the diagnosis. Remember, any load from a failed cycle should be treated as non-sterile and re-processed.
Preventative Maintenance for Autoclaves
While troubleshooting can resolve immediate issues, the key to avoiding future cycle failures lies in a solid maintenance plan and properly trained staff.
Creating a Maintenance Schedule
A well-structured maintenance schedule not only reduces the chances of cycle failures but can also extend your autoclave’s lifespan from 8–10 years up to 12–15 years. Maintenance tasks should be divided into daily, weekly, monthly (or quarterly), and annual intervals – or based on cycle counts, depending on which occurs first.
Daily maintenance takes only a few minutes but can prevent many common issues. Each morning, when the autoclave is cold, clean the rubber door seal and chamber face with a damp, lint-free cloth, and inspect the chamber for any debris.
For weekly tasks, clean the autoclave chamber, trays, rack, and drain strainer to prevent clogs. Additionally, conduct a biological indicator test to ensure sterilisation is effective.
Monthly or quarterly maintenance is a bit more involved. Tasks include descaling the chamber to remove mineral deposits that can strain the heating elements, lubricating moving parts like door hinges, and replacing bacteriological and dust filters – typically every three months or 400 cycles. Always use distilled or demineralised water with a conductivity level below 50 micro siemens to protect the unit. Replace door seals every 800 cycles or 12 months to ensure a proper pneumatic seal.
Regular maintenance not only minimises unexpected failures but also reduces repair costs. Annual professional servicing is critical to meet Australian standards, such as AS/NZS 4815:2006 for office-based healthcare or AS/NZS 4187:2014 for larger facilities. A qualified technician should handle validation, calibration, and safety checks. Keep a detailed sterilisation log for compliance, recording each cycle’s date, time, parameters, and indicator results. Additionally, monitor the autoclave’s digital cycle counter and reset it after replacing filters or seals to stay on top of maintenance intervals. Neglecting these routines can be costly – one clinic spent nearly A$2,000 on three repairs before their autoclave ultimately failed [6].
Beyond these tasks, well-trained staff play a crucial role in maintaining high standards.
Training Staff on Proper Use
Proper training for staff can significantly reduce both cycle failures and wear on the equipment. One of the most important aspects is teaching correct loading techniques. Overloading or overcrowding the chamber disrupts steam circulation, which can lead to sterilisation failures.
Water quality management is another critical area. Staff must understand that using tap water leads to mineral buildup (scaling), which damages internal components and sensors. Only distilled or demineralised water should be used. By handling the autoclave correctly, staff can prevent most equipment damage and ensure consistent sterilisation. They should also be trained to recognise early warning signs – like unusual noises, hissing from steam leaks, or wet instruments post-cycle – so minor issues can be addressed before they escalate.
Daily checklists can help maintain proper operation. Staff should wipe down the chamber and door seal each morning, check water levels, and ensure the unit is ready for the first cycle. When operated correctly, an autoclave can eliminate 99.9999% of spores [15]. However, this level of effectiveness depends entirely on proper use. Many common problems, such as loose lids or dirty filters, are minor issues that trained staff can often resolve without needing a technician [6].
To maintain accountability, staff should regularly review cycle logs, clean the drain strainer weekly, descale monthly, and never attempt to force the autoclave door open while it’s pressurised, as this can cause severe steam burns. Cycle logs should also be backed up regularly to prevent data loss during repairs or software updates. Ongoing training ensures immediate troubleshooting is effective and contributes to the long-term reliability of the autoclave.
Conclusion
Autoclave cycle failures pose a serious risk to patient safety and can threaten your clinic’s compliance with Australian standards. When sterilisation falls short, instruments may carry dangerous pathogens like Hepatitis B, HIV, and Tuberculosis [3][4]. This makes sterilisation a non-negotiable aspect of patient care [3].
The good news? Most failures can be avoided. Common issues, like those mentioned earlier [2][7], can often be resolved by following best practices. Stick to the 80% loading rule, use the right water quality, and follow a structured maintenance schedule. These steps not only prevent costly breakdowns but can also extend your autoclave’s lifespan to anywhere between 8 and 15 years [6].
If a load fails, take immediate action. Quarantine the instruments, document the failure, and investigate the cause before attempting to reprocess [3]. Minor problems, such as clogged filters or improperly secured lids, can often be fixed by trained staff. However, persistent issues should be addressed by a professional [6]. If repairs are likely to cost more than 50% of the price of a new unit, it’s usually smarter to replace the machine [6].
Don’t overlook the importance of regular validation and meticulous record-keeping. These are not just good practices – they’re mandatory under AS/NZS 4815:2006 [5]. Keep detailed validation records, back up digital logs, and ensure professional calibration is performed annually to meet compliance standards [2][5][6].
FAQs
What can I do to prevent autoclave cycle failures in my dental clinic?
To reduce the chances of autoclave cycle failures in your dental clinic, it’s important to stick closely to the manufacturer’s instructions. Make sure instruments are loaded correctly, allowing enough space for steam to circulate effectively. Avoid cramming too many items into the chamber, and always fill the reservoir with distilled or demineralised water. Choosing the right sterilisation cycle for the specific load type is equally important.
Routine maintenance plays a big role in keeping your autoclave running smoothly. Clean the filters regularly, check the door seals for any signs of wear, and ensure the chamber isn’t overcrowded during use. Monitor the autoclave to confirm it’s operating within the recommended temperature and pressure settings. Be alert for error codes, odd noises, or unusual smells, as these could signal potential issues. Regular validation using biological, chemical, and physical indicators is also key to confirming the sterilisation process meets Australian standards.
By combining correct operation, consistent maintenance, and thorough performance checks, you can minimise cycle failures, ensure reliable sterilisation, and prioritise the safety of your patients.
Why is it essential to use distilled water in autoclaves?
Using distilled water in autoclaves is essential to keep the equipment running smoothly. It prevents mineral deposits, scale buildup, and corrosion from forming inside the sterilisation chamber. These problems can harm the autoclave’s performance and even shorten its lifespan.
When you use distilled water, you’re helping the autoclave function more effectively, ensuring consistent sterilisation of dental instruments. This is particularly critical in dental clinics, where maintaining proper sterilisation is key to safeguarding patient health and controlling infections.
How often should you replace autoclave gaskets?
Autoclave gaskets typically need replacing every year, but you should act sooner if you spot signs of wear like cracks, tears, or reduced flexibility. Keeping a close eye on the gasket is crucial to ensure it maintains a proper seal – an essential factor for effective sterilisation.
For autoclaves that are heavily used or operate under tough conditions, it’s wise to inspect the gasket more frequently to avoid unexpected cycle failures. Always stick to the manufacturer’s maintenance and replacement recommendations to ensure your autoclave continues to perform reliably.
Related Blog Posts
- Orthodontic Sterilization Tools: Guide
- Common Causes of Sterilization Failures
- Checklist for Sterilisation Competency in Dental Clinics
- How to Calibrate Dental Equipment
Important Notice: Any surgical or invasive procedure carries risks. Before proceeding, you should seek a second opinion from an appropriately qualified health practitioner.
Individual results may vary. The information provided in this article is for educational purposes only and does not constitute medical advice.
Checkout Related Blogs


Get in touch with us
For more information, call us now to start feeling better. Or fill the form below to make appointment
The Latest News from Complete Smiles
How to Clean Clear Plastic Retainers
Checklist for Choosing Wearable Dental Devices
Checklist for Choosing Cloud AI Platforms in Dentistry

Complete Smiles Bella VistaAccepts All Major Health Funds, Including


