


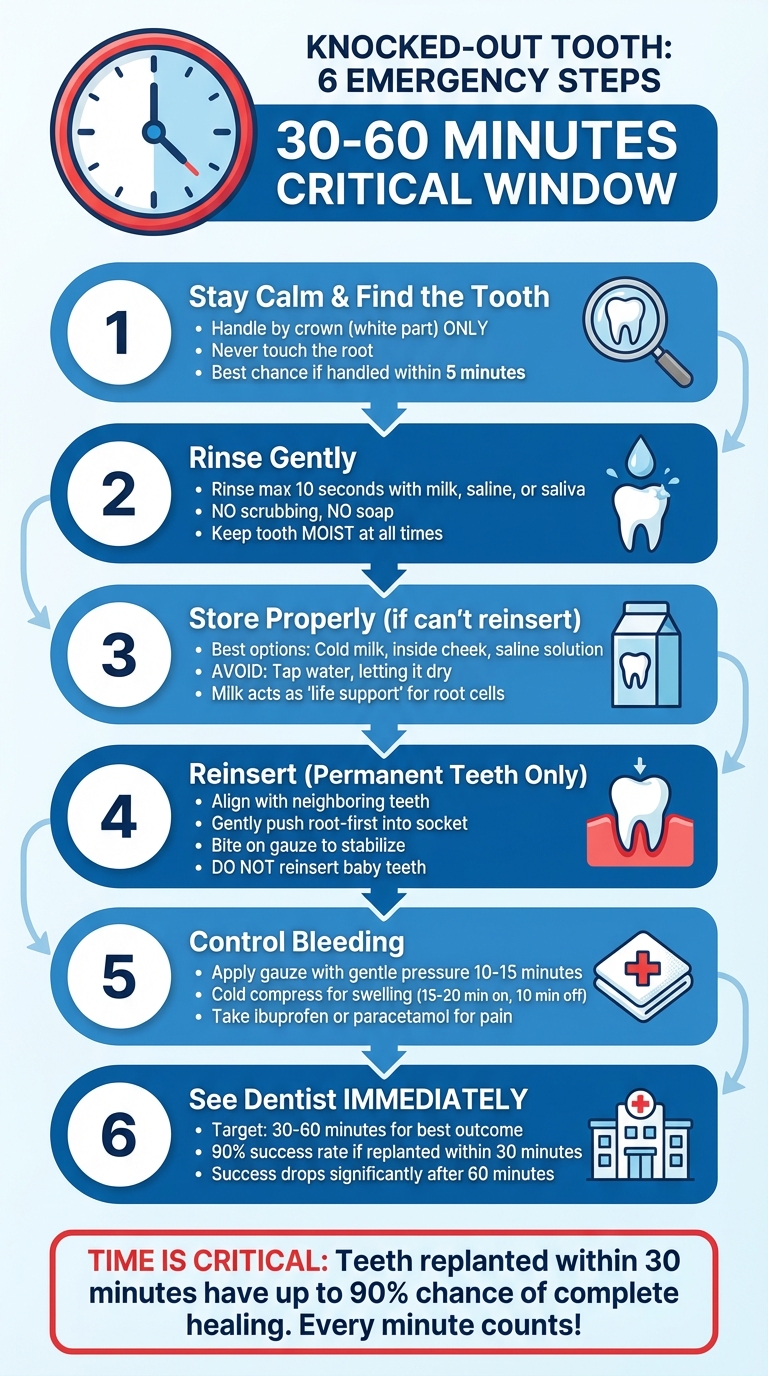
Knocked-Out Tooth: What to Do First

A knocked-out tooth is a dental emergency that requires immediate action to save the tooth. Here’s what you need to do:
- Stay Calm and Find the Tooth: Locate the tooth quickly and handle it by the crown (the white part). Avoid touching the root to prevent damage to the fibres needed for reattachment.
- Rinse if Necessary: If the tooth is dirty, rinse it gently with milk, saline, or saliva for no more than 10 seconds. Avoid scrubbing or using soap.
- Keep the Tooth Moist: If reinserting the tooth isn’t possible, store it in milk, saline, or inside the cheek. Do not let it dry out.
- Reinsert the Tooth (if Permanent): If it’s an adult tooth, gently place it back into the socket, ensuring proper alignment. If it doesn’t fit easily, don’t force it.
- Control Bleeding and Pain: Use gauze to stop bleeding. For pain, apply a cold compress to reduce swelling and take over-the-counter pain relief if needed.
- Get to a Dentist Quickly: Aim to see a dentist within 30–60 minutes. The sooner, the better, as the chances of saving the tooth drop significantly after an hour.
Key Tip: Time is critical. Teeth replanted within 30 minutes have the highest chance of survival. Always prioritise keeping the tooth moist and seeking professional care promptly.
6 Emergency Steps for a Knocked-Out Tooth
First Aid on a knocked-out tooth ???????? #ambulance #paramedic #emergency #firstaid #hospital #nurse
sbb-itb-2be92ed
Step 1: Stay Calm and Find the Tooth
A dental avulsion can be alarming, but staying calm is essential. Your ability to remain composed allows you to check for any head injuries or heavy bleeding while ensuring the tooth is handled correctly. This is especially important if the injured person is a child – your calmness can help them stay more at ease too.
Start by searching the area where the injury occurred to locate the tooth. As Dr Todd Coy, DMD, notes:
Time is an important factor in the survival of the tooth [7].
In fact, the sooner you act, the better. A knocked-out tooth has the best chance of survival if it’s handled properly within the first 5 minutes [7].
When you find the tooth, always pick it up by the crown – the white, visible part – while avoiding contact with the root. Dr Todd Coy explains:
The root contains important fibres called periodontal ligaments, which are necessary for proper healing [7].
Touching the root can damage these delicate fibres, reducing the likelihood of successfully reattaching the tooth.
If the tooth is dirty, gently rinse it for no more than 10 seconds using milk, saliva, or saline. Avoid scrubbing, scraping, or using soap, as the root’s surface has living tissue that needs to stay intact.
One important point: if the tooth belongs to a young child and is a baby tooth, do not try to reinsert it. This could harm the developing permanent tooth beneath. Make sure to identify whether the tooth is a baby tooth or a permanent one before taking further steps. Reinsertions should only be attempted with permanent teeth.
Step 2: Clean and Protect the Tooth
Once you’ve carefully handled the tooth in Step 1, the next step is to clean and protect it. Start by rinsing off any visible dirt or debris using a neutral liquid. If you only have access to cold tap water, keep the rinse brief – no more than 10 seconds [9]. This minimises the risk of damaging the delicate root cells, as these liquids help maintain a balanced pH and nutrients.
What NOT to Do: Never scrub, wipe, or use soap to clean the tooth. According to MGA Dental Clinic:
The root’s surface contains delicate periodontal ligament fibres that are vital for successful reattachment. Even a brief period of drying can damage these cells [2].
The key takeaway here? Keep the tooth moist at all times. Letting it dry out or wrapping it in anything absorbent will quickly destroy the cells needed for reattachment. After cleaning, shift your focus to preserving moisture to protect the root.
How to Keep the Tooth Moist
Moisture preservation is critical after cleaning. If reinserting the tooth immediately isn’t an option, you’ll need to store it in a suitable environment. Here are the best options:
- Cold milk: Milk is ideal because its balanced pH and nutrients act as a "life support" for the tooth. As Greenvale Dental House explains:
Milk has the perfect balance of nutrients and pH to keep tooth root cells alive – it’s like life support for your tooth [9].
- Inside the mouth: If the person is old enough to avoid swallowing it, they can tuck the tooth between their cheek and gums. Saliva creates a naturally moist and temperature-stable environment.
- Sterile saline solution: If you have access to saline (like contact lens solution), it’s another excellent option for keeping the tooth viable.
- Specialised preservation kits: Products like Save-A-Tooth contain balanced salt solutions specifically designed to maintain cell viability. These are great additions to any first aid kit.
However, avoid using plain tap water for storage. While it might seem harmless, it can actually damage the root cells you’re trying to protect. The goal is to give the tooth the best chance of survival until it can be reinserted.
Step 3: Try to Put the Tooth Back in Place
Once the tooth is clean and moist, the next step is to attempt putting it back into its socket. Acting quickly here gives the tooth the best chance of survival, so handle it with care and precision.
First, make sure it’s a permanent tooth. Only permanent teeth should be reinserted – baby teeth should not. If you’re unsure, skip this step and focus on keeping the tooth moist until you can get professional help.
To reinsert the tooth, check its orientation. Align it with the neighbouring teeth – the pointed, yellowish root should go into the socket first. Always hold the tooth by the crown, not the root, to avoid causing damage. Once you’re confident it’s positioned correctly, gently push it back into place. If you encounter resistance or it doesn’t slide in easily, stop to prevent further harm.
After the tooth is in place, stabilise it. Have the person bite down gently on a clean piece of gauze, a handkerchief, or a soft cloth to hold it steady. If the tooth feels loose, you can carefully wrap aluminium foil around it and the surrounding teeth to keep it secure during transport to a dentist.
If You Cannot Reinsert the Tooth
If reimplanting the tooth isn’t an option – whether due to discomfort, improper fit, or if the person is unconscious – focus on keeping it moist. Place the tooth in milk, saline solution, or even saliva (if it’s safe to do so). Time is critical, so aim to get to a dentist within 30–60 minutes for the best outcome.
Step 4: Control Bleeding and Reduce Pain
Once the tooth is handled, the next step is to manage bleeding and ease any pain. Some bleeding from the empty socket is perfectly normal. To control it, place a clean gauze pad or soft cloth over the socket and apply steady, gentle pressure for 10–15 minutes. This helps a blood clot form, which is essential for healing[8]. If the tooth has been reinserted, biting down softly on the gauze not only controls bleeding but also helps stabilise the tooth. However, if bleeding continues beyond 15 minutes, becomes heavy, or you notice a lot of blood being swallowed, keep applying pressure and seek emergency care immediately. Heavy bleeding can sometimes lead to complications, including potential airway obstruction[8][4].
Swelling and discomfort are also common after a dental injury. To reduce swelling, use a cold compress on the outside of the face near the injured area. Wrap an ice pack or cold compress in a cloth and apply it for 15–20 minutes, followed by a 10-minute break. Avoid placing ice directly on the skin or tooth, as this can cause tissue damage[8].
For pain relief, over-the-counter options like ibuprofen or paracetamol are effective. Always stick to the recommended dosage on the packaging. Steer clear of high doses of aspirin or applying it directly to the gums, as aspirin can thin the blood and make bleeding worse[4][8].
Step 5: Get to a Dentist Within 30-60 Minutes
Once the tooth is stabilised, the next step is to seek professional dental care as quickly as possible. Acting within this critical timeframe can make all the difference in saving the tooth.
Timing is everything when dealing with a knocked-out tooth. Dentists recommend reimplantation within 30 to 60 minutes of the injury [5][6][10]. This is because the root surface is covered with fragile periodontal ligament (PDL) cells, which are essential for the tooth to reattach to the jawbone. These cells start to deteriorate immediately after the tooth is dislodged, and the chances of successful reimplantation drop significantly beyond the 60-minute mark [4][10].
At the dental clinic, the dentist will examine your mouth for any additional injuries, such as jaw fractures or head trauma. Digital X-rays will likely be taken to assess the bone structure and check for hidden damage to the tooth root [1][10]. The dentist will clean the socket to remove blood clots or debris that could interfere with healing. If the tooth hasn’t already been reinserted, they’ll carefully reposition it into the socket. To stabilise the tooth, they’ll use splinting – a method that secures the tooth to adjacent teeth using a thin wire or bonding material, giving the ligaments time to heal [1][5][6].
It’s a good idea to call the dental clinic while you’re on your way so the team can prepare for your arrival. If it’s after hours and no dentist is available, head straight to a hospital emergency department. In Australia, the costs for emergency dental care can vary: consultations, including X-rays, range from $150–$250 AUD; reimplantation and splinting can cost $300–$800 AUD; and root canal therapy, often needed within one to two weeks, typically costs $900–$1,700 AUD [10].
General Dentist vs Endodontist
Knowing which type of dental professional to consult can clarify your treatment path. A general dentist often handles the initial emergency care, including reimplantation, socket cleaning, and stabilisation of the tooth. They also monitor the healing process.
An endodontist, on the other hand, specialises in treating the tooth’s pulp and roots. Since the blood supply to the tooth is usually severed during an avulsion, the pulp often dies, making a root canal necessary to prevent infection and further damage. This advanced treatment is typically carried out one to two weeks after the initial injury.
| Criteria | General Dentist | Endodontist |
|---|---|---|
| Role | Manages emergency care, including reimplantation and splinting | Focuses on root canal therapy and complex cases |
| Training | General dental education | Additional expertise in dental trauma and endodontics |
| Best for | Initial treatment and stabilisation | Advanced treatment, such as root canal therapy |
Conclusion
A knocked-out tooth is a serious dental emergency. Acting quickly and carefully is crucial to saving it. Keeping the tooth moist and getting to a dentist within 30 to 60 minutes can make all the difference. As the Better Health Channel highlights, "Every minute a tooth is out of the gum, the less chance it has of surviving" [3]. Research supports this urgency, showing that teeth replanted within 30 minutes have up to a 90% chance of complete healing [9]. However, delaying replantation beyond 60 minutes significantly reduces success rates, with risks like root resorption or ankylosis becoming more likely [6].
The periodontal ligament cells on the tooth’s root begin to die within minutes if the tooth dries out [2][6]. If reinserting the tooth isn’t possible, storing it in milk can protect the root cells until professional care is available.
Even when successfully replanted, a tooth may remain functional for 10 to 20 years [6]. However, the outcome hinges on how the tooth is handled in those critical first moments. As MGA Dental Clinic explains, "The outcome depends on how the tooth is handled and how soon professional care is received. Providing the right first aid within minutes can often mean the difference between saving the natural tooth and facing more complex dental treatment later on" [2].
These essential steps emphasise the importance of calm, swift action to protect your natural smile in a dental emergency.
FAQs
How can I tell if it’s a baby tooth or a permanent tooth?
Baby teeth tend to be smaller, smoother, and more translucent than permanent teeth. In contrast, permanent teeth are larger, more robust, and less transparent. If you’re uncertain, it’s always a good idea to check with a dentist for confirmation.
What’s the best container to carry the tooth in to the dentist?
If a tooth gets knocked out, the best way to transport it is in milk or a saline solution. These liquids help maintain the tooth’s cells, giving it a better chance of being successfully reimplanted. If neither is available, you can either keep the tooth in your mouth (between your cheek and gums) or wrap it in plastic wrap along with a damp cloth until you’re able to get to a dentist.
What treatment might be needed after the tooth is replanted?
After replanting a tooth, it might require stabilisation using a splint, close monitoring to ensure proper healing, and possibly root canal therapy if the pulp becomes infected or dies. Ideally, the tooth should be replanted immediately. If that’s not feasible, keeping the tooth stored in milk or saliva until you can see a dentist is crucial. Acting quickly increases the likelihood of successful treatment and long-term recovery.
Related Blog Posts
- When To Call A Dentist For Post-Extraction Bleeding
- What to Do if Veneers Fall Off
- How Dentists Assess Crown Lengthening Candidates
- Ultimate Guide To After-Hours Dental Services
Important Notice: Any surgical or invasive procedure carries risks. Before proceeding, you should seek a second opinion from an appropriately qualified health practitioner.
Individual results may vary. The information provided in this article is for educational purposes only and does not constitute medical advice.
Checkout Related Blogs


Get in touch with us
For more information, call us now to start feeling better. Or fill the form below to make appointment
The Latest News from Complete Smiles
How to Clean Clear Plastic Retainers
Checklist for Choosing Wearable Dental Devices
Checklist for Choosing Cloud AI Platforms in Dentistry

Complete Smiles Bella VistaAccepts All Major Health Funds, Including


