


5 Methods for Sterilizing Endodontic Files

Sterilising endodontic files is essential to prevent cross-contamination during root canal treatments. These files often trap debris like blood and saliva, which can harbour harmful microorganisms. Despite routine cleaning, studies show up to 76% of files remain contaminated, and even new files can show bacterial growth. Proper sterilisation isn’t just important – it’s mandatory for patient safety.
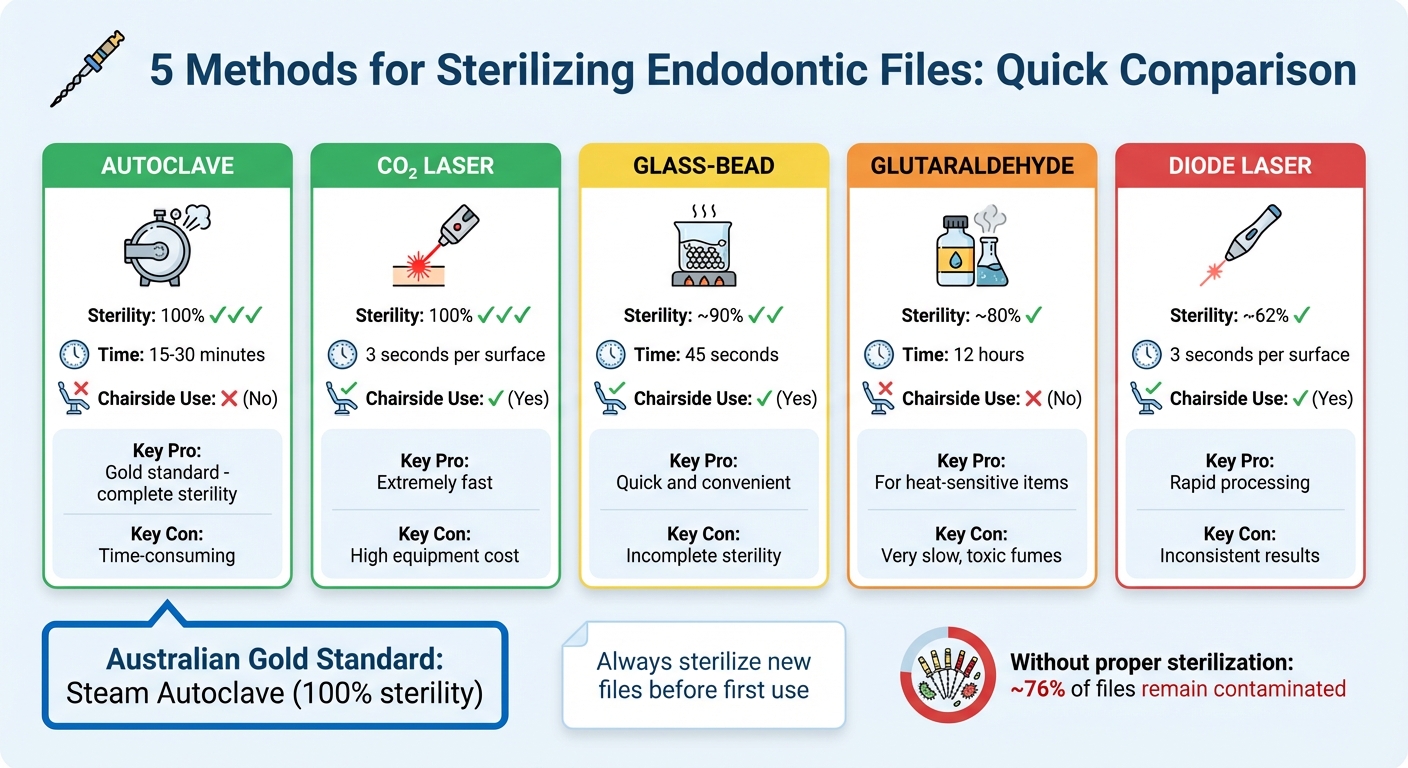
Here’s a quick breakdown of five sterilisation methods:
- Autoclave: The most effective method, providing 100% sterility, but time-consuming (15–30 minutes) and unsuitable for immediate reuse.
- CO₂ Laser: Achieves complete sterility in just 3 seconds per surface. Ideal for chairside use but requires costly equipment.
- Glass-Bead: A quick 45-second process, offering around 90% sterility. Best as a supplementary method.
- Glutaraldehyde: A chemical method with only 80% effectiveness. Requires 12 hours, making it impractical for daily use.
- Diode Laser: Fast (3 seconds per surface) but only 62% effective, making it unreliable as a standalone solution.
Quick Comparison:
| Method | Sterility (%) | Time Required | Chairside Use | Key Limitation |
|---|---|---|---|---|
| Autoclave | 100% | 15–30 minutes | No | Time-consuming |
| CO₂ Laser | 100% | 3 seconds/surface | Yes | High equipment cost |
| Glass-Bead | ~90% | 45 seconds | Yes | Incomplete sterility |
| Glutaraldehyde | ~80% | 12 hours | No | Long cycle, toxic fumes |
| Diode Laser | ~62% | 3 seconds/surface | Yes | Inconsistent results |
In Australia, autoclaving is the gold standard for sterilising reusable instruments, meeting strict local guidelines. For quick chairside solutions, CO₂ lasers are effective but expensive. Glass-bead sterilisers are handy for immediate use but should not replace autoclaving. Glutaraldehyde and diode lasers are less reliable, making them unsuitable for routine practice.
For maximum safety, always sterilise new files before use, and consider using single-use files where feasible.
Comparison of 5 Endodontic File Sterilization Methods: Effectiveness, Time and Suitability
Sterilization of Endodontic Instruments and files
1. Autoclave Sterilisation
Autoclave sterilisation is widely regarded as the gold standard for sterilising endodontic files. By using moist heat to coagulate the proteins of microorganisms, autoclaves achieve complete sterility when operated under the right conditions [1][3]. A survey revealed that 76.6% of dental practitioners rely on steam autoclaves for reprocessing endodontic files [6], highlighting their widespread adoption in clinical settings.
Sterility Effectiveness
Autoclaves deliver 100% sterility, even eradicating highly resistant bacterial spores like Bacillus stearothermophilus [1][5]. Ameer B from the Department of Conservative Dentistry and Endodontics emphasised this by stating:
"We can conclude that autoclave is the perfect process of sterilisation providing 100% sterility" [5].
The following section outlines the time requirements and practical considerations for using autoclaves in clinical environments.
Sterilisation Time and Chairside Suitability
Standard autoclave operation involves either 121°C for 15 minutes at 15 pounds of pressure or 136°C (± 2°C) for 20 minutes [1][3]. While highly effective, these cycle times make autoclaves impractical for quick chairside use. Successful operation requires dedicated equipment, proper instrument packaging, and sufficient downtime between patient appointments. However, their reliability makes them an excellent choice for batch sterilisation between procedures.
Pros and Cons
| Advantages | Disadvantages |
|---|---|
| Provides complete sterility, even against resistant microorganisms [1][5] | Time-consuming, unsuitable for immediate reuse [1] |
| Recognised globally as the standard for sterilisation [2] | Requires thorough pre-cleaning to remove biological debris [2][3] |
| Effectively prevents cross-contamination [2][3] | May reduce instrument cutting efficiency over repeated cycles [7] |
| Standardised and reliable | Risk of corrosion if instruments are not properly dried [3] |
Pre-cleaning is crucial before autoclaving. Instruments must be cleaned with soap and water or placed in ultrasonic baths to remove biological debris that could shield bacteria from the sterilising steam [2][3]. Even brand-new, factory-sealed files are not exempt – they often arrive contaminated and should be autoclaved before their first use [2].
2. Glass-Bead Sterilisation
Glass-bead sterilisation provides a quick, chairside alternative to traditional autoclaving. It uses dry heat at 240°C to neutralise microorganisms through oxidation and desiccation. The procedure involves placing the working end of endodontic files into a bed of heated glass beads for 45 seconds. Before sterilising, it’s recommended to wipe the file’s working end with gauze soaked in surgical spirit for 10 seconds to remove debris [1] [3]. While the speed of the process is appealing, its sterilisation effectiveness warrants further consideration.
Sterility Effectiveness
Research indicates that glass-bead sterilisation achieves approximately 90% sterility, with results ranging between 76.9% and 90%, as some microbial growth is observed in 10%–23% of samples. Sowjanyaa J., a postgraduate student at Saveetha Dental College, highlights:
"Effective of sterilization by a glass-bead sterilizer is 90%" [3].
However, it’s important to note that this method cannot sterilise plastic handles or the non-working ends of files, which may still harbour contaminants.
Sterilisation Time and Chairside Suitability
One of the biggest advantages of glass-bead sterilisation is its rapid 45-second cycle, making it ideal for immediate chairside use. This speed offers a significant time-saving advantage compared to autoclave cycles. That said, the reduced sterility level means it works best as a supplementary method rather than a standalone solution.
Pros and Cons
Here’s a quick breakdown of the main benefits and limitations of this method:
| Advantages | Disadvantages |
|---|---|
| Extremely fast (45 seconds) | Achieves only around 90% sterility |
| Convenient for chairside use | Cannot sterilise plastic handles or non-working ends |
| More reliable than chemical immersion methods | Operates at very high temperatures (240°C) |
| Not a replacement for autoclaving |
While glass-bead sterilisation is a practical addition to the sterilisation toolkit, it works best when paired with conventional autoclaving. Bilal Ameer, from the Department of Conservative Dentistry and Endodontics at SJM Dental College and Hospital, underscores this point:
"Glass-bead sanitizer can be utilized as another option in the event that autoclave isn’t accessible" [8].
3. Glutaraldehyde Chemical Sterilisation
Glutaraldehyde chemical sterilisation involves immersing endodontic files in a 2.4% glutaraldehyde solution. This method is mainly reserved for heat-sensitive instruments that cannot endure the high temperatures required by autoclaves or glass-bead sterilisers. However, it is consistently regarded as the least effective sterilisation method among those commonly used [1]. Unlike the speedy process of glass-bead sterilisation or the thorough sterility achieved with autoclaving, glutaraldehyde falls short in efficiency and effectiveness.
Sterility Effectiveness
When it comes to sterility, glutaraldehyde achieves about 80% effectiveness for endodontic files [1]. Unfortunately, it fails to eliminate Bacillus stearothermophilus spores in 20%–38.5% of cases [1]. This means that approximately one in five files may still carry viable microorganisms after completing the sterilisation process, raising significant concerns for infection control in clinical settings.
Sterilisation Time
The process requires a lengthy 12-hour immersion period [1]. This extended time frame makes glutaraldehyde impractical for everyday clinical use, especially when compared to the 45-second cycle of glass-bead sterilisation or the rapid efficiency of laser methods. Pre-cleaning the files is also critical, as organic debris can shield microbes and reduce the method’s effectiveness [7]. Given these limitations, its use in clinical practice is quite restricted.
Suitability for Chairside Use
Due to its prolonged cycle, glutaraldehyde is not suitable for chairside use [1]. It cannot meet the fast-paced demands of busy clinical environments where quick instrument turnaround is essential. T B V G Raju and colleagues highlight this drawback, recommending autoclave or laser sterilisation for clinical practice, with lasers being particularly advantageous for chairside applications [1].
Pros and Cons
| Advantages | Disadvantages |
|---|---|
| Suitable for heat-sensitive tools | Only achieves around 80% sterility [1] |
| Does not require high temperatures | Impractical for chairside use due to 12-hour cycle [1] |
| Affordable and readily available | Fails to eliminate bacterial spores in 20%–38.5% of cases [1] |
| Requires thorough rinsing to remove toxic residues [7] |
Glutaraldehyde is best viewed as a last-resort option when heat-based sterilisation methods are not available. Autoclaving remains the preferred standard, delivering 100% sterility compared to glutaraldehyde’s limited 80% effectiveness [1].
sbb-itb-2be92ed
4. CO2 Laser Sterilisation
CO2 laser sterilisation is a technique used to decontaminate endodontic files with the help of a 10,600 nm CO2 laser. To sterilise, you irradiate the file at 10 W for 3 seconds per surface, rotating the instrument to ensure the entire length is exposed [1].
Sterility Effectiveness
This method delivers complete sterility, even for files contaminated with heat-resistant spores like Bacillus stearothermophilus [1]. Its performance matches that of autoclaving and far outpaces glass-bead sterilisation (90%) and glutaraldehyde (80%). The laser works by targeting intracellular water, leading to cell rupture and breaking down biofilms [1].
Sterilisation Time
One of the standout features of CO2 laser sterilisation is its speed. Each surface requires just 3 seconds of irradiation, a stark contrast to the 15–30 minutes needed for autoclaving [1]. This quick turnaround is a major advantage in busy clinical environments where instruments need to be reused promptly.
Suitability for Chairside Use
CO2 lasers are highly practical for chairside use in clinical settings. The equipment is straightforward to operate in a standard clinical environment, without the need for a complicated setup [10]. Safety, however, is paramount. Operators must wear wavelength-rated safety glasses to avoid eye injury [11], and the laser must be applied in a continuous, controlled "painting" motion to ensure thorough coverage of the file [9].
Pros and Cons
| Advantages | Disadvantages |
|---|---|
| Provides complete sterility, even for heat-resistant spores [1] | Requires costly, specialised laser equipment [12, 13] |
| Extremely fast – 3 seconds per surface [1] | Manual handling is necessary to expose all surfaces [9] |
| Ideal for immediate reuse at the chairside [1] | Requires safety training and protective eyewear [17, 19] |
| Outperforms glass-bead (90%) and glutaraldehyde (80%) methods [1] | Higher initial investment compared to traditional methods [12, 13] |
With its unparalleled speed and effectiveness, CO2 laser sterilisation offers a strong alternative to more conventional methods, particularly in fast-paced clinical settings.
5. Diode Laser Sterilisation
Diode laser sterilisation operates using wavelengths between 810–980 nm to decontaminate endodontic files. This process involves irradiating the files at around 10 watts for 3 seconds per surface [1]. While diode lasers can penetrate dentinal tubules to depths of up to 1,000 μm during canal disinfection [12][13], they fall short when it comes to achieving complete sterility on metal surfaces.
Sterility Effectiveness
The effectiveness of diode laser sterilisation is limited. It achieves about 61.5% sterility [4], with microbial growth observed in 30.76% of samples after 3 days and 38.46% after 21 days. This performance pales compared to autoclaving, which ensures 100% sterility, and even other methods like glass-bead sterilisation (77%) and glutaraldehyde (53.8%) [4]. The reduced effectiveness stems from the laser’s inability to reach microscopic crevices and flutes in endodontic files. Additionally, the bactericidal effect weakens as the distance between the laser tip and the file surface increases, due to scattering of the radiation. These limitations highlight the trade-off between its speed and its reliability.
Sterilisation Time
Speed is where diode laser sterilisation shines. Each surface requires just 3 seconds of irradiation [1]. However, this quick turnaround comes at a cost – its inability to consistently achieve complete sterility.
Suitability for Chairside Use
Diode lasers are practical for chairside use due to their rapid processing time. However, the method demands precise manual irradiation, making it labour-intensive. This limitation means diode lasers are better suited as a supplementary tool rather than a standalone solution when absolute sterility is necessary [1][5].
Pros and Cons
Here’s a quick breakdown of the strengths and weaknesses of diode laser sterilisation:
| Advantages | Disadvantages |
|---|---|
| Extremely fast – just 3 seconds per surface [1] | Sterility rate of only 61.5% [4] |
| Convenient for quick chairside use [1] | Effectiveness decreases with increased distance from the file surface |
| Faster than traditional methods | Cannot reach microscopic crevices [12][13] |
| Requires manual irradiation for all surfaces [1] | |
| Works best as a supplement to autoclaving, not as a standalone method [4] |
Comparison of Sterilisation Methods
When deciding on a sterilisation method, consider factors like sterility, speed, and practicality. Both autoclave and CO₂ laser sterilisation ensure 100% sterility, while glass-bead, glutaraldehyde, and diode laser methods fall short, achieving approximately 90%, 80%, and 62% effectiveness, respectively [1][4][5].
| Method | Sterility Effectiveness | Time Required | Chairside Suitability | Key Advantage | Key Disadvantage |
|---|---|---|---|---|---|
| Autoclave | 100% [5] | 15–30 minutes | No (Centralised) | Gold standard; reliably kills spores | Time-consuming; requires specialised equipment |
| CO₂ Laser | 100% [1] | 3 seconds/surface | Yes | Extremely fast; complete sterility | High cost; operator skill-dependent |
| Glass-Bead | ~90% [1] | 45 seconds | Yes | Quick and convenient | Incomplete sterility; may miss certain areas |
| Glutaraldehyde | ~80% [1] | 12 hours | No | Ideal for heat-sensitive items | Very slow; toxic fumes; least effective |
| Diode Laser | ~62% [4] | 3 seconds | Yes | Rapid option for chairside use | Inconsistent results; limited penetration |
These comparisons highlight the importance of selecting methods that effectively balance efficiency with sterility, especially in line with Australian standards. In Australia, autoclaving remains the gold standard for reusable instruments. Steam autoclaving is the only method that reliably delivers completely sterile tools, making it indispensable for endodontic hand files. By contrast, methods like glass-bead sterilisation and glutaraldehyde solutions often fall short, failing to adequately sterilise such instruments [3].
For high-volume chairside sterilisation, CO₂ lasers present a cutting-edge option, though their high initial cost may deter some practices. Glass-bead sterilisers, while fast and convenient, should only serve as a secondary measure and never replace autoclaving for final processing. Glutaraldehyde, with its prolonged 12-hour cycle and toxic fumes, is impractical for routine use. Similarly, diode lasers lack the consistency and penetration depth required to ensure proper infection control.
Australian guidelines, including those from the Australian Dental Association, stress that autoclaving is the only verified method for fully decontaminating reusable rotary NiTi files. Additionally, hand files are recommended to be treated as single-use items whenever possible to maintain the highest standards of infection control [7].
Conclusion
Choosing the right sterilisation method is all about finding the balance between ensuring thorough sterility and meeting the practical needs of a busy clinical environment. In Australia, steam autoclaving continues to set the benchmark for sterilisation, providing complete sterility and aligning with national regulatory standards for reusable instruments [1][5]. For those needing quicker, chairside solutions, CO₂ lasers deliver full sterilisation in just three seconds per surface [1].
On the other hand, glass-bead sterilisers offer convenience for chairside use but fall short with a 90% effectiveness rate, which makes them unsuitable as a replacement for autoclaving [1]. Similarly, glutaraldehyde sterilisation, which takes 12 hours to achieve only 80% sterility, is far from ideal for routine endodontic procedures [1]. While diode lasers are fast, they lack the reliability needed for consistent infection control [4].
It’s also essential to remember that new files must be sterilised before their first use. This involves ultrasonic cleaning followed by heat sterilisation, as manufacturer packaging is not sterile [2]. Dental practices, such as Complete Smiles Bella Vista, adhere to stringent sterilisation protocols to ensure patient safety at every step [2][3].
To minimise cross-contamination risks, Australian clinics are encouraged to rely on autoclaving for reusable files and consider using single-use hand files where feasible [7]. This combination safeguards patient care while maintaining compliance with Australian sterilisation standards.
FAQs
Why is autoclaving the most reliable method for sterilising endodontic files?
Autoclaving stands out as the most reliable way to sterilise endodontic files. By using high-pressure saturated steam, it effectively destroys all microorganisms, including even the most resistant spores. This method achieves a ≥10⁶ log reduction in microbial count, ensuring complete sterility.
Its reliability and consistency have made autoclaving the standard practice in dental clinics, particularly for instruments used in delicate procedures like root canal therapy. It meets the strict sterilisation requirements necessary to maintain patient safety and procedural efficacy.
What are the pros and cons of using CO₂ laser sterilisation for endodontic files?
There isn’t a wealth of detailed information specifically about the pros and cons of using CO₂ laser sterilisation for endodontic files. However, CO₂ lasers are widely acknowledged for their ability to sterilise surfaces by using high-intensity light energy to destroy bacteria and other microorganisms effectively.
This method might bring benefits like precision and efficiency, but there could be some drawbacks when applied to endodontic files. These might include higher costs, the need for specialised equipment, or even potential effects on the durability or structure of the files themselves. For reliable advice on sterilisation techniques, it’s best to consult a dental professional or explore evidence-based resources that align with the needs of your practice.
How effective and fast is glass-bead sterilisation compared to other methods for cleaning endodontic files?
Glass-bead sterilisation can reduce microbial contamination to a certain extent, but it doesn’t match the thorough sterility achieved by a steam autoclave. Research highlights that autoclaves deliver complete sterility, whereas glass-bead sterilisation may leave behind some contamination, making it less dependable. This method is generally suggested only as a backup when access to an autoclave is limited.
When it comes to speed, there isn’t much data directly comparing the cycle times of glass-bead sterilisation with other methods. While it might seem faster for immediate use, its lower reliability makes it unsuitable for situations where thorough sterilisation is critical. For the best results, a steam autoclave remains the go-to option for effectively sterilising endodontic files.
Related Blog Posts
- Orthodontic Sterilization Tools: Guide
- Cleaning Rotary Endodontic Instruments: Protocols
- Advances in Endodontic File Manufacturing
- Ultrasonic Activation for Biofilm Removal: Research Insights
Important Notice: Any surgical or invasive procedure carries risks. Before proceeding, you should seek a second opinion from an appropriately qualified health practitioner.
Individual results may vary. The information provided in this article is for educational purposes only and does not constitute medical advice.
Checkout Related Blogs


Get in touch with us
For more information, call us now to start feeling better. Or fill the form below to make appointment
The Latest News from Complete Smiles
How to Clean Clear Plastic Retainers
Checklist for Choosing Wearable Dental Devices
Checklist for Choosing Cloud AI Platforms in Dentistry

Complete Smiles Bella VistaAccepts All Major Health Funds, Including


