


Step-by-Step Guide: Cleaning Retainers with Ultrasonic Cleaners

Ultrasonic cleaners are a quick and effective way to clean retainers. They use sound waves to remove bacteria, plaque, and debris from hard-to-reach areas in just 3–5 minutes. This method is gentle on most retainer materials like clear plastic and acrylic, making it a great option for maintaining hygiene. However, it’s important to inspect your retainer for damage before using this method and follow the steps carefully for the best results.
Key Points:
- Why Clean Retainers? Prevents bacteria, plaque, and fungi build-up, which can cause bad breath, gum irritation, and tooth decay.
- How Ultrasonic Cleaners Work: Sound waves create bubbles that clean every nook and cranny, even areas a toothbrush can’t reach.
- What You’ll Need: Ultrasonic cleaner (40–42 kHz), distilled water, approved cleaning solution, soft toothbrush, and a clean towel.
- Steps to Clean:
- Pre-clean the retainer with water and a soft toothbrush.
- Fill the ultrasonic cleaner with water and cleaning solution.
- Place the retainer in the cleaner and run a 3–5 minute cycle.
- Rinse thoroughly and air-dry before storing.
- Safety Tips: Avoid hot water, harsh chemicals, and abrasive cleaning methods. Use ultrasonic cleaning 2–3 times a week as part of your routine.
By following these steps and maintaining regular dental check-ups, you can keep your retainer clean and in great condition.
How Ultrasonic Cleaners Work for Retainers
The Science Behind Ultrasonic Cleaning
Ultrasonic cleaners use sound waves – typically in the 40–42 kHz range – within a liquid medium to create tiny, high-energy bubbles. These bubbles, formed through a process called cavitation, collapse against the surface of the retainer, generating shockwaves. This action effectively removes plaque, bacteria, and food particles, even from the smallest crevices, such as around wires or embossed areas.
What makes this method special is that the cleaning is powered by fluid movement rather than physical scrubbing. This means it’s gentle on materials like plastic or acrylic, minimising the risk of scratches where bacteria could hide. Most home ultrasonic cleaners can complete a cleaning cycle in just 3–5 minutes, eliminating up to 99.9% of bacteria and germs from your retainer [1]. This precise and efficient process makes ultrasonic cleaning a reliable option for maintaining retainers.
Which Retainer Types Work with Ultrasonic Cleaners
Not all retainers are created equal when it comes to ultrasonic cleaning. Clear thermoplastic retainers, such as those made from Essix or Vivera materials, are ideal candidates. The smooth plastic surfaces of these retainers respond well to the cavitation process, ensuring a thorough clean. Removable acrylic Hawley retainers, which often feature stainless steel wires, are also compatible. Ultrasonic cleaning can effectively target the junctions where the acrylic meets the metal components.
However, some caution is needed. Retainers with soldered joints, loose adhesives, visible cracks, or decorative elements may not fare well under the vibrations, as these could worsen any existing issues. Fixed (bonded) lingual wires, which are attached directly to teeth, are better suited to traditional cleaning methods like brushing and flossing.
Pros and Cons of Ultrasonic Cleaning
Ultrasonic cleaning has several advantages over manual methods. It excels at reaching narrow crevices and hard-to-clean areas, providing a deep clean in just a few minutes. The process is also gentle on retainer materials, avoiding the scratches that can occur with abrasive toothpastes or vigorous brushing.
However, there are some drawbacks. Ultrasonic cleaners come with an upfront cost and require upkeep, such as replacing the cleaning solution and maintaining the tank. They also cannot fix pre-existing damage – cavitation might even make cracks or loose parts worse. It’s important to see ultrasonic cleaning as a complement to daily rinsing and gentle brushing, not a complete replacement.
| Aspect | Ultrasonic Cleaning | Manual Brushing/Soaking |
|---|---|---|
| Reach | Cleans tiny crevices via cavitation | Limited to easily accessible surfaces |
| Time | About 3–5 minutes per cycle | Often requires a longer cleaning session |
| Effectiveness | Kills 99.9% of bacteria for a thorough clean [1] | May miss plaque in hard-to-reach areas |
| Risk to Retainer | Low risk of abrasion on plastics | Higher chance of causing surface scratches |
Getting Ready to Clean Your Retainer
Check If Ultrasonic Cleaning Is Right for Your Retainer
Before using an ultrasonic cleaner, it’s important to ensure your retainer is compatible with this method. Start by reviewing any care instructions or manufacturer guidelines provided with your appliance. If you’re unsure or the instructions are unclear, reach out to your dentist or orthodontist (for example, Complete Smiles Bella Vista) for confirmation. This step is especially crucial if your retainer has delicate soldered joints or has been previously damaged.
Take a moment to carefully inspect your retainer under good lighting. Look for cracks, chips, bent wires, or cloudy areas. If you have a plastic retainer, you can gently flex it – but only if you know it’s safe to do so. Watch out for white stress lines, squeaking, or movement in bonded wires, as these could indicate damage. If you spot any issues, stop and schedule a check-up before proceeding. Ultrasonic vibrations could worsen existing problems.
Once you’ve confirmed your retainer is in good condition, it’s time to gather the necessary cleaning tools.
What You’ll Need
Make sure you have the following items ready:
- Ultrasonic cleaner specifically designed for dental appliances (look for units operating at 40–42 kHz, typically priced between AUD $60 and $200)
- Cool or lukewarm water (distilled or filtered water is a good choice to minimise mineral deposits)
- Approved cleaning solution or tablet as recommended by your dentist or the retainer’s manufacturer (costs usually range from AUD $0.30 to $1.00 per tablet)
- A soft-bristled toothbrush dedicated solely to cleaning your retainer
- A clean towel or paper towel for drying your retainer after cleaning
Having everything prepared beforehand ensures a smooth cleaning process.
Initial Cleaning Before Using the Ultrasonic Cleaner
Before starting the ultrasonic cleaning cycle, give your retainer a quick pre-clean to remove loose debris. Rinse it under cool or lukewarm running water to wash away saliva and food particles. Then, use a soft toothbrush with plain water – or a small amount of non-abrasive liquid soap if approved by your dentist – to gently scrub all surfaces. Pay extra attention to areas around wires and clasps.
Avoid using toothpaste, especially those with whitening or charcoal formulas, as they can be abrasive and might scratch the plastic, making it easier for plaque to accumulate. Once brushed, rinse the retainer thoroughly to remove any soap residue. This step ensures that the ultrasonic cleaner can focus on tackling plaque and biofilm in hard-to-reach spots, giving your retainer a deeper clean during the cycle.
How to keep retainers clean (+ dentures + mouth guards)!!
sbb-itb-2be92ed
How to Clean Your Retainer with an Ultrasonic Cleaner
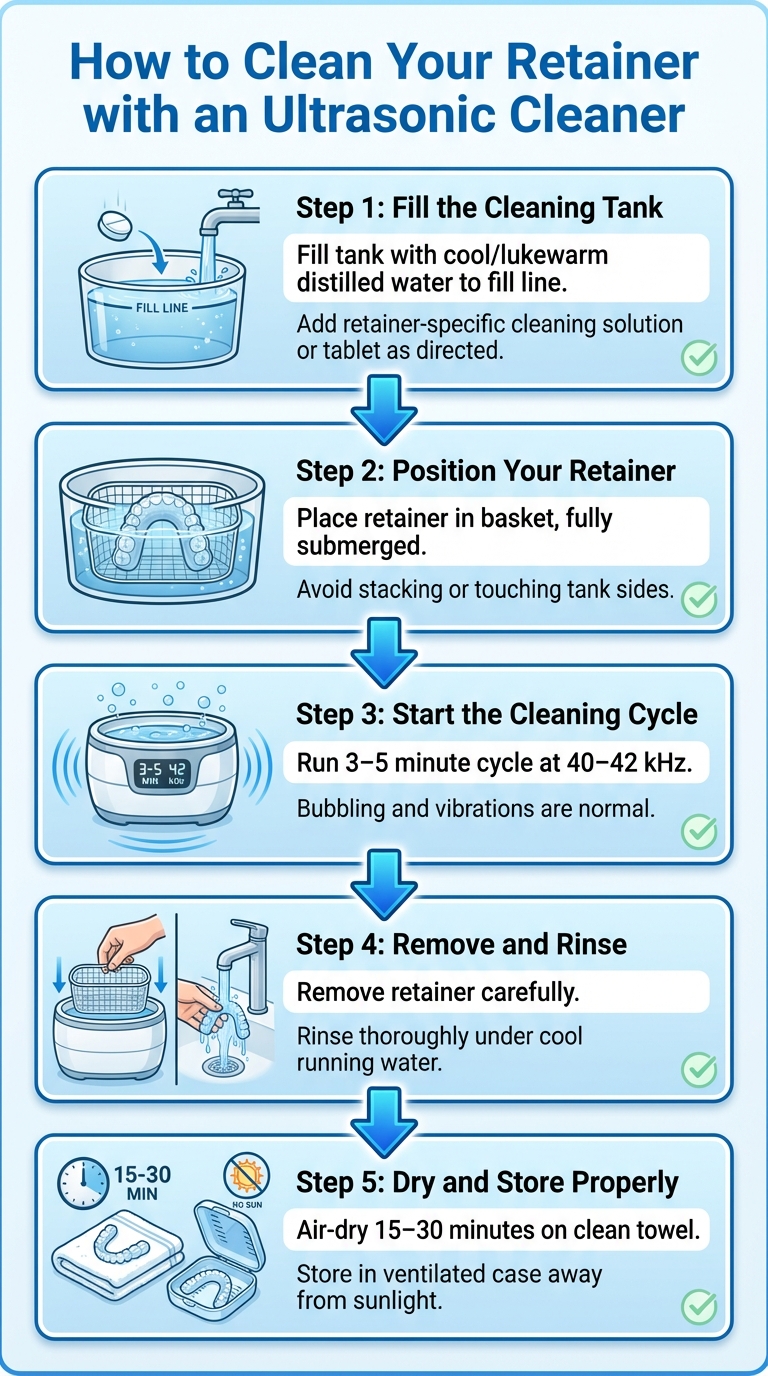
5-Step Guide to Cleaning Retainers with Ultrasonic Cleaners
Keeping your retainer clean is essential, and using an ultrasonic cleaner can make the process simple and effective. Here’s how you can do it step by step:
Step 1: Fill the Cleaning Tank
Start by filling the cleaner’s tank with cool or lukewarm distilled or filtered water, ensuring you stay within the fill line. If your dentist or product instructions recommend it, add a retainer-specific cleaning solution or an effervescent tablet. Be sure to follow the exact dosage instructions.
Step 2: Position Your Retainer
Place your retainer carefully in the cleaner’s basket, making sure it’s fully submerged. Avoid stacking items or letting the retainer touch the sides of the tank to ensure an even clean.
Step 3: Start the Cleaning Cycle
Set the ultrasonic cleaner to a 3–5 minute cycle at around 40–42 kHz, as directed by the device’s manual. During the cycle, you might notice bubbling or slight vibrations – this is completely normal and part of the cleaning process.
Step 4: Remove and Rinse
Once the cycle is complete, carefully remove the retainer using gloves or tongs if necessary. Rinse it thoroughly under cool running water to wash away any residue from the cleaning solution. If stubborn deposits remain, consult your dentist rather than running another cycle.
Step 5: Dry and Store Properly
Let your retainer air-dry for 15–30 minutes on a clean towel or drying stand. If you’re in a hurry, you can gently pat it dry with a soft, lint-free cloth. Avoid using paper towels, as they can leave fibres behind. Once dry, store your retainer in a clean, ventilated case, keeping it away from direct sunlight to prevent damage.
Safety Tips and Maintenance
How Often to Use Ultrasonic Cleaning
Incorporate ultrasonic cleaning into your routine 2–3 times a week to complement daily rinsing and brushing. Each time you remove your retainer, rinse it with water and gently brush it using a soft toothbrush – skip the toothpaste to avoid unnecessary wear. Ultrasonic cleaners are perfect for a deeper clean, especially for reaching those tricky spots around wires and in crevices. If you’re dealing with heavy plaque build-up, daily ultrasonic cleaning might be worth considering, but it’s best to check with your dentist for tailored advice. Make sure this cleaning schedule fits seamlessly into your overall retainer care routine.
What to Avoid
Steer clear of water hotter than 50°C, as it can warp plastic or acrylic retainers. Harsh chemicals like bleach, methylated spirits, or household cleaners are a no-go – they can damage the materials and leave harmful residues behind. Abrasive toothpaste or scouring powders should also be avoided because they can create tiny scratches that trap bacteria. Instead, stick to cool distilled water paired with retainer-specific cleaning solutions, and always follow the manufacturer’s instructions for both your retainer and ultrasonic cleaner. These precautions not only protect your retainer but also keep your ultrasonic cleaner working effectively.
Caring for Your Ultrasonic Cleaner
Taking care of your ultrasonic cleaner is key to keeping it in top shape. After each use, unplug the device, empty it, and rinse the tank with warm soapy water. Dry it thoroughly with a soft cloth to prevent biofilm or mineral deposits. If you live in a hard-water area, descale the tank once a month using a mild vinegar solution, but only if the manufacturer permits it. Regularly check the power cord and buttons for any signs of wear, and never operate the cleaner without water or submerge its electrical components. These simple steps can help extend the life of your device and ensure it performs reliably.
Fixing Common Problems
If you notice persistent odours or white deposits after several uses, it could signal biofilm build-up or material degradation. In such cases, consult your dentist for an inspection. If the detailed cleaning steps don’t resolve the issue, a dental professional can safely tackle stubborn build-up. Additionally, if your retainer shows signs of cracks, warping, or persistent discolouration, stop using it immediately and seek professional advice. Taking prompt action can save you from bigger problems down the line.
Conclusion
Ultrasonic cleaners provide a quick and efficient way to clean retainers, using high-frequency sound waves to target areas that regular brushing often misses. In just 3–5 minutes, they can help remove plaque, biofilm, and bacteria, contributing to better oral hygiene outcomes [1] [2].
While ultrasonic cleaning offers a deep clean, it should be part of a broader oral care routine. Daily rinsing, gentle brushing, and storing your retainer in a clean, dry case are equally important. Before introducing ultrasonic cleaning into your routine, check with your dentist or orthodontist to ensure it’s suitable for your specific type of retainer – whether it’s a clear plastic model, a Hawley retainer, or a bonded wire. This precaution helps prevent potential damage, such as warping.
Regular dental check-ups are also key. They allow professionals to assess your retainer for wear or build-up and ensure your cleaning practices remain safe and effective. Clinics like Complete Smiles Bella Vista can provide tailored advice to help maintain your retainer. By combining ultrasonic cleaning with consistent care and professional guidance, you can keep your retainer in excellent condition for the long term.
FAQs
Can using an ultrasonic cleaner harm my retainer?
Using ultrasonic cleaners can be a safe way to clean your retainer, as long as they’re used properly. That said, if they’re misused or used too often, they might cause wear or even damage – especially to retainers made from more fragile materials.
To keep your retainer in top shape, stick to the cleaning instructions provided by the manufacturer. If you’re not sure whether an ultrasonic cleaner is a good fit for your type of retainer, it’s always a smart idea to check with your dentist.
How often should I clean my retainer with an ultrasonic cleaner?
Using an ultrasonic cleaner for your retainer once a week – or as directed by your dentist – is a great way to keep it clean and hygienic. This type of cleaning helps eliminate plaque, bacteria, and other debris, ensuring your retainer stays in good shape.
For everyday care, rinse your retainer with lukewarm water and gently brush it with a soft toothbrush. Be careful not to use hot water, as it can distort the material. Always stick to the care instructions provided by your dentist for the best results.
Can all types of retainers be cleaned with an ultrasonic cleaner?
Not every retainer is built to handle ultrasonic cleaning – it all comes down to the material and design. Plastic or acrylic retainers can be sensitive to the vibrations and may end up getting damaged, whereas metal or wire retainers tend to handle ultrasonic cleaning much better.
To keep your retainer safe, it’s always best to check the care guidelines from the manufacturer or ask your dentist for advice before using an ultrasonic cleaner.
Related Blog Posts
- Ultimate Guide to Retainer Hygiene While Travelling
- Natural Retainer Cleaning: Myths vs. Facts
- Deep Cleaning Retainers: Vinegar and Water Tips
- Ultimate Guide To Retainer Cleaning
Important Notice: Any surgical or invasive procedure carries risks. Before proceeding, you should seek a second opinion from an appropriately qualified health practitioner.
Individual results may vary. The information provided in this article is for educational purposes only and does not constitute medical advice.
Checkout Related Blogs


Get in touch with us
For more information, call us now to start feeling better. Or fill the form below to make appointment
The Latest News from Complete Smiles
How to Clean Clear Plastic Retainers
Checklist for Choosing Wearable Dental Devices
Checklist for Choosing Cloud AI Platforms in Dentistry

Complete Smiles Bella VistaAccepts All Major Health Funds, Including


