


Common Mistakes When Using Ultrasonic Retainer Cleaners
Ultrasonic retainer cleaners are fantastic for keeping dental appliances like retainers, aligners, and dentures clean. But using them incorrectly can damage your retainer or reduce cleaning efficiency. Here’s what to avoid:
- Skipping Cleaning Solutions: Plain water doesn’t disinfect or clean effectively. Always use a suitable cleaning tablet with distilled or filtered water.
- Overfilling the Tank: Too much water or overcrowding the tank can block ultrasonic waves, reducing cleaning performance and risking damage.
- Using Hot Water: Hot water can warp retainers. Stick to cool or room-temperature water. Maintaining these habits is especially important for retainer hygiene while travelling.
- Wrong Cleaning Tablets: Harsh chemicals or unsuitable tablets can damage the retainer over time. Use tablets designed for dental appliances.
- Incorrect Cycle Times: Short cycles might leave debris behind, while long cycles can cause heat build-up, potentially harming your retainer.
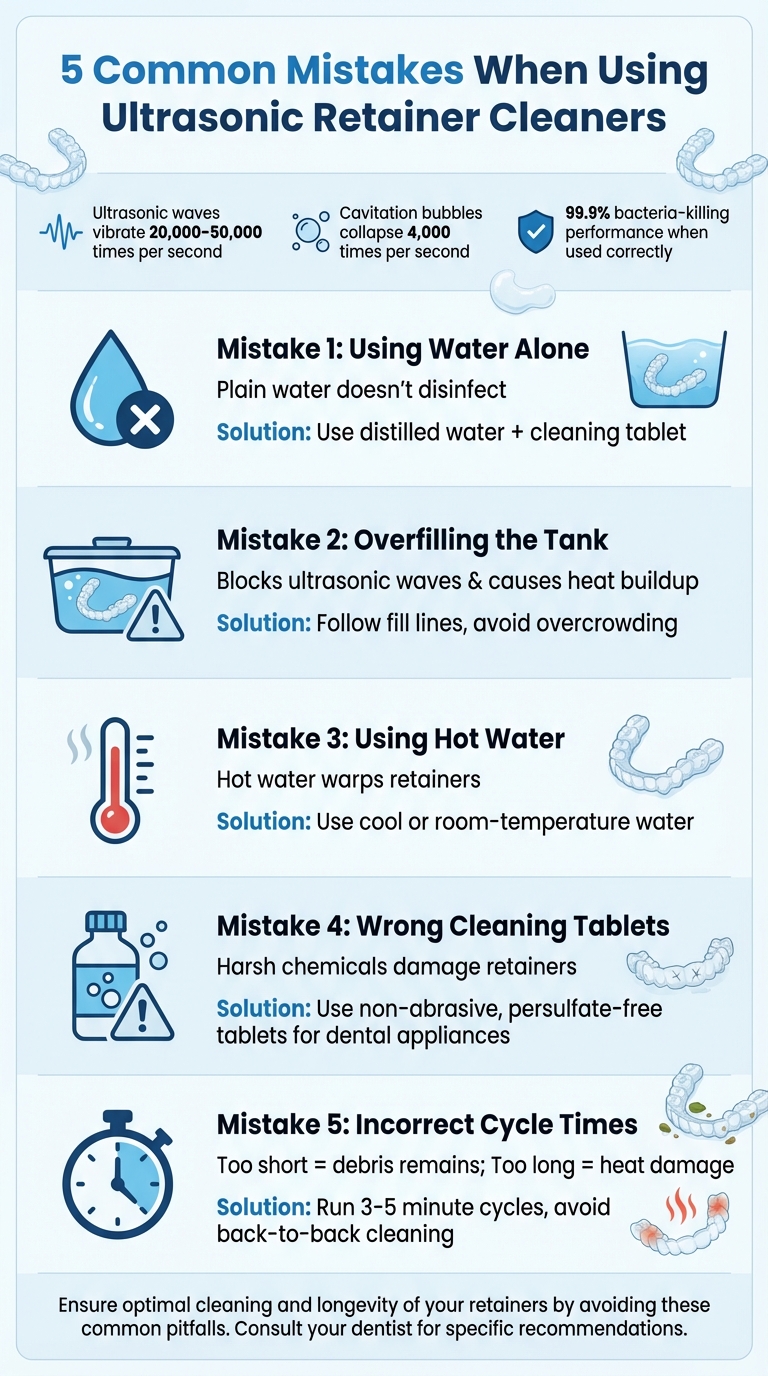
5 Common Mistakes When Using Ultrasonic Retainer Cleaners
The BEST Way to Clean Your Retainer (Avoid Bad Breath & Bacteria!)
sbb-itb-2be92ed
Common Mistakes When Using Ultrasonic Retainer Cleaners
Ultrasonic cleaners are highly effective when used correctly, but small mistakes can lead to less-than-ideal cleaning, damage to your retainer, or even a shortened lifespan for the device. Knowing what to avoid is essential to keep your retainer clean and your cleaner running smoothly.
Using Water Alone Without a Cleaning Solution
One common error is relying solely on plain water, thinking the ultrasonic waves will do all the work. While water can remove debris through cavitation, it doesn’t disinfect properly or remove all harmful microorganisms. Plus, it can lead to mineral build-up over time. To get the best results, pair distilled or filtered water with a non-abrasive, persulfate-free cleaning tablet. After the cycle, rinse your retainer with cool, clean water for a thorough finish [3][4][5][8].
Overfilling the Cleaning Tank
Adding too much water or cramming multiple items into the tank can seriously impact cleaning performance. Ultrasonic cleaners rely on cavitation, and overcrowding prevents the waves from reaching all parts of your retainer. Worse, overcrowding can cause heat to build up, which may warp the delicate materials of your appliance [5].
To avoid this, stick to the fill lines provided by the manufacturer and ensure there’s enough space around your retainer. This simple habit protects both your retainer and the ultrasonic cleaner itself [2].
Using Water That Is Too Hot
Water temperature is another critical factor to consider. Hot water can warp or permanently damage the plastic or acrylic materials used in retainers [4][5][10]. Even slight warping can affect the fit of your retainer, leading to discomfort or unintended tooth movement [2][4].
"Excessive heat deforms retainers; select cleaners designed for oral appliances to prevent damage" [8].
Keep in mind that ultrasonic cleaners naturally generate some heat during use. Starting with hot water only amplifies this effect. Avoid boiling water, dishwashers, or any external heat sources that could damage your retainer. Stick to cool or room-temperature water when filling the tank [3][8][10].
Choosing the Wrong Cleaning Tablets
Not all cleaning tablets are suitable for use with ultrasonic cleaners or dental appliances. Some contain abrasive chemicals that can scratch, cloud, or degrade the plastic over time. Always opt for cleaning tablets specifically designed for dental appliances and ultrasonic cleaners. These are typically non-abrasive and free of persulfates [3][5].
Avoid using household cleaners, bleach, or denture tablets not meant for ultrasonic cleaning. These can leave harmful residues or interfere with the cavitation process, reducing cleaning efficiency and potentially damaging your retainer.
Running Incorrect Cleaning Cycle Times
Timing matters when it comes to ultrasonic cleaning. Running cycles that are too short might leave behind residue, while excessively long cycles can cause heat buildup, risking damage to your appliance [2][3][4][8][11].
Most ultrasonic cleaners recommend cycles lasting between 3 and 10 minutes. A deep clean typically takes 3 to 5 minutes, which is enough time for the ultrasonic waves – vibrating at 20,000 to 50,000 times per second – to thoroughly clean your retainer [2][4][8][11]. Avoid back-to-back cycles to prevent unnecessary heat buildup and keep everything in optimal condition.
Risks of Incorrect Ultrasonic Cleaning
Improper ultrasonic cleaning can do more harm than good when it comes to maintaining your retainer. Beyond leaving your retainer less clean than expected, incorrect use can actually damage its structure and functionality. One major concern is structural damage. Using hot water or running overly long cleaning cycles can warp or even crack your retainer. When a retainer becomes warped, it may no longer fit properly, which can lead to your teeth shifting out of alignment – a frustrating and costly setback [5].
Another issue is material degradation. Harsh cleaning chemicals can break down the material of your retainer, leaving it damaged and potentially coated with harmful residues [5]. These damaged areas can develop tiny crevices, which become perfect hiding spots for bacteria. This makes it much harder to keep your retainer hygienic and safe to use.
"Putting a dirty retainer in your mouth is like applying bacteria and plaque directly to your teeth." – Dr. Chloe Harrington-Taylor, Dentist [8]
One of the most misleading risks is the false sense of security that comes with improper cleaning methods. For example, simply running a water-only cycle might make your retainer look clean by removing visible debris, but it won’t eliminate harmful bacteria [3]. Worse yet, if the ultrasonic cleaner’s tank isn’t cleaned regularly, it can actually become a breeding ground for bacteria, contaminating your retainer instead of sanitising it [5].
The consequences of these mistakes can be serious for your oral health. Retainers that aren’t properly cleaned can contribute to gum disease, and in extreme cases, may lead to the need for root canals or even tooth extractions [13]. Additionally, over-cleaning with prolonged cycles can weaken the retainer material, reducing its lifespan and forcing you to replace it more often [12]. All of this underscores the importance of using retainer cleaning techniques to protect both your retainer and your oral health.
How to Use an Ultrasonic Retainer Cleaner Correctly
Using your ultrasonic retainer cleaner the right way is crucial for keeping your orthodontic appliance in top shape and ensuring it stays effective. Follow these steps to get the best results while avoiding potential damage.
Start by preparing both your retainer and the cleaner’s tank. Before each use, inspect your retainer for cracks or loose parts since ultrasonic vibrations can make existing damage worse [6]. Then, check the cleaning tank to ensure it’s clean and free of leftover residue from earlier cycles [6]. Fill the tank with distilled or filtered cool water up to the maximum fill line – this prevents mineral build-up over time.
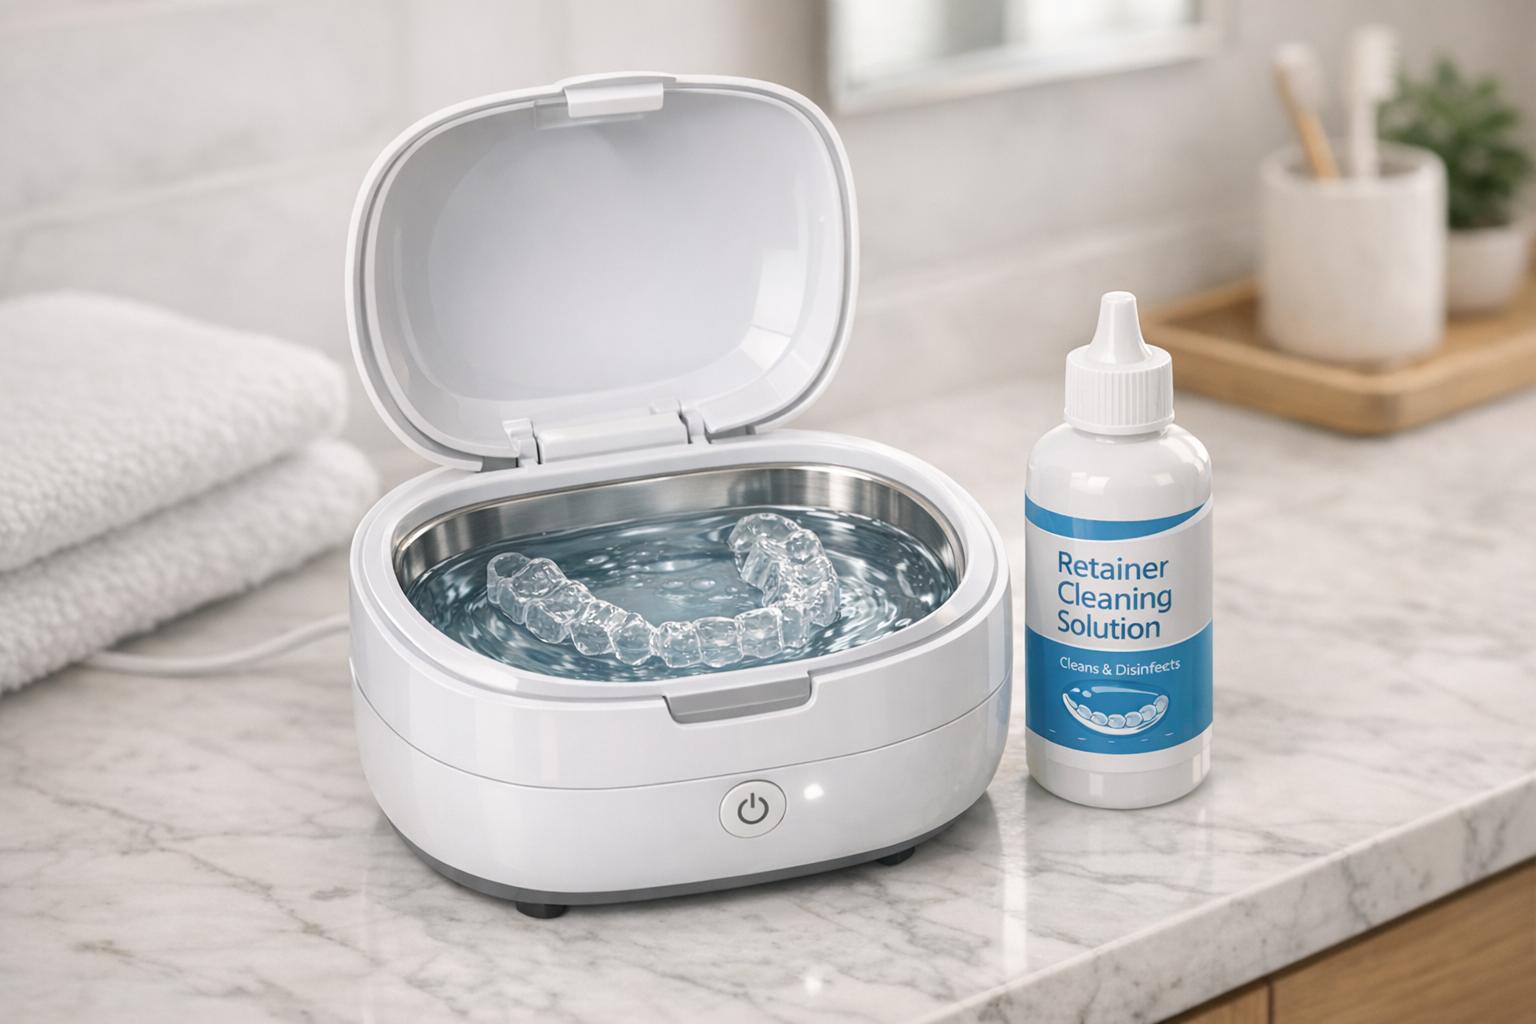
Next, enhance the cleaning process by adding the right solution. Drop in a retainer cleaning tablet or mix 1 teaspoon of baking soda into the water [14]. Stay away from harsh chemicals like bleach, vinegar, or mouthwash unless your manufacturer specifically recommends them – they can harm both your retainer and the machine [5]. Place your retainer in the cleaning basket, making sure it’s fully submerged for the ultrasonic waves to clean effectively [1] [3].
"The purpose of the white plastic tray is to allow more surfaces of the guard or other items to be cleaned by the ultrasonic waves." – Dylan Hao, Founder, JS Dental Lab [1]
Set the cycle time according to the manufacturer’s instructions, usually between 3 and 5 minutes [3]. Most dental ultrasonic cleaners operate at 42,000 Hz, creating thousands of tiny bubbles per second to remove debris [8]. Once the cycle is done, immediately rinse the retainer under cool water to wash away any leftover debris or cleaning solution [3]. Let it air dry on a clean towel before storing it in a breathable case [3].
To keep your ultrasonic cleaner working effectively, make it a habit to empty and rinse the tank after each use. Replace the cleaning solution regularly to prevent bacteria from building up. This simple routine ensures your cleaner stays hygienic and continues to deliver its 99.9% bacteria-killing performance [3].
How to Maintain Your Ultrasonic Cleaner
Taking care of your ultrasonic cleaner ensures it runs efficiently and lasts longer. Start by emptying the cleaning tank after every use. Leaving water or solution in the tank can encourage bacterial growth and mineral build-up, which you definitely want to avoid [15][5]. After emptying, rinse the tank thoroughly with clean water and dry it using a lint-free cloth to prevent water spots and corrosion [15][9]. A regular cleaning routine like this sets the stage for more thorough maintenance later on.
For a deeper clean, wipe down the interior tank weekly with a damp cloth and mild soapy water to remove any debris that may have settled at the bottom [17]. If you notice any stains on the stainless steel, a stainless steel cleaning powder can help. For minor scratches, fine sandpaper can smooth them out, which helps prevent debris from accumulating in those areas [15].
It’s also important to replace the cleaning solution every 1–2 cycles, or at least once a day if the solution looks cloudy or contaminated [15][3]. After refilling with fresh solution, run an empty cycle for 5–10 minutes to degas the liquid [15][1]. Always ensure the water level matches the manufacturer’s guidelines – running the cleaner with too little water can damage the transducers or overheat the heating elements [16][17].
Beyond cleaning, follow these safety tips to keep your cleaner in top condition. Avoid using bleach, acids, or flammable liquids in the tank, as these can harm the stainless steel and pose safety risks [15][1]. When you’re done using the cleaner, unplug it and store it in a dry place to prevent overheating or electrical issues [16][17]. If your model has UV lights, remember to keep the quartz glass covering the LEDs clean and clear for the best sanitising results [1].
Conclusion
Keep your ultrasonic retainer cleaner working effectively by steering clear of common missteps and using it correctly. This cutting-edge cleaning tool removes debris and tackles those hard-to-reach areas that manual brushing often misses. Thanks to the cavitation process – where bubbles form and collapse up to 4,000 times per second – it efficiently clears away plaque without damaging your retainer’s surface [1][7]. Plus, its gentle cleaning action helps prevent issues like warping, cracking, or scratching.
To keep your ultrasonic cleaner in top shape, make it a habit to empty the tank after every use and rinse it thoroughly. Proper care ensures the device continues to perform well [5]. Not only does this extend the life of your retainer, but it also supports your oral health by reducing the risk of bacteria buildup, which can cause bad breath and even gum disease [13][1]. By following these steps, you’ll safeguard your retainer and contribute to better oral hygiene overall.
FAQs
What is the best cleaning solution to use with an ultrasonic retainer cleaner?
For the best results, pair your ultrasonic retainer cleaner with a liquid ultrasonic cleaning solution or specially formulated cleaning tablets. These products are designed to thoroughly disinfect and remove plaque, keeping your retainer clean and hygienic. Plain water, on the other hand, won’t deliver the same cleaning power or sanitisation benefits.
What’s the best way to stop my retainer from warping when using an ultrasonic cleaner?
To keep your retainer in its proper shape, stick to cool or lukewarm water when using an ultrasonic cleaner, paired with a mild cleaning solution. Steer clear of hot or boiling water, as the heat can warp the plastic. Keep the cleaning cycle brief and always follow the manufacturer’s guidelines specific to your retainer to maintain its form.
What happens if I use the wrong cleaning cycle time for my retainer?
Using the wrong cleaning cycle time for your retainer can cause a range of problems. If the cycle is too short, it might not fully eliminate plaque, bacteria, or debris, leaving your retainer less than clean. On the flip side, running the cleaner for too long can harm your retainer by causing it to warp, crack, or lose its shape. This not only affects its fit but could also lead to discomfort or even injury when you wear it.
To keep your retainer in good condition, stick to the manufacturer’s guidelines for your ultrasonic cleaner. If you’re unsure about the best cleaning routine, it’s always a good idea to check with your dentist.
Related Blog Posts
- Ultimate Guide to Retainer Hygiene While Travelling
- Ultimate Guide To Retainer Cleaning
- Step-by-Step Guide: Cleaning Retainers with Ultrasonic Cleaners
- Ultimate Guide to Alcohol-Free Retainer Cleaning
Important Notice: Any surgical or invasive procedure carries risks. Before proceeding, you should seek a second opinion from an appropriately qualified health practitioner.
Individual results may vary. The information provided in this article is for educational purposes only and does not constitute medical advice.
Checkout Related Blogs


Get in touch with us
For more information, call us now to start feeling better. Or fill the form below to make appointment
The Latest News from Complete Smiles
How to Clean Clear Plastic Retainers
Checklist for Choosing Wearable Dental Devices
Checklist for Choosing Cloud AI Platforms in Dentistry

Complete Smiles Bella VistaAccepts All Major Health Funds, Including


