


Effect of Application Techniques on Bonding Success

Adhesive bonding success doesn’t just depend on the product – it’s all about how you apply it. The right technique can make restorations last longer, prevent microleakage, and reduce sensitivity. Here’s what you need to know:
- Key to Success: A strong hybrid layer is essential. It needs proper resin penetration and solvent evaporation to avoid voids and nanoleakage.
- Techniques Matter: Active application with a micro-brush improves resin infiltration. Solvent evaporation through gentle air-drying is critical.
- Three Main Methods:
- Etch-and-Rinse: Great for enamel bonding but requires precise moisture control.
- Self-Etch: Simplifies the process and works well for dentine but less effective on enamel.
- Universal Adhesives: Flexible – can be used in various modes for different clinical needs.
- Common Pitfalls: Over-drying dentine, inadequate solvent evaporation, and skipping separate light-curing for adhesives can weaken bonds.
For the best results, focus on surface preparation, proper isolation, and following bonding protocols. When done right, these steps can significantly improve restoration longevity.
Teeth Bonding Procedure | Front Tooth Filling to Repair Chipped Tooth
3 Main Adhesive Application Techniques
Dental professionals rely on three primary adhesive application methods: etch-and-rinse, self-etch, and universal adhesives. The etch-and-rinse method has been a long-standing favourite for bonding to enamel, while the self-etch technique simplifies the process by skipping the rinsing step. Universal adhesives offer versatility, allowing clinicians to adapt their approach by selecting etch-and-rinse, self-etch, or selective enamel etching based on the specific clinical scenario. Let’s take a closer look at each method, how they work, and their key benefits.
Etch-and-Rinse Technique
The etch-and-rinse (ER) method uses phosphoric acid, typically at concentrations between 30% and 40%, to prepare the tooth surface. This acid is applied for 15–30 seconds, creating porosities and exposing the collagen network on the tooth surface [6][7]. After etching, the tooth is rinsed with water for 15 seconds, and the surface is kept moist (a technique known as wet bonding) to prevent the collagen fibres from collapsing.
In three-step ER systems, primers and bonding resins are applied separately, while two-step systems combine these into one. The adhesive layers in three-step ER systems are about five times thicker than those in single-step self-etch adhesives, which helps distribute stress more evenly [5]. This technique is particularly effective for enamel bonding, as it achieves strong micromechanical interlocking [7][9]. However, controlling moisture levels is critical – over-wetting or over-drying the dentine can compromise the bond.
Self-Etch Technique
Self-etch (SE) adhesives simplify the bonding process by using acidic monomers to simultaneously etch and prime the tooth surface, eliminating the need for a separate rinsing step [9]. Instead of removing the smear layer, these adhesives modify and incorporate it into the hybrid layer. This makes them especially useful for dentine bonding, as they reduce the sensitivity to moisture control and lower the risk of post-operative sensitivity [7][9].
The pH of self-etch adhesives typically ranges from 1.5 to 3.2, resulting in more superficial dentine demineralisation compared to phosphoric acid [9][10]. While this makes them less effective for deep enamel etching, they are a reliable option for direct restorations in situations where moisture control is difficult. However, their shallower etching of enamel can sometimes lead to lower retention rates [8].
Universal Adhesives Technique
Universal adhesives, also called multi-mode systems, are designed for flexibility. They can be used in etch-and-rinse, self-etch, or selective enamel etching modes, depending on the clinical requirements [8][10]. Many universal adhesives contain functional monomers like 10-MDP, which form stable ionic bonds with calcium in hydroxyapatite. This nano-layering process improves bond durability beyond simple mechanical interlocking [7][10].
These adhesives are compatible with a wide range of materials, including tooth structures, zirconia, precious and non-precious metals, and composites [1][10]. When used in etch-and-rinse mode, universal adhesives show lower retention failure rates (2.4%) compared to self-etch mode (7.6%) [8]. For the best results, selective enamel etching with phosphoric acid for 15 seconds is recommended, even when applying the adhesive in self-etch mode on dentine [10].
Factors That Affect Bonding Outcomes
As mentioned earlier, achieving proper bonding relies heavily on technique. Elements like surface preparation, isolation, and hybrid layer formation are key to determining how long a restoration will last. The difference between a restoration that holds up for years and one that fails prematurely often lies in meticulous surface preparation, precise application techniques, and a solid understanding of hybrid layer formation. Research indicates that replacing failed restorations accounts for about 70% of all restorative dentistry in the United States [11], underscoring the importance of following bonding protocols for long-term success.
Surface Preparation and Isolation
Moisture contamination – whether from saliva or blood – poses one of the greatest risks to adhesive bonding. Proper isolation, such as using a rubber dam, is critical because adhesive cementation is highly sensitive to these contaminants [2]. Other surface contaminants, including saliva, blood, silicone fit checkers, try-in pastes, and gypsum residues, can significantly reduce bond strength [2].
Techniques like intraoral air-particle abrasion (APA) before cementation help remove biofilm, stains, and temporary cement residues, thereby improving bond strength to both dentine and enamel [2]. For glass ceramics, cleaning with phosphoric acid after try-in procedures effectively removes saliva and glass precipitates. However, phosphoric acid should never be used on polycrystalline ceramics like zirconia or metal alloys. The phosphate ions bind chemically to the surface, leaving no free sites for the MDP monomer, which weakens the bond [2]. Instead, proprietary zirconium-based cleaning pastes or sodium hypochlorite are recommended for these materials.
Additionally, scrubbing the adhesive into the dentine surface for at least 20 seconds enhances hybridisation and aids solvent evaporation [1][4]. These preparation steps are essential for reducing common errors during application.
Common Application Mistakes
Beyond surface preparation, common errors during application can severely compromise bond longevity. One frequent mistake is over-drying dentine in etch-and-rinse systems. This causes the collagen fibril network to collapse, creating a barrier that prevents resin monomers from penetrating and forming the hybrid layer [11]. To avoid this, the dentine should retain a "glossy wet" appearance [3].
Another issue is inadequate solvent evaporation. Residual solvents like ethanol, acetone, or water can interfere with resin polymerisation, create voids in the adhesive interface, and lead to nanoleakage [4]. Using a gentle air stream for 5–10 seconds before light-curing helps remove solvents without over-thinning the adhesive layer [4][5]. If solvents remain in the hybrid layer, they weaken the cured resin’s mechanical properties and reduce bond strength [4].
The co-curing technique – where the adhesive and the first layer of composite are cured simultaneously – can also undermine bond strength. Studies have shown that co-curing results in significantly lower bond strengths. For example, shear bond strength for Excite F dropped to 12.2 MPa compared to 21.7 MPa for Prime&Bond when cured conventionally [3]. To avoid this, always light-cure the adhesive layer separately, following the manufacturer’s instructions, before applying composite resin.
Hybrid Layer Depth and Bond Strength
The hybrid layer, where resin monomers penetrate a demineralised collagen layer, plays a critical role in bonding [1][4]. Its durability depends on how well the collagen and resin resist hydrolytic degradation over time. Incomplete resin infiltration leaves exposed collagen, which accelerates degradation, causing nanoleakage and eventual bond failure [3].
Thicker adhesive layers, especially those from three-step etch-and-rinse or two-step self-etch systems, enhance bond performance by reducing local stress and preventing crack propagation. However, if not properly thinned before curing, bonding agents can pool to a thickness of up to 500 µm [2], which weakens the bond.
Mastering these factors is essential for achieving durable and reliable bonds in clinical practice. By paying close attention to preparation, avoiding common errors, and understanding the hybrid layer’s role, clinicians can significantly improve restoration outcomes.
sbb-itb-2be92ed
Bond Strength and Clinical Performance Comparison
Dental Adhesive Techniques Comparison: Bond Strength and Clinical Performance
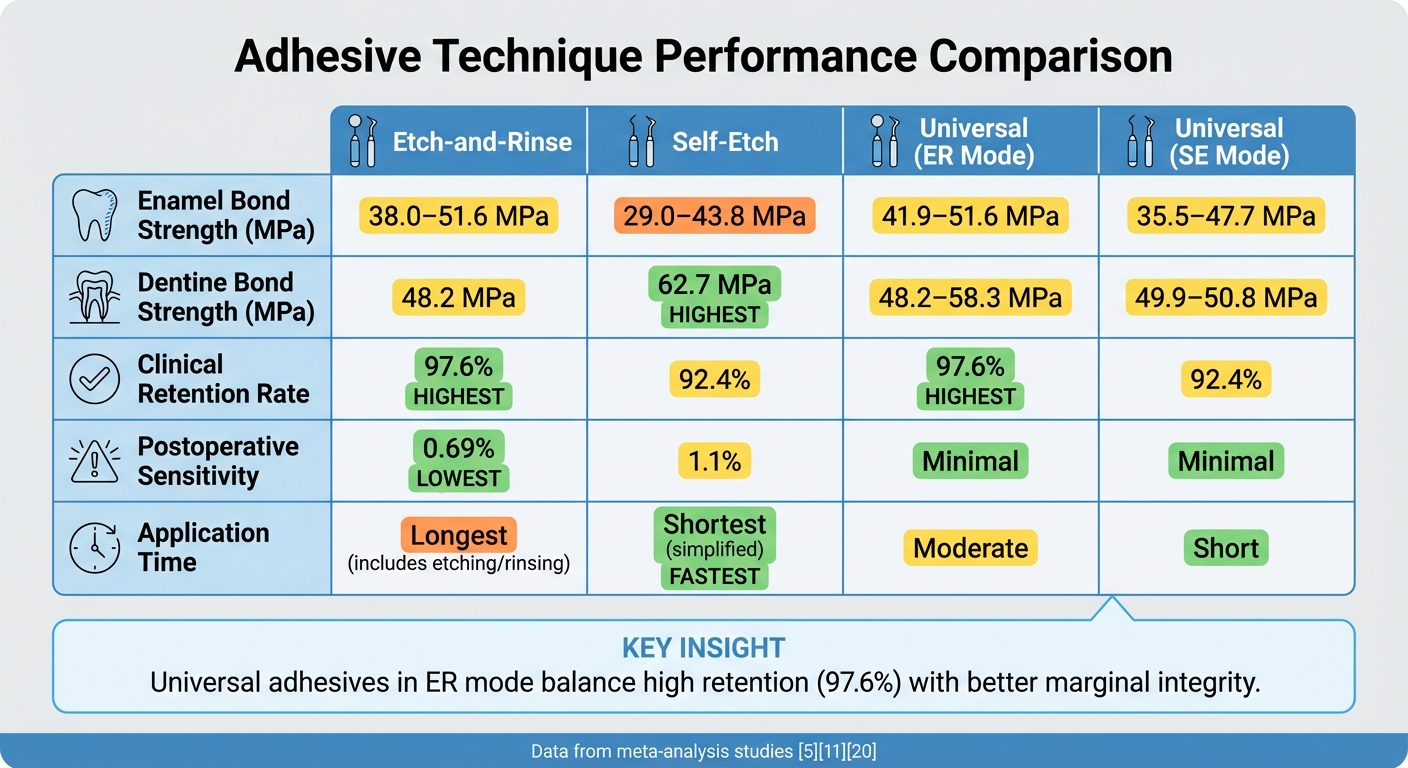
When it comes to adhesive techniques, understanding their bond strength and clinical performance is key for choosing the most effective approach. While laboratory tests measure bond strength in megapascals (MPa), clinical outcomes like retention rates, marginal integrity, and postoperative sensitivity offer a broader view of long-term success. The table below highlights these outcomes across various techniques.
The etch-and-rinse method consistently delivers better clinical retention compared to self-etch techniques. According to meta-analysis data, universal adhesives in etch-and-rinse mode showed a failure rate of just 2.4% (18 out of 763 restorations), whereas self-etch mode had a higher failure rate of 7.6% (58 out of 759 restorations) [8]. This difference stems from the superior enamel preparation achieved with phosphoric acid etching, which creates deeper microporosities than acidic monomers can.
Postoperative sensitivity is low across all techniques, with etch-and-rinse showing a 0.69% incidence rate compared to 1.1% for self-etch [8]. Both approaches also resist secondary caries well, with rates of 0.27% for etch-and-rinse and 0.70% for self-etch [8]. However, when it comes to marginal adaptation and staining, etch-and-rinse has the edge. Marginal issues occur in 12.9% of cases for etch-and-rinse, compared to 21.1% for self-etch, and marginal staining rates are 12.2% versus 20.1%, respectively [8].
Technique Comparison Table
| Technique | Enamel Bond Strength (MPa) | Dentine Bond Strength (MPa) | Clinical Retention Rate | Postoperative Sensitivity | Application Time |
|---|---|---|---|---|---|
| Etch-and-Rinse | 38.0–51.6 [5] | 48.2 [13] | 97.6% [8] | 0.69% [8] | Longest (includes etching/rinsing) |
| Self-Etch | 29.0–43.8 [5] | 62.7 [13] | 92.4% [8] | 1.1% [8] | Shortest (simplified) |
| Universal (ER Mode) | 41.9–51.6 [5] | 48.2–58.3 [13] | 97.6% [8] | Minimal | Moderate |
| Universal (SE Mode) | 35.5–47.7 [5] | 49.9–50.8 [13] | 92.4% [8] | Minimal | Short |
Overall, universal adhesives in etch-and-rinse mode strike a balance between high clinical retention and better marginal integrity. While self-etch techniques are faster and excel in dentine bonding, the etch-and-rinse approach stands out for its superior enamel retention and marginal performance. A selective enamel etching strategy – using phosphoric acid on enamel while applying a self-etch approach to dentine – blends the strengths of both methods [12].
Best Practices for Reliable Bonding
Summary of Findings
When it comes to adhesive techniques, there’s no one-size-fits-all solution for clinical scenarios. Etch-and-rinse methods remain the go-to choice for bonding to enamel because they create a dependable mechanical interlock. However, they require precise moisture control and are highly technique-sensitive. On the other hand, self-etch and universal adhesives simplify the process and generally reduce postoperative sensitivity. That said, their performance on unprepared enamel can fall short unless phosphoric acid is applied beforehand. A selective etching approach – using phosphoric acid on enamel while employing self-etch techniques on dentine – strikes a balance, leveraging the strengths of both methods.
For durability, three-step etch-and-rinse and two-step self-etch systems outperform one-bottle systems over the long term. Actively applying adhesive for 20 seconds improves resin infiltration and bond strength. Equally important is thorough solvent evaporation, achieved through gentle air-drying, to prevent voids that could lead to nanoleakage and early bond failure [1][2][14].
These findings offer practical steps to enhance bonding outcomes.
Practical Recommendations
To maintain optimal bonding conditions, use a rubber dam for moisture control, preventing contamination from saliva or blood. Actively apply adhesive for 20 seconds to ensure monomers penetrate the collagen network effectively [1][14]. Follow this with gentle air-drying for 10 seconds to fully evaporate any solvents [14].
"The active application technique could be recommended as a gold standard for the application of an adhesive system to dentin." – Rim Bourgi et al., Polymers [1]
For indirect restorations, Immediate Dentine Sealing (IDS) after tooth preparation protects the pulp and strengthens the bond over time [2]. Applying a double layer of adhesive or adding a hydrophobic resin coat can further seal the interface, minimising water sorption [14]. To prevent oxygen inhibition during light-curing, use a glycerine-based gel over restoration margins [2]. If contamination occurs during a try-in, clean glass ceramics with phosphoric acid. However, avoid using phosphoric acid on zirconia, as it blocks the chemical binding sites essential for MDP-based primers [2].
FAQs
How do etch-and-rinse and self-etch adhesive techniques differ?
The key difference between etch-and-rinse and self-etch adhesive techniques lies in how each prepares the tooth surface for bonding.
With the etch-and-rinse method, phosphoric acid is applied to etch the enamel and dentine separately. After this, the surface is rinsed and dried. This approach delivers a strong bond to enamel, making it well-suited for procedures like indirect restorations.
In contrast, self-etch adhesives simplify the process by combining etching and priming into a single step using acidic monomers. This technique is easier to use, lowers the risk of over-etching, and works especially well for bonding to dentine. It’s commonly used in direct composite restorations.
Each method has its advantages, and the choice depends on the clinical situation and the materials involved.
Why is solvent evaporation important for successful adhesive bonding?
Solvent evaporation is crucial for achieving strong adhesive bonds. When the solvent doesn’t completely evaporate, it can leave behind residues that disrupt the adhesive’s polymerisation process. This often results in weaker bonds and compromises the material’s durability.
Following the recommended application techniques is essential for success. Ensuring proper evaporation leads to a stronger, more dependable bond, reducing the likelihood of failures during dental procedures.
Why is proper surface preparation important for long-lasting dental bonding?
Getting the surface right is a crucial first step for strong and lasting dental bonding. Proper preparation clears away contaminants like debris, plaque, and moisture, which can interfere with the adhesive’s ability to do its job. Beyond just cleaning, this step also modifies the surface to help the adhesive penetrate and bond more effectively.
The payoff? A much lower chance of bond failure or wear over time. By focusing on this essential step, dental professionals set the stage for stronger, longer-lasting results in bonding treatments.
Related Blog Posts
- Advances in Dental Adhesives: What to Know
- Chemical Adhesion in Dental Bonding: How It Works
- Ceramic Bracket Bonding: Adhesive Types Compared
- Bond Strength of CAD/CAM Materials with Adhesives
Important Notice: Any surgical or invasive procedure carries risks. Before proceeding, you should seek a second opinion from an appropriately qualified health practitioner.
Individual results may vary. The information provided in this article is for educational purposes only and does not constitute medical advice.
Checkout Related Blogs


Get in touch with us
For more information, call us now to start feeling better. Or fill the form below to make appointment
The Latest News from Complete Smiles
How to Clean Clear Plastic Retainers
Checklist for Choosing Wearable Dental Devices
Checklist for Choosing Cloud AI Platforms in Dentistry

Complete Smiles Bella VistaAccepts All Major Health Funds, Including


