


Bone Graft Healing Stages Explained
A dental bone graft is a process to restore jawbone strength and volume, often necessary for dental implants. Healing occurs in five stages over several months. Here’s what you need to know:
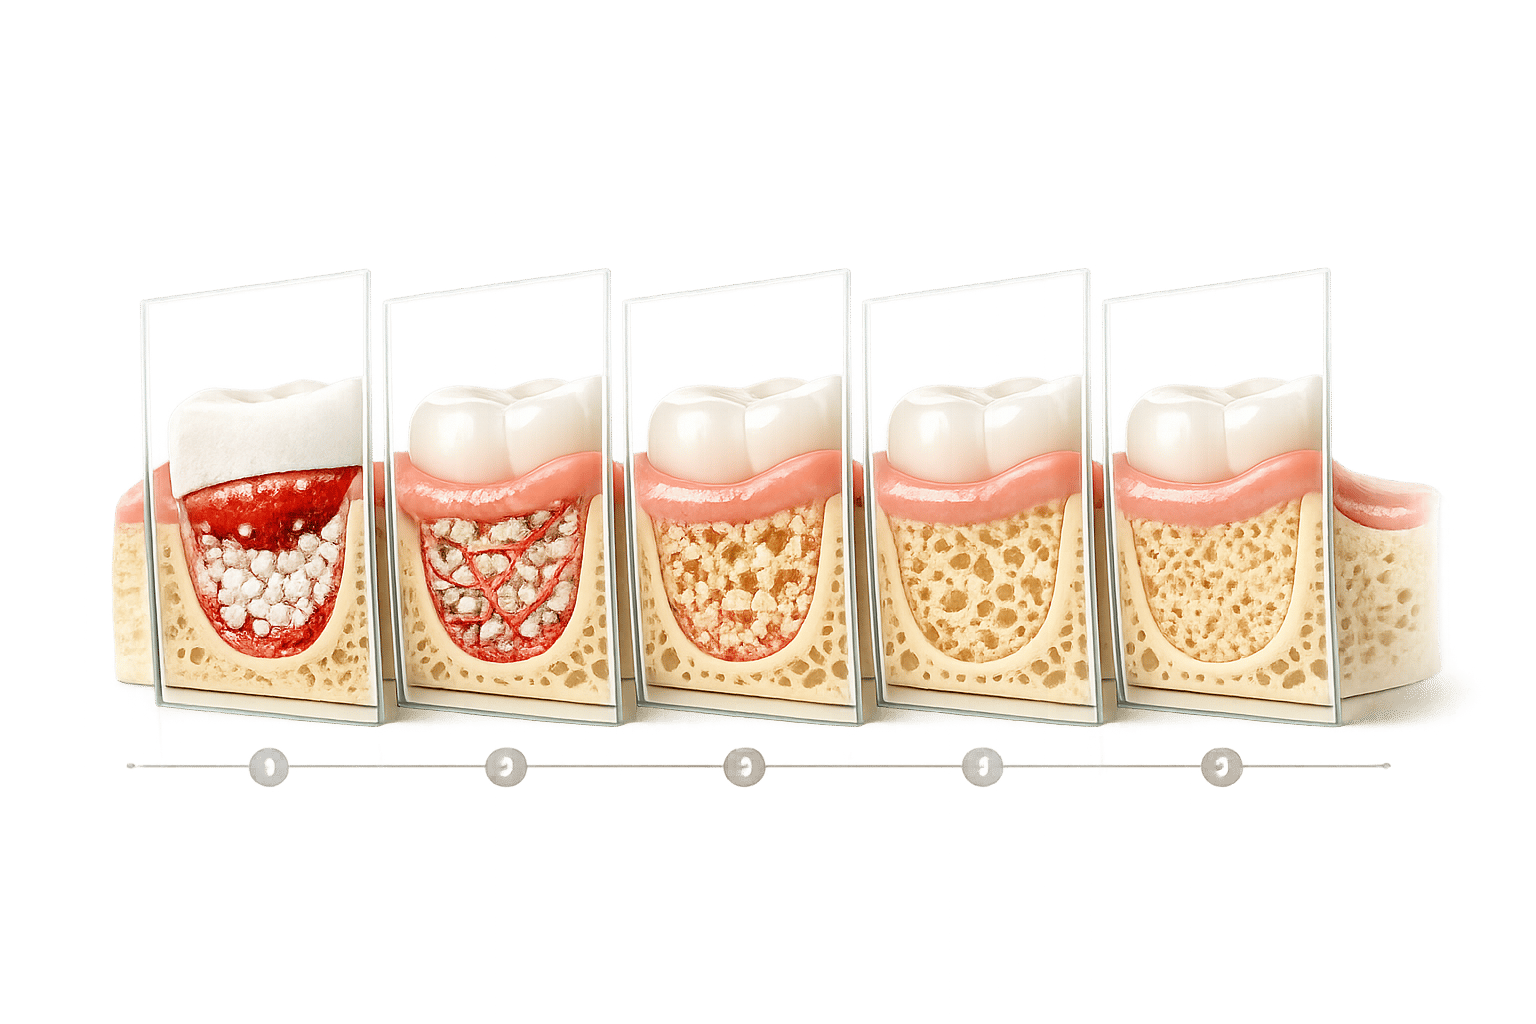
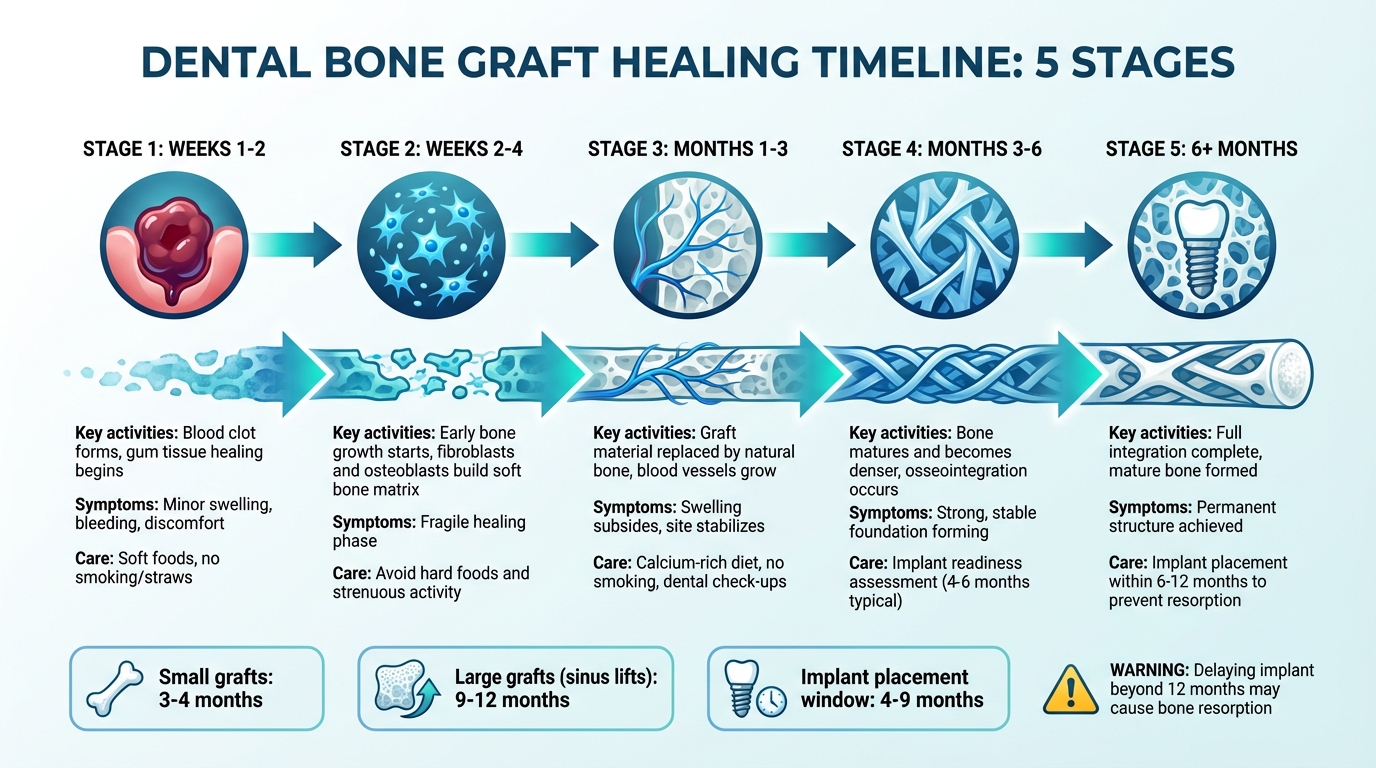
- Stage 1 (Weeks 1–2): Blood clot forms, gum tissue begins healing. Minor swelling, bleeding, and discomfort are normal. Stick to soft foods and avoid smoking or straws.
- Stage 2 (Weeks 2–4): Early bone growth starts. Fibroblasts and osteoblasts work to build a soft bone matrix. Avoid hard foods and strenuous activity.
- Stage 3 (Months 1–3): Bone integration begins. The graft material is replaced by natural bone, creating a scaffold for stability.
- Stage 4 (Months 3–6): Bone matures, becoming denser and stronger. Dentists may assess readiness for implants.
- Stage 5 (6+ Months): Full integration occurs, forming a stable foundation for implants. Long-term care, including good oral hygiene and a nutrient-rich diet, is critical.
Recovery time depends on factors like graft material, overall health, and habits. Smoking, poor diet, or infections can slow healing. Regular dental check-ups and following aftercare instructions are essential for success.
5 Stages of Bone Graft Healing Timeline
How to Tell If Your Bone Graft Is Healing Properly | Bone Graft Academy
Stage 1: First 1-2 Weeks After Surgery
The first couple of weeks after surgery are all about protecting the graft site while your body begins its natural repair process. This period is crucial for setting the foundation for proper bone integration in the months to come. Experiencing minor bleeding, swelling, and bruising within the first 24 to 48 hours is completely normal [1]. During this time, a blood clot forms at the graft site to shield it and kickstart the healing process [5]. Here’s how you can manage bleeding, pain, and support soft tissue recovery effectively.
Controlling Bleeding and Swelling
Swelling tends to peak between 48 and 72 hours post-surgery. To manage it, apply ice packs to your jaw in 20-minute intervals during the first two days, and keep your head elevated with extra pillows while resting. If you notice minor bleeding, gently press a sterile gauze pad against the area – avoid spitting or rinsing vigorously, as this could disturb the essential blood clot. You might also spot tiny bone fragments resembling grains of sand during the initial recovery days, which is entirely normal [1]. These steps help set the stage for the healing process.
Pain Management and Medication
Follow your surgeon’s instructions for taking prescribed pain relievers and antibiotics, and be sure to complete the full course, even if you start feeling better. Some surgeons may recommend avoiding NSAIDs, like ibuprofen or naproxen, as they could potentially slow down bone healing. Alcohol should also be avoided for at least two weeks, as it can interfere with your medications and delay recovery. Keep an eye out for warning signs like a fever over 38.3°C, pus drainage, or worsening pain after the first week – if any of these occur, contact your surgeon immediately [1].
Soft Tissue Healing
During the first 14 days, your body focuses on closing the gum tissue over the graft site through a process called granular tissue formation. Wait at least 24 hours before starting gentle rinses with warm salt water or any prescribed antiseptic solutions. You can resume brushing the day after surgery, but use a soft-bristled brush and avoid the surgical area. Stick to soft, cool foods like yoghurt, mashed potatoes, or smoothies, and steer clear of anything hot, spicy, or crunchy. Avoid using straws, as the suction could dislodge the clot. Most importantly, refrain from smoking or vaping during this time – nicotine reduces blood flow and oxygen supply, which are vital for tissue healing.
Stage 2: Weeks 2-4 – Early Bone Development
Once the initial soft tissue healing is underway, your body shifts gears to focus on early bone growth. Between the second and fourth weeks, a lot happens beneath the surface. This is a critical repair phase where the graft begins to merge with your natural bone. At this stage, the graft acts as a temporary scaffold, while new blood vessels grow into the area to deliver oxygen and nutrients essential for bone cell development. Simultaneously, fibroblasts create a collagen network that helps guide osteoblasts to deposit osteoid – a soft, unmineralised bone matrix that will eventually harden into mature bone. These early developments are key for osseointegration, the process where the graft and jawbone gradually fuse into a single, solid structure. This groundwork ensures the stronger integration that will follow in later stages [10][11][12].
New Bone Cell Formation
The groundwork laid during the initial clot and soft callus stages continues to evolve. Fibroblasts build a collagen framework that directs osteoblasts to deposit osteoid. However, this early soft callus is fragile and lacks mechanical strength, so it’s crucial to avoid putting stress on the area. Dr. Iain H. Kalfas from the Cleveland Clinic Foundation underscores this point:
"the area is very weak in the first 4 to 6 weeks of the healing process and requires adequate protection in the form of bracing or internal fixation."
While these early steps are vital, complete internal bone bonding takes significantly longer to achieve [11][12].
Diet and Activity Limits
To support the healing process, stick to a soft, nutrient-rich diet. Foods like yoghurt, scrambled eggs, mashed potatoes, and smoothies are excellent choices. Avoid anything hard, crunchy, or chewy – like nuts, seeds, chips, or crusty bread – as these can disrupt the delicate developing bone and blood vessels.
Activity also needs to be limited during this phase. Strenuous exercise, heavy lifting, or anything that raises your blood pressure could jeopardise the stability of the graft. Keep your oral hygiene gentle – brush areas away from the graft as usual, but avoid brushing directly over it until your dentist gives the green light.
Stay vigilant for any warning signs, such as a foul taste, unusual discharge, or worsening pain after initial improvement. If you notice any of these, reach out to your healthcare provider right away [11].
Stage 3: Months 1-3 – Bone Integration
After the initial bone development phase, the focus shifts to integration. During this stage, spanning months one to three, the graft serves as a biological scaffold. Osteoclasts begin breaking down the graft material while osteoblasts deposit new bone, gradually blending it with your jaw. Blood vessels also grow into the graft, delivering the oxygen and nutrients needed for this process. Dr Ayoub Elhabbazi explains it well:
"Think of a bone graft like a foundation or scaffold. It’s similar to how a support stick helps a young plant grow straight. The graft provides a base for new cells and blood vessels to grow, so your body can gradually replace it with real, living bone." [13]
Although the graft itself isn’t living tissue and doesn’t fuse directly, your natural bone steadily replaces it, improving the density and stability of your jaw over time. [13]
Graft Hardening and Bone Strengthening
As the graft integrates, the surgical site begins to stabilise. Swelling and tenderness subside, and the gum tissue starts to look healthy. This strengthening process allows for the gradual return to normal chewing, though it’s still wise to avoid hard or crunchy foods until your dentist gives the go-ahead.
Be aware of any warning signs during this phase. Loose material, gum recession, or sudden pain and swelling could indicate complications – reach out to your dentist immediately if these occur. Habits like grinding or clenching your teeth should also be avoided, as they can interfere with the integration process. To support bone health, focus on a diet rich in calcium, vitamin D, and protein. Foods like leafy greens, dairy products, and lean meats are excellent choices. And above all, avoid smoking or using nicotine products, as nicotine restricts blood flow and can hinder the graft’s ability to fuse with your natural bone.
Monitoring Progress with Dental Visits
Regular dental check-ups are crucial during this stage. Dentists often schedule follow-ups around the third and sixth weeks to examine the graft site, monitor gum healing, and use X-rays to track changes in bone density and graft replacement [9]. If a non-absorbable membrane was used in your procedure, it might be removed during one of these visits. Even if everything feels fine, don’t skip these appointments – they’re key to catching and addressing any potential issues early.
Stage 4: Months 3–6 – Bone Maturation
From months 3 to 6, the bone graft enters a crucial phase of maturation. This is when natural bone begins replacing the graft material, creating a strong and durable structure [5]. Known as osseointegration, this process ensures the graft bonds seamlessly with your existing jawbone [11]. As the bone density increases, it forms a reliable base for dental implants. Smaller grafts, such as those used for socket preservation after a single tooth extraction, generally mature within 3–4 months. In contrast, larger procedures like ridge augmentations or sinus lifts may take up to 6–9 months to fully stabilise [2]. Let’s look at how this fusion and densification support dental implant success.
Complete Fusion and Increased Density
During this stage, the graft fully integrates with your natural bone. The surrounding jawbone becomes denser and more robust, providing a solid foundation for future dental procedures [8]. As Joshua M. Ignatowicz, DMD & Associates, explains:
"Strong, mature bone supports long-term implant success and bite stability." [11]
To support this natural process, maintain a balanced diet rich in calcium – found in dairy products and leafy greens – and vitamin D, which you can get from fatty fish or egg yolks [8]. If you grind your teeth at night, consider using a night guard to protect the maturing bone. These steps help ensure the graft matures into a stable base for dental implants.
Evaluating Readiness for Dental Implants
Dentists use X-rays or 3D CT scans to confirm that the graft has fused completely and that the area is firm and stable [8]. Most patients are ready for implant placement within 4 to 6 months [2]. Delaying beyond this period can lead to bone resorption, which may compromise the graft’s integrity [6]. If you experience ongoing discomfort or suspect the graft is not secure, contact your oral surgeon without delay.
sbb-itb-2be92ed
Stage 5: 6+ Months – Full Integration and Long-Term Results
Once you pass the six-month mark, your bone graft enters its final phase. Here, immature bone is replaced by mature, strong bone that ensures long-term implant stability. This transformation relies on the combined efforts of bone-resorbing cells (osteoclasts) and bone-forming cells (osteoblasts). Everyday activities like chewing play a role in encouraging bone adaptation. For larger grafts, such as sinus lifts or ridge augmentations, this consolidation process can take anywhere from 9 to 12 months [10]. This stage paves the way for the final remodelling of the bone, as outlined below.
Final Bone Remodelling
Bone remodelling kicks off around the three-month mark and continues well beyond 12 months. Shady Salem, DDS, highlights the importance of this stage:
"The strength of the new bone determines how well it can support implants and prevent further loss of bone. While healing can take longer for some patients, once the bone graft reaches full maturity, the results can last a lifetime." [2]
During this time, the bone achieves its permanent structure and maximum density. However, without the stimulation provided by a dental implant, the newly formed bone may start to shrink (resorb) within 6 to 12 months [8, 16]. To avoid this, it’s essential to schedule your implant placement within this timeframe. Once the bone has fully remodelled, the focus shifts to maintaining these results through proper care.
Ongoing Care and Complication Prevention
Even after the bone graft has fully matured, ongoing care is essential to avoid complications. Maintaining excellent oral hygiene is key – use a soft-bristled toothbrush and antiseptic rinses as recommended by your dentist to minimise infection risks. Regular dental check-ups and imaging are also crucial for monitoring bone density and ensuring graft stability [7, 8].
Be vigilant about warning signs like pus, an unusual taste, gum recession, or visible changes in the treated area. If you notice any of these, consult your dentist immediately. Additionally, avoiding smoking is critical, as tobacco can weaken bone density and compromise long-term results. Supporting your recovery with a nutrient-rich diet – especially foods high in calcium, vitamin D, and phosphorus – can further aid the ongoing mineralisation of your remodelled bone.
What Affects Healing Time
Bone graft healing isn’t just about the surgical process; individual factors play a big role in how quickly and successfully recovery happens. While the stages of healing follow a general timeline, the specifics can vary widely depending on several key elements.
Healing times can range significantly. Depending on the graft material, your overall health, and how well you care for the surgical site, recovery could take as little as three months – or stretch closer to a year.
Types of Graft Materials
The type of graft material used has a major impact on healing speed. Autografts – bone taken from your own body, often from the hip or jaw – are considered the top choice. Why? They contain living bone cells that actively encourage faster healing. As Maria Pia Ferraz explains:
"healing time is also dependent on the material used, with autologous bone being the most rapidly vascularized and, therefore, the most osteogenic of all materials currently available" [15].
However, the downside is that autografts require an additional surgical site, which can add to recovery time and discomfort.
Other options, like allografts, xenografts, and synthetic materials, act as scaffolds for new bone growth but integrate more slowly since they lack living cells. On the plus side, these alternatives eliminate the need for a second surgical site [15][1]. Beyond the material, personal health and habits play a critical role in how quickly recovery progresses.
Health and Lifestyle Factors
Your overall health and daily habits can either speed up or slow down recovery. Smoking and nicotine use, even through patches, is a major roadblock. Nicotine reduces blood flow, which limits the oxygen and nutrients your body needs to heal. As MedlinePlus warns:
"If you smoke, the graft is more likely to fail. Be aware that nicotine patches slow healing just like smoking does" [7].
For the best results, it’s recommended to quit smoking for at least two weeks after surgery, though quitting for good is even better.
Age is another factor – generally, younger people heal faster than older individuals. Chronic conditions like diabetes, osteoporosis, or autoimmune disorders can also slow the process by interfering with nutrient delivery. Certain medications, such as steroids, immunosuppressants, and NSAIDs (like ibuprofen or naproxen), may further delay healing [7][16]. Always check with your dentist before taking any medication during recovery. Additionally, a balanced diet rich in calcium, vitamin D, protein, and vitamin C is essential for bone repair. Alongside these factors, avoiding infection is crucial for a smooth recovery.
Infection Risks and Complications
Infections can disrupt healing and lead to serious complications. Signs to watch for include redness, swelling that worsens after the third day, pus, or a foul smell at the surgical site. A fever of 38.3°C or higher is a red flag and needs immediate attention [1]. Graft failure can happen if the material doesn’t integrate properly with your bone. Symptoms like ongoing pain, loose teeth near the graft, or noticeable loss of graft material may indicate an issue.
Protecting the surgical site is vital, especially in the early days. Avoid anything that could dislodge the blood clot, as this increases the risk of dry socket or graft displacement. Stick to soft foods like yoghurt, mashed potatoes, or smoothies, and steer clear of crunchy or spicy foods that might irritate the area. Sleeping with your head elevated using extra pillows can help minimise swelling and ease pressure on the graft site. If you notice significant chunks of graft material coming loose – beyond the normal tiny, sand-like granules – contact your dentist immediately.
How to Support Healing
Building on the recovery stages described earlier, these steps can help your graft heal effectively. While your body does most of the work, you can create the best conditions for recovery by focusing on your diet, maintaining proper hygiene, and staying alert to any potential issues.
Foods That Support Recovery
What you eat plays a big role in how well your body heals. A diet rich in protein and nutrients is key. Soft, high-protein foods like scrambled eggs, Greek yoghurt, mashed beans, tofu, and flaked fish are excellent options. Calcium and vitamin D sources, such as fortified milk, soft cheeses, and leafy greens, can strengthen your recovery. Omega‑3-rich foods like mashed avocado and pureed salmon, along with vitamin C-packed fruits, also support the process. For iron, try pureed lentils or cooked spinach to help oxygen reach healing tissues [17].
Start with liquids like smoothies, broths, and milkshakes for the first three days. By day four, you can move to soft foods like mashed potatoes, applesauce, and yoghurt. From weeks 2 to 4, introduce soft solids such as pasta, steamed vegetables, and shredded chicken. Stay hydrated by drinking at least eight glasses of water daily [20][21][18][19]. To minimise swelling, avoid very hot foods and drinks during the first 24 to 48 hours, and limit caffeine to prevent dehydration [18][20][17][19].
Cleaning Your Mouth Safely
Oral hygiene is essential but needs to be approached carefully to avoid disturbing the graft. For the first 24 hours, avoid rinsing or spitting to allow the blood clot to stabilise [3]. After this, gently rinse with a warm saltwater solution or a prescribed antibacterial mouthwash. Instead of spitting, let the liquid drip out to avoid dislodging the clot [14][3]. Follow the earlier recommendations for cleaning the rest of your mouth, using a soft-bristled toothbrush while steering clear of the surgical area [4][3]. Avoid touching the graft with your tongue or fingers, as this could introduce bacteria or disturb the healing process [4][1].
During the first few days, you might notice small, sand-like particles of bone material – this is usually normal unless a significant amount is lost. Sleeping with your head elevated can help reduce swelling and make oral care more comfortable [4][1].
Warning Signs to Watch For
Most symptoms should start improving by the third day. However, if you notice any of the following, contact your dentist immediately:
- Pain that worsens after day three or persists beyond the first week [1][11].
- Heavy bleeding that doesn’t stop with firm pressure [1].
- Signs of infection, such as pus, an unusual taste or odour, or a fever above 38.3°C [1].
- Swelling that continues to increase after peaking at 48 to 72 hours [1][11].
- Large pieces of graft material coming loose or the graft feeling unstable [1][11].
- Gum recession or stitches coming undone too early [1].
These symptoms serve as an extension of the earlier recovery alerts, ensuring you know when to act. As Joshua M. Ignatowicz from DMD & Associates puts it:
"We’d rather hear from you and reassure you than have you worry at home" [11].
If you’re unsure about anything, reaching out early can prevent small problems from turning into larger complications.
Conclusion
Bone graft healing unfolds in five distinct stages, beginning with blood clot formation in the first two weeks and culminating in full bone remodelling at six months or later. Each step – clot formation, inflammation, blood vessel growth, mineralisation, and bone maturation – plays a crucial role in ensuring the graft successfully supports a dental implant. Over time, the graft material is replaced with living bone, ready to anchor an implant. For most patients, implants can be placed between four and nine months after surgery [6][10].
To support graft integration, patients should focus on proper nutrition, gentle oral hygiene, and avoiding smoking. These measures are key to promoting healing and ensuring long-term success.
Regular dental check-ups, including imaging, are vital to track the graft’s progress and determine the optimal time for implant placement. As the West Periodontics & Dental Implants Team advises:
"Through regular follow-ups, we carefully monitor your bone development to time implant placement perfectly. Remember that grafted bone needs the stimulation of an implant within 6–12 months, or it may begin to shrink."
Delaying implant placement beyond 12 months can lead to bone resorption, which might require another graft procedure [6][10].
FAQs
How long does it usually take for a bone graft to heal completely?
The recovery period for a bone graft usually spans 4 to 6 months. During this phase, the graft fuses with your natural bone, forming a solid and stable base.
However, the exact healing time can differ based on factors such as the graft’s size, its location, and your general health. Sticking to your dentist’s aftercare guidelines and practising excellent oral hygiene can play a key role in promoting healing and achieving the best results.
What factors can delay the healing of a bone graft?
Several things can delay the healing of a bone graft. Smoking is a major factor, as it limits blood flow and reduces oxygen delivery to the graft site. Medical conditions like diabetes or a compromised immune system can also slow down the body’s ability to heal naturally. Additionally, larger or more complicated grafts – especially in areas like the upper jaw where blood supply is lower – can take more time to recover.
To aid in the healing process, it’s crucial to stick to your dentist’s aftercare instructions, practice excellent oral hygiene, and steer clear of habits like smoking that might disrupt recovery.
How long after a bone graft can dental implants be placed?
The timing for getting dental implants after a bone graft varies based on factors like the graft’s type, size, and your body’s healing speed. Typically, implants are placed 3 to 6 months after the grafting procedure.
This period gives the graft enough time to bond with your natural bone, forming a solid base for the implant. Your dentist or oral surgeon will track your healing and suggest the best time for implant placement to achieve optimal results.
Related Blog Posts
- When to Place Implants After Bone Grafting
- How Pain Is Controlled During Bone Grafting Surgery
- Gum Grafting Healing Stages: Day-by-Day Guide
- Advances in Bone Grafting for Implant Stability
Important Notice: Any surgical or invasive procedure carries risks. Before proceeding, you should seek a second opinion from an appropriately qualified health practitioner.
Individual results may vary. The information provided in this article is for educational purposes only and does not constitute medical advice.
Checkout Related Blogs


Get in touch with us
For more information, call us now to start feeling better. Or fill the form below to make appointment
The Latest News from Complete Smiles
How to Clean Clear Plastic Retainers
Checklist for Choosing Wearable Dental Devices
Checklist for Choosing Cloud AI Platforms in Dentistry
Complete Smiles Bella VistaAccepts All Major Health Funds, Including


