


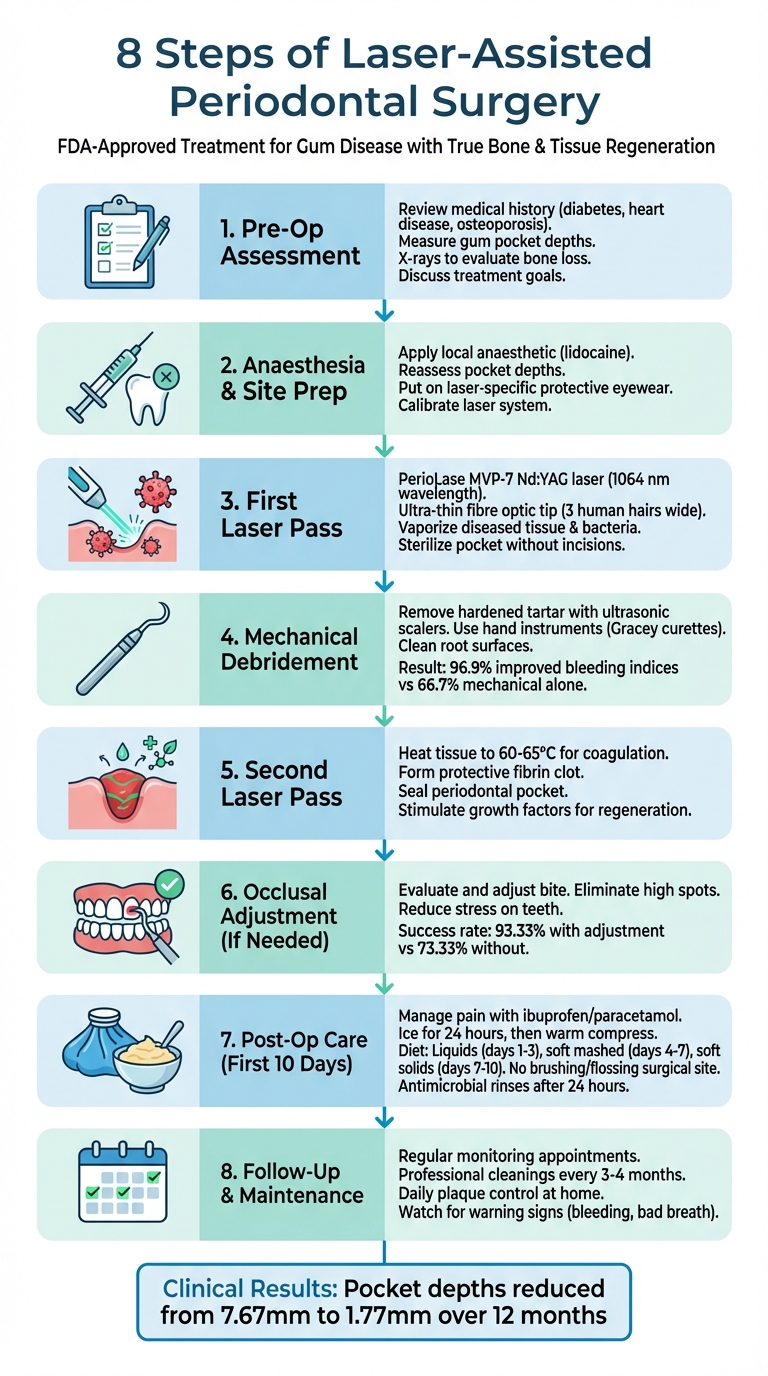
8 Steps of Laser-Assisted Periodontal Surgery

Laser-assisted periodontal surgery offers a precise, less invasive way to treat moderate to severe gum disease. Using advanced dental lasers like the PerioLase MVP-7, this method removes infected tissue while protecting healthy gums and promoting natural healing. Here’s a quick summary of the process:
- Step 1: Pre-op assessment includes reviewing medical history, measuring gum pockets, and discussing treatment goals.
- Step 2: Local anaesthetic is applied, followed by site preparation and safety checks.
- Step 3: The first laser pass targets bacteria and diseased tissue without incisions.
- Step 4: Mechanical cleaning removes hardened tartar from tooth surfaces.
- Step 5: A second laser pass seals the pocket, forms a protective clot, and encourages tissue regeneration.
- Step 6: Bite adjustments may be made to reduce stress on teeth and support healing.
- Step 7: Post-op care involves pain management, diet changes, and a modified oral hygiene routine.
- Step 8: Regular follow-ups and long-term maintenance are critical for sustained results.
This method is the only FDA-approved laser treatment for true bone and tissue regeneration, making it a precise and effective option for managing gum disease.
8 Steps of Laser-Assisted Periodontal Surgery Process
LANAP Procedure Step-by-Step. Laser Gum Treatment with Dr. Sandak. Live Patient Demonstration.
Step 1: Preoperative Assessment and Treatment Planning
Before starting treatment, your dentist will assess your overall health, the severity of gum disease, and any other factors that might affect your care.
Medical and Dental History Review
Your dentist will take a close look at your medical and dental history, paying particular attention to conditions linked to periodontal disease, such as diabetes, coronary artery disease, and osteoporosis. This is crucial, as people with gum disease are nearly twice as likely to develop coronary artery disease [10]. They’ll also review any medications you’re taking. For instance, if you’re on blood thinners, you generally won’t need to stop them before laser-assisted procedures, which is a big plus compared to traditional surgery [7]. Additionally, your family history might be discussed, as genetics can play a role in how your body responds to plaque and bacteria [8].
After this review, a detailed clinical and radiographic evaluation will follow.
Clinical and Radiographic Examination
Using a periodontal probe, your dentist will measure the depth of pockets around your teeth to assess the extent of the infection and any bone loss [3][2]. They’ll check for signs of more advanced gum disease, such as swollen gums, bleeding during probing, colour changes, increased sensitivity, pus, gum recession, or loose teeth or implants.
X-rays or other imaging techniques will be used to evaluate bone loss and identify vertical bony defects, which may be suitable for regeneration [12]. Areas with persistent vertical defects and pocket depths over 5 mm are often ideal for laser-assisted treatment. One clinical study highlighted that laser therapy, combined with scaling, reduced pocket depths from an average of 7.67 mm to 1.77 mm over 12 months [12].
Informed Consent and Patient Education
Clear communication is key to achieving the best results. Your dentist will explain that the primary goal of periodontal treatment is to slow disease progression and help you retain your teeth longer [8]. They’ll also outline the importance of following strict post-treatment care guidelines.
To maintain results, you’ll need to commit to professional cleanings every three months for at least the first year. If you’re a smoker, you’ll be advised that smoking can seriously impact the success of regenerative treatments [10].
This thorough preoperative assessment lays the groundwork for the next steps in your treatment plan.
Step 2: Anaesthesia and Initial Site Preparation
After the initial assessment, the next step focuses on ensuring the patient is comfortable and the treatment site is ready for the procedure.
To start, your dentist will administer a local anaesthetic to numb the area. Lidocaine is the preferred choice these days, as it offers longer-lasting relief and carries a lower risk of allergic reactions compared to Novocain [13]. Before the injection, the treatment site is dried, and a topical numbing gel is applied to minimise any discomfort from the needle [13][15].
The type of anaesthetic injection depends on the scope of the treatment. For smaller, targeted areas, an infiltration injection is used. For broader regions, like an entire side of the jaw, a block injection may be chosen [13]. Once injected into the gum tissue around the affected teeth, the anaesthetic ensures the area remains numb for several hours.
Next, your dentist will reassess the pocket depths to pinpoint the treatment zones accurately [9][3]. Both you and the dental staff will don laser-specific protective eyewear to ensure safety before activating the laser system [11][16].
The laser system is then calibrated and prepared for use [10][7]. To further disinfect the oral cavity, your dentist might have you rinse with a chlorhexidine mouthwash before proceeding [12].
With the area numbed, mapped, and all safety measures in place, the laser treatment is ready to begin.
Step 3: First Laser Pass
With everything set, your dentist initiates the first laser pass – a highly precise and minimally invasive step aimed at removing infection without the need for incisions.
The laser system used for this procedure is typically the PerioLase MVP-7 Nd:YAG laser, which operates at a wavelength of 1064 nanometres. This specific wavelength is absorbed by pigmented bacteria like Porphyromonas gingivalis and inflamed tissue, while leaving healthy gum tissue, bone, and teeth unaffected [4][11]. A specialised fibre optic tip, about as thin as three human hairs, is gently inserted into the periodontal pocket to target the diseased tissue [7][10].
The dentist carefully guides the laser fibre along the pocket wall, steering clear of the tooth surface. This process vaporises diseased tissue, bacteria, and harmful proteins deep within the pocket, thoroughly decontaminating the area without the need for surgical cuts [4]. The laser also sterilises the pocket and reduces inflammation, ensuring the area is ready for the next phase of treatment. The appearance of a "fresh bleed" indicates that the diseased lining has been successfully removed [17][18]. This precise removal process paves the way for the mechanical cleaning of any remaining deposits in Step 4.
Step 4: Mechanical Debridement
Once the laser decontamination is complete, the next focus is on the tooth structure itself. This is where mechanical debridement plays its part. It’s a hands-on process designed to physically remove hardened tartar (calculus) and biofilm from the root surfaces – something lasers alone simply can’t achieve.
To get the job done, dentists rely on ultrasonic scalers equipped with tips as fine as the laser fibre. When necessary, they also turn to hand instruments like Gracey curettes for precision work [3][1][12]. Moistened gauze may be used to clear away debris from the instruments during the procedure [19].
While lasers excel at targeting soft tissue, they fall short when it comes to removing hard calculus deposits. That’s where mechanical tools come in, creating a clean, biocompatible root surface that encourages tissue reattachment [19]. By combining laser technology with mechanical instruments, dentists ensure that both the surrounding tissue and the tooth structure are thoroughly cleaned and decontaminated.
This two-step approach isn’t just thorough – it’s effective. Research highlights its benefits, with one study showing that 96.9% of patients who underwent laser-assisted therapy after traditional mechanical debridement experienced improved bleeding indices. In contrast, only 66.7% of those treated with mechanical methods alone saw similar results [19]. This meticulous cleaning process lays the groundwork for the second laser pass in Step 5.
sbb-itb-2be92ed
Step 5: Second Laser Pass
After debridement, the laser takes on a more refined role in the second pass, focusing on sealing the pocket, controlling bleeding, and encouraging the healing process. This step ensures the tissue is prepared for the precise coagulation process that follows.
During this stage, the laser settings are adjusted to promote coagulation. When the tissue temperature reaches between 60° and 65°C, a blanching effect occurs, signalling successful coagulation and effective bleeding control. The Nd:YAG laser, operating at a wavelength of 1064 nm, is ideal for this task because its energy is highly absorbed by melanin and haemoglobin. This process forms a fibrin clot, which acts as a biological seal, closing the periodontal pocket and creating a thermal barrier to block bacteria from entering the treated area during the crucial early healing phase [14].
"The Nd:YAG is then used for hemostasis, to establish a stable fibrin clot, activate growth factors, and upregulate gene expression." – Allen S. Honigman and John Sulewski [14]
Simultaneously, the laser delivers a final round of deep disinfection within the junctional epithelium and connective tissue [1][12].
Beyond simply sealing the pocket, the laser plays a vital role in promoting regenerative healing. It stimulates natural growth factors and enhances gene expression, which supports the regeneration of bone and soft tissue. Additionally, by de-epithelialising the pocket’s interior, the laser delays epithelial migration, creating a "closed healing environment" that encourages gum tissue to reattach to the cleaned root surface.
For patients taking anticoagulant medications, the laser’s ability to achieve effective haemostasis is particularly beneficial. It often allows the procedure to be performed without requiring patients to pause their medication [14].
Step 6: Occlusal Adjustment (If Necessary)
After completing the second laser pass, the focus shifts to addressing any mechanical issues that might hinder healing.
Once the pocket is sealed, the dentist evaluates the patient’s bite to determine if occlusal adjustments are needed. This process involves reshaping the biting surfaces to eliminate high spots and reduce stress on the teeth [20][3]. While not always required, occlusal adjustment can be critical when teeth are compromised by bone loss or infection. Reducing stress in these cases creates a more stable environment for tissues to heal and regenerate.
Studies show that combining inflammation control with regular occlusal adjustments significantly improves outcomes. For example, two-thirds of treated teeth exhibited reduced mobility when mechanical stress was addressed alongside inflammation [20]. Without this step, ongoing trauma from bite imbalances can undermine the regenerative effects of laser treatment [21].
As highlighted in the Laser Assisted Peri-Implantitis Protocol (LAPIP):
"The bite forces on the affected implants are adjusted to eliminate any high spots or occlusal trauma which may delay ongoing bone healing." – Laser Assisted Peri-Implantitis Protocol (LAPIP) [3]
Clinical evidence supports the importance of this step. In a randomised controlled trial involving 60 patients with chronic periodontitis and occlusal trauma, those who received occlusal adjustment alongside standard treatment achieved a 93.33% success rate, compared to 73.33% without adjustment. These patients also experienced better attachment levels and reduced pocket depths [21].
Occlusal adjustment isn’t a one-and-done procedure. Dentists usually reassess the bite during follow-up visits – at one week, one month, and three months after surgery – to account for changes as the tissues heal [20]. Additionally, a maxillary flat plane biteguard is often provided four to six weeks post-surgery to help manage occlusal forces and protect the healing tissues [20].
This ongoing monitoring and adjustment play a vital role in supporting optimal healing and preparing for the next stage of postoperative care.
Step 7: Immediate Postoperative Care
After occlusal adjustment, immediate postoperative care plays a crucial role in promoting smooth healing and safeguarding the results of the laser treatment and debridement. Taking the right steps during this phase can make all the difference.
Managing pain and swelling is a priority in the first 24 hours. To keep discomfort and inflammation under control, use ibuprofen or paracetamol as recommended [22]. Applying ice to the cheek near the treated area in 20-minute intervals (20 minutes on, 20 minutes off) during the first day can also help. After that, switch to warm, moist heat for continued relief [22][24].
Protecting the surgical site is equally important. The blood clots that form between your gums and teeth act like a natural bandage, essential for healing. Dislodging them could interfere with recovery [22]. Stick to a specific diet plan to keep the clot intact: liquids only for the first three days, soft mashed foods from days 4 to 7, and soft solids from days 7 to 10. Avoid using straws during this time, as the suction can disturb the clot [22][23][24].
Adjust your oral hygiene routine to prevent harming the treated area. Do not brush or floss the surgical site until your dentist gives the green light [22]. However, continue brushing and flossing other teeth as usual to minimise bacterial buildup [22][24]. After the first 24 hours, you can gently clean the treated area using a cotton bud dipped in an antimicrobial rinse like Peridex or Listerine. Supplement this with warm salt water rinses (half a teaspoon of salt in 250 ml of water) every three hours [22][23].
Studies show that while laser-assisted procedures might cause slightly more discomfort than non-surgical therapy, they lead to significantly less postoperative pain compared to traditional flap surgery [5]. Most patients recover within 24 hours [22]. During healing, the gum tissue may change colour, appearing grey, yellow, red, blue, or purple – this is a normal part of the process [22][23]. For the first few hours after surgery, take it easy, and avoid strenuous activities like running or heavy lifting for two to three days [22][24].
Step 8: Follow-Up and Long-Term Maintenance
After the initial postoperative care, the key to lasting success lies in consistent follow-ups and diligent home care. These steps are essential to ensure proper healing and to keep any underlying conditions under control.
Your first follow-up appointments will be scheduled soon after the procedure. These visits are crucial for monitoring your healing process and confirming that the laser treatment is working as intended [1][6]. During these check-ups, your dental team will measure periodontal pocket depths again to track your progress. It’s worth noting that the healing process can take months or even years, so these regular evaluations are critical for achieving long-term results.
Once the healing phase is complete, maintenance cleanings every 3–4 months are recommended. This routine helps prevent bacteria from regrowing quickly and causing irreversible damage [25].
At home, daily plaque control is non-negotiable. Tools like interdental brushes or Waterpiks can help keep bacteria at bay [25][26]. Stick to any prescribed antimicrobial rinses and address lifestyle factors like smoking or diabetes, as these can significantly impact your oral health [26].
It’s also important to stay alert for warning signs such as bad breath, bleeding gums, or pus. If you notice any of these, contact your periodontist immediately [25]. Sensitivity or tenderness in your teeth is normal for up to a year as your bone and ligaments regenerate. However, if sensitivity persists, it might signal a bite imbalance that needs adjustment [22].
As Leticia Algarves Miranda from teeth.org.au aptly puts it:
"The long-term success of treatment for periodontal disease is a partnership. It relies on your own efforts at home with optimal cleaning and those of the dental team who provide your ongoing checks and regular care" [26].
Conclusion
Laser-assisted periodontal surgery operates through a detailed eight-step process that supports healing and tissue regeneration. From the initial assessment to long-term maintenance, every stage is essential for achieving the best possible results. The first laser pass removes diseased tissue, mechanical debridement clears calcified plaque, and the second laser pass forms a protective fibrin clot. This clot acts as a natural barrier, allowing your tissues to heal from within [27][28]. Each step in this protocol is carefully designed to deliver immediate recovery while ensuring long-term periodontal stability. Beyond eliminating disease, this method lays the groundwork for genuine tissue regeneration.
What makes this approach stand out is its ability to promote true healing. The LANAP protocol is the only laser treatment with US FDA clearance for actual periodontal regeneration, enabling the restoration of bone, cementum, and ligaments [27][7]. The PerioLase MVP-7 laser supports rapid recovery and may even save teeth that have experienced severe bone loss [29].
Occlusal adjustment plays a key role in this process, as it prevents bite imbalances that could hinder tissue regeneration [27]. As Fiandaca Periodontics emphasises, "Bite adjustment is critical to making sure your teeth and gum between your teeth is not traumatised and can regrow" [27]. This is why Step 6, occlusal adjustment, is a vital component of the treatment.
Your role as a patient is equally important. Protecting the fibrin clot during the first 10 days by following dietary guidelines, avoiding straws, and practising gentle oral care significantly aids tissue regeneration [23][27]. Once recovery is complete, maintaining professional cleanings every three to four months, alongside daily plaque control at home, is essential to prevent bacterial recolonisation.
Strict adherence to follow-up care and home routines is crucial for sustaining long-term success. By committing to these steps, both clinicians and patients work together to ensure enduring periodontal health.
FAQs
What are the advantages of laser-assisted periodontal surgery over traditional techniques?
Laser-assisted periodontal surgery brings a range of advantages over traditional techniques. Patients often experience quicker recovery times, with less discomfort and minimal bleeding. Another plus? It tends to cause less gum-line recession, making the process gentler on your mouth. The precision of the laser also means healthier tissue is preserved, which can support natural bone and tissue regeneration.
On top of that, this approach usually requires fewer visits to the dentist, adding a layer of convenience for busy schedules. As a less invasive option compared to scalpel-based surgery, laser-assisted techniques not only enhance oral health but also make the entire treatment process more comfortable.
How does laser-assisted periodontal surgery help with tissue healing and regeneration?
Laser-assisted periodontal surgery utilises a precise laser to target and remove diseased tissue while preserving healthy gum and bone structures. This method not only reduces inflammation but also creates the ideal conditions for the body to regenerate new cementum, periodontal ligament, and alveolar bone.
This technique encourages a natural healing process, offering a supportive environment for tissue regeneration. Compared to traditional methods, it often results in a quicker recovery and improved healing, making it a modern solution for enhancing oral health.
What care is needed after laser-assisted periodontal surgery to ensure proper healing?
Successful recovery after laser-assisted periodontal surgery depends on following proper post-operative care. To help reduce swelling and ease discomfort during the first 72 hours, use cold packs in intervals – 20 minutes on, 10 minutes off. Pair this with over-the-counter pain relief like paracetamol or ibuprofen, taken with food as directed. Stick to a diet of soft, cool foods such as yoghurt, smoothies, or mashed potatoes. For at least 48 hours, steer clear of hot drinks, spicy or crunchy foods, straws, smoking, and alcohol.
When it comes to oral hygiene, be gentle. During the first 24 hours, rinse your mouth with a prescribed antimicrobial solution or warm salt water (mix ½ teaspoon of salt in a glass of warm water). Avoid brushing or flossing near the treated area. After a week, you can start brushing the crown surfaces and carefully flossing nearby teeth. Full brushing and flossing routines can usually resume two weeks post-surgery, but always follow your dentist’s guidance.
Protect the healing area by avoiding strenuous activities, keeping pressure off the surgical site, and staying smoke-free. Be sure to schedule a follow-up appointment within 7–10 days to check on your progress. If you notice severe pain, excessive bleeding, worsening swelling, or develop a fever, contact your dentist immediately. These steps are key to ensuring a smooth and effective recovery.
Related Blog Posts
- How Dentists Evaluate Patients For Laser Gum Surgery
- Minimally Invasive vs. Traditional Gum Surgery: Key Differences
- Laser Gum Surgery Recovery: What to Expect
- 5 Steps of Flap Surgery Explained
Important Notice: Any surgical or invasive procedure carries risks. Before proceeding, you should seek a second opinion from an appropriately qualified health practitioner.
Individual results may vary. The information provided in this article is for educational purposes only and does not constitute medical advice.
Checkout Related Blogs


Get in touch with us
For more information, call us now to start feeling better. Or fill the form below to make appointment
The Latest News from Complete Smiles
How to Clean Clear Plastic Retainers
Checklist for Choosing Wearable Dental Devices
Checklist for Choosing Cloud AI Platforms in Dentistry

Complete Smiles Bella VistaAccepts All Major Health Funds, Including


