


3D Printing in Dental Implant Prototyping: How It Works
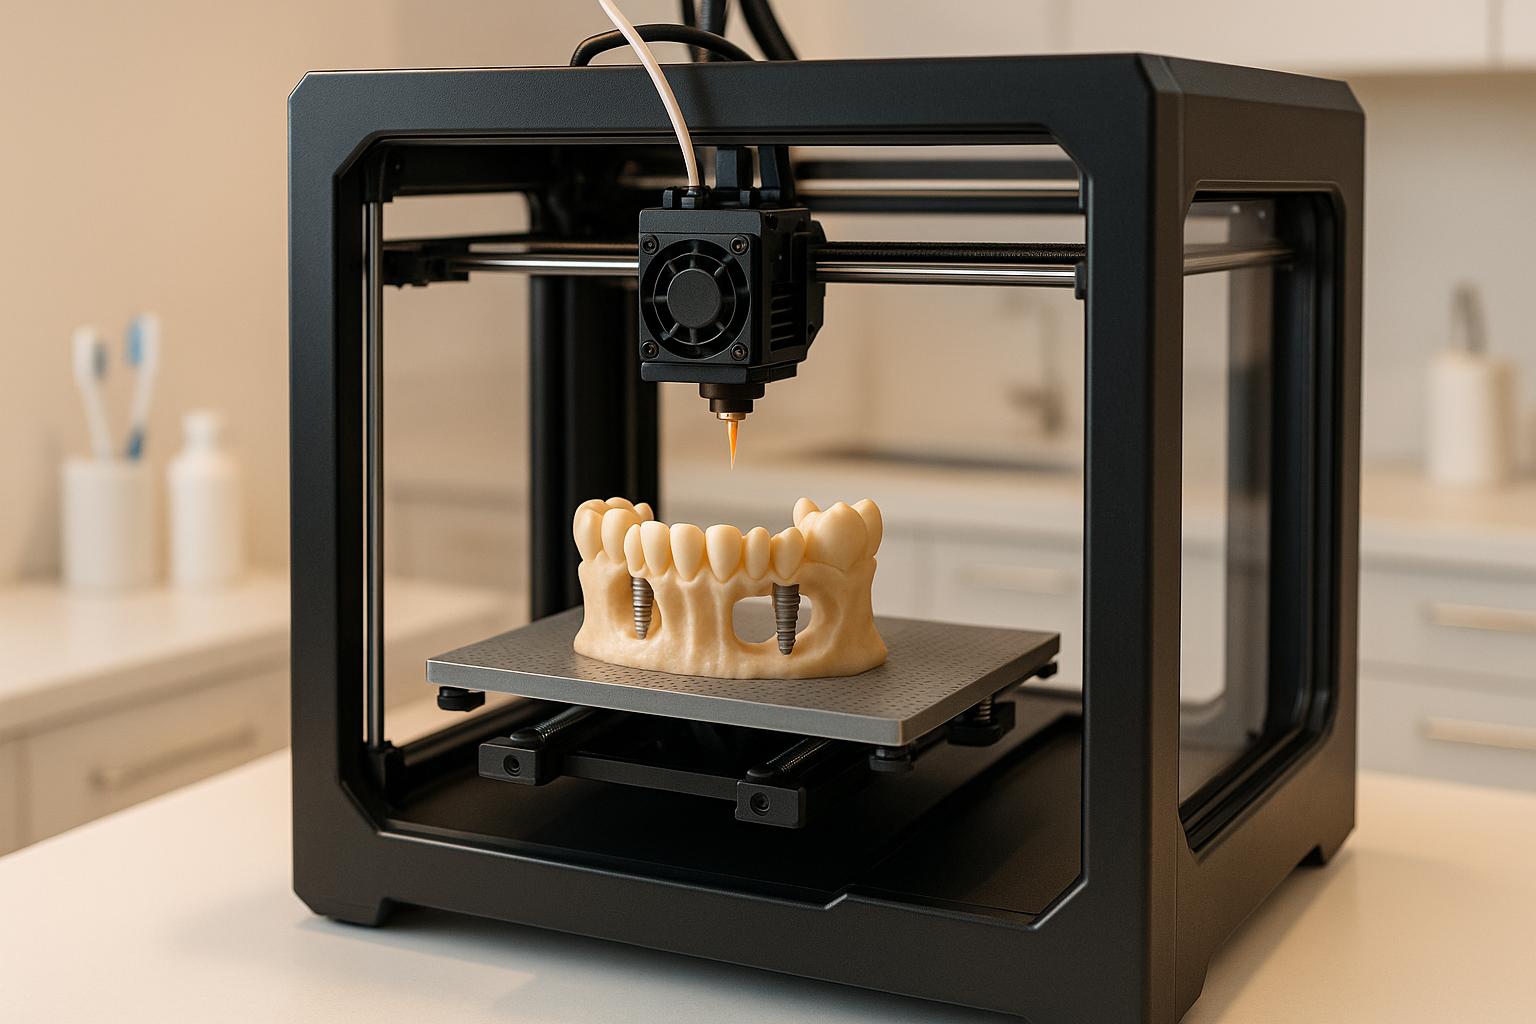
3D printing is transforming how dental implants are created by offering faster, more precise, and cost-efficient solutions compared to older methods. Here’s the key takeaway:
- Cost: 3D-printed implants cost as little as $13 AUD per unit, compared to $225 AUD for conventional methods.
- Time: Production time drops from weeks to as little as 24 hours.
- Precision: Achieves micron-level accuracy, reducing risks like poor fit or complications.
- Materials: Options include biocompatible resins for temporary uses and durable metals like titanium for long-term applications.
- Workflow: Combines digital scanning, CAD design, and advanced printing technologies to create patient-specific prototypes.
While there are challenges, such as high initial costs and regulatory requirements, the advantages make it a game-changer for clinics prioritising precision and efficiency.
Step-by-Step Guide: How to 3D Print Dental Implant Surgical Guides | iDD
Digital Scanning and Data Collection
The process of creating a 3D-printed implant starts with capturing highly detailed digital data, replacing the need for traditional impressions. This approach delivers instant, precise digital blueprints that play a critical role in the success of the final prototype.
Types of Scanning Technology
Intraoral scanners offer a straightforward way to capture the surface anatomy of a patient’s mouth. These handheld devices use optical imaging to generate detailed 3D models of teeth and soft tissues directly inside the mouth. The process is quick – just a few minutes – and provides digital impressions with exceptional accuracy at the micron level[6][3].
Some of the most popular intraoral scanners in Australian dental practices include the 3Shape TRIOS, iTero Element, and Carestream CS 3600. These tools are ideal for capturing the intricate details required for designing crowns, bridges, and surgical guides[7][6][3].
On the other hand, cone-beam computed tomography (CBCT) serves a complementary purpose. While intraoral scanners focus on surface details, CBCT offers a complete 3D radiographic view of the jawbone structure. Systems like the Planmeca ProMax 3D and Carestream CS 9300 are commonly used in Australia for this purpose[7].
CBCT provides essential insights that surface scanning alone cannot, such as bone density, volume, and the location of critical structures like nerves and sinuses. This makes it particularly valuable for planning implant placement in areas with complex anatomy or limited bone availability[6][3].
The choice of technology depends on the clinical needs. For simpler cases, such as crowns, an intraoral scanner may be sufficient. However, more complex procedures, like implant placement, often require both intraoral scanning and CBCT for a complete understanding of the patient’s oral anatomy.
| Technology | Data Captured | Primary Use Case | Key Advantages |
|---|---|---|---|
| Intraoral Scanner | Surface anatomy (teeth, gums) | Digital impressions, prosthetics | Quick, non-invasive, detailed surface imaging |
| CBCT | 3D radiographic (bone, teeth) | Implant planning, bone assessment | Comprehensive bone data, structural insights |
These detailed digital models are then seamlessly integrated with dental CAD software for further design and planning.
Integration with Dental Software
Once the digital models are captured, the data is transferred to dental CAD software for processing and design. Modern scanning devices export data in formats like STL and DICOM, ensuring compatibility with leading CAD/CAM systems such as exocad and DentalCAD[7][6].
This integration allows clinicians to visualise and manipulate the patient’s anatomy in a virtual environment. They can examine the model from all angles, zoom in on specific areas, and identify potential issues before moving to the physical prototyping stage[6][3].
The workflow involves several steps. First, the scan data is verified to ensure there are no artefacts or missing sections. Any gaps or inconsistencies must be corrected before the design phase begins. In some cases, the software combines data from multiple sources, such as merging intraoral scans with CBCT images, to create a comprehensive model that includes both surface details and bone structure.
Cloud-based platforms have further streamlined this process by enabling secure data sharing among dental practices, specialists, and laboratories. This connectivity allows for collaborative treatment planning, where multiple experts can review and contribute to implant designs, regardless of location.
For practices like Complete Smiles Bella Vista, this integration represents a significant step forward in delivering tailored implant solutions. By combining precise surface scanning with detailed bone data, clinicians can plan each implant with exceptional accuracy[3][5].
To ensure these systems remain effective, regular software updates and staff training are essential. As scanning technology continues to advance, staying updated on new features and capabilities helps practices achieve better patient outcomes and maintain efficiency.
Computer-Aided Design (CAD) and Virtual Planning
To create precise, patient-specific implant prototypes, digital scan data (usually in STL format) is imported into specialised CAD software for processing [6].
Role of CAD Software in Implant Design
CAD software transforms scan data into detailed, adjustable digital models with exceptional precision. This allows clinicians and technicians to simulate the implant’s shape, size, and fit within the patient’s digital anatomy [1][2]. During virtual planning, practitioners can visualise and fine-tune the implant’s position relative to critical anatomical features like nerves and sinuses, helping to minimise potential surgical complications [6].
Modern 3D printing can produce layers as thin as 20 microns, ensuring exceptional dimensional accuracy. This precision is crucial for creating components that integrate seamlessly with existing dental structures. CAD software also supports the simulation of occlusion and the evaluation of implant fit, enabling designers to assess how the implant interacts with opposing teeth during chewing and speaking. This process helps identify and address potential functional issues early on [1][2].
The software further refines structural details, such as thread pitch and retention features, which are essential for the implant’s success [2]. By leveraging a digital workflow, intricate dental implant components with complex geometries – often challenging or impossible to create manually – can be designed and fabricated with ease [1][2].
Once the design is validated digitally, clinicians proceed to select biocompatible materials to finalise the model.
Material Selection and Design Refinement
After the virtual planning stage, selecting the right materials and refining the design ensures the digital model meets clinical and functional standards. For example, MED690 VeroDentPlus is a biocompatible material known for its suitability in small abutments for CAD-designed prototypes [2]. Material selection must consider factors like biocompatibility, mechanical strength, and sterilisation compatibility. Common materials include biocompatible plastics, resins, and metals such as stainless steel or titanium alloys [2][7]. The refinement process involves adjusting the digital model to accommodate patient-specific anatomy and fine-tuning structural elements for better performance [2][3]. CAD software’s iterative simulation tools further ensure a precise fit and optimal functionality.
One example demonstrates the efficiency of this digital approach: a titanium healing cap was scanned, refined in CAD software, and 3D printed in both plastic and metal [2]:
| Method | Cost per Unit | Production Time | Success Rate |
|---|---|---|---|
| Traditional fabrication | ~$225 AUD | Several weeks | 50% |
| Digital CAD and 3D printing | ~$13 AUD | Approximately one week | 85% |
This comparison illustrates the advantages of CAD and 3D printing: faster production times, greater precision, reduced material waste, and higher levels of customisation. The digital workflow can cut production time from weeks to days while reducing costs from hundreds to just tens of dollars per unit [2]. Once the design is finalised, it is sliced into layers with a specified thickness tailored to the chosen 3D printing technology [6]. This slicing process determines the optimal layer thickness and selects the best printing method for the material and application.
For practices adopting these technologies, the CAD design process marks a shift towards more predictable results and higher-quality patient care. This iterative process also lays the groundwork for precise 3D printing parameters, ensuring the final implant meets accuracy and performance standards.
3D Printing Technologies and Materials
After finalising and slicing the CAD design, the next step is choosing the right 3D printing technology and materials to create a dental implant prototype. This decision directly affects the precision, surface finish, and mechanical performance of the final product [3][4]. Let’s dive into the specific printing methods and materials that bring these digital designs to life as clinical prototypes.
Types of 3D Printing Technologies
Once the design is ready, the fabrication phase begins. Different 3D printing technologies cater to various needs in dental implant prototyping.
Stereolithography (SLA) and Digital Light Processing (DLP) are popular for creating resin-based components with intricate details. Both methods cure resin layer by layer using light, but they differ in how the light is applied: SLA uses a laser to trace each layer point by point, while DLP projects an entire layer at once with a digital light projector [4][6]. These techniques are ideal for producing models with high precision and smooth surfaces, making them perfect for surgical guides, temporary crowns, and diagnostic models.
For metal components, Selective Laser Melting (SLM) and Selective Laser Sintering (SLS) are commonly used. SLM employs a high-powered laser to fully melt and fuse fine metal powders, creating dense and strong structures. On the other hand, SLS uses lower temperatures to partially fuse powder particles. Both methods are excellent for crafting durable metal components like abutments and implant frameworks that can endure the mechanical stresses of chewing [2][4].
This level of precision ensures minimal microgaps and results in prostheses that fit exceptionally well [3].
Materials for Dental Implant Prototyping
The choice of materials is just as critical as the printing method, as it influences both the functionality and clinical performance of the prototype. Biocompatible resins are widely used for their safety in intraoral applications and their ability to achieve high precision. For instance, MED690 VeroDentPlus is a resin specifically designed for dental use, making it a great choice for creating small abutments and CAD-designed prototypes [2]. While these resins excel in detail and surface quality, they may not provide the mechanical strength needed for permanent or load-bearing components [2][7].
For components requiring greater strength and durability, metals are the preferred choice. Stainless steel, such as Duraform 316L, is a cost-effective material with excellent mechanical properties and compatibility with sterilisation processes [2]. For final implant components, titanium alloys like Ti-6Al-4V are considered the gold standard, offering exceptional biocompatibility, corrosion resistance, and the ability to integrate seamlessly with bone [2][7].
When selecting materials, dental professionals must weigh factors such as biocompatibility, sterilisation needs, and mechanical strength. While temporary guides focus on dimensional accuracy, abutments and fixtures demand enhanced fatigue resistance and long-term durability [2][7].
| Technology | Suitable Materials | Typical Applications | Key Advantages |
|---|---|---|---|
| SLA/DLP | Biocompatible resins (e.g. MED690 VeroDentPlus) | Surgical guides, models, provisional restorations | High detail, smooth surfaces, quick production |
| SLM/SLS | Metals (stainless steel, titanium alloys) | Abutments, implant frameworks, functional components | Strength, durability, biocompatibility |
sbb-itb-2be92ed
Post-Printing Processing and Quality Control
After the CAD and 3D printing stages, post-processing is a critical step to ensure the printed designs meet clinical standards. Once the 3D printer finishes its job, the printed part isn’t immediately ready for clinical use. Several steps are required to refine the raw print into a functional, patient-ready implant prototype.
Post-Printing Steps
The process starts with carefully removing the prototype from the printer platform to avoid damaging any delicate features. Next, the part undergoes cleaning to eliminate excess material based on the printing method used. For metal components created via Selective Laser Sintering (SLS), unfused powder is removed[4]. Meanwhile, resin-based prototypes made with Stereolithography (SLA) or Digital Light Processing (DLP) require solvent cleaning to clear uncured resin from surfaces and internal structures[4]. This cleaning step is especially important for small, intricate dental components where leftover material could compromise biocompatibility or precision.
Following cleaning, support structures are removed, and the surface is refined through polishing or machining to achieve the required clinical accuracy[1]. For metal prototypes, additional machining might be needed to fine-tune thread pitch and ensure precise dimensions[2]. This step validates all the intricate work done during earlier stages.
Resin-based components often require exposure to controlled heat or light to fully cure the material, which improves their mechanical properties and ensures durability[3][4].
Quality Control Standards
Quality control begins with verifying dimensional accuracy. Prototypes are meticulously measured to ensure they align with the original design specifications. Modern 3D printing can achieve layer thicknesses as fine as 20 microns, which is essential for applications like dental abutments. An exact internal fit minimises microgaps, enhancing both durability and mechanical performance[3].
Functional testing is another key quality control step. This involves checking that prototypes can be threaded correctly into implant bodies and perform as expected in lab simulations for artificial tooth fabrication[2]. Thread pitch accuracy often requires additional refinement during post-processing to meet these standards[2].
Laboratory tests are conducted to confirm the structural integrity of components under threading and prosthetic stresses[2]. In such tests, metal prototypes tend to outperform plastic ones in terms of reliability.
Material properties are a crucial consideration during quality control. For instance, while plastic prototypes made from MED690 VeroDentPlus are biocompatible, they may lack the strength needed for demanding dental applications. On the other hand, metal prototypes using Duraform 316L stainless steel typically withstand simulated provisionalisation processes and sterilisation due to their superior physical properties[2].
Lastly, quality control ensures compliance with medical device regulations. This involves verifying that materials meet biocompatibility standards and sterilisation requirements. These steps are the final checkpoint to ensure the precise digital design translates into a safe, reliable implant ready for patient use. Quality control bridges the gap between digital innovation and clinical application, ensuring every component is fit for purpose.
Benefits and Limitations of 3D-Printed Implant Prototyping
Understanding the pros and cons of 3D printing technology is crucial for dental practices considering this modern approach to implant prototyping. It enables them to make informed choices about incorporating this technology into their workflows.
Benefits Over Conventional Methods
Speed and Efficiency: Traditional fabrication methods can take weeks, but with 3D printing, components can be produced in as little as 24 hours[3]. This faster turnaround allows practitioners to reduce patient waiting times and streamline treatment processes.
Cost Savings: Conventional prototyping costs approximately $225 AUD per unit and has a 50% success rate[2]. In contrast, 3D-printed metal prototypes cost just $13 AUD per unit, with an 85% success rate[2]. That’s a cost reduction of more than 90%, coupled with significantly improved reliability.
Precision and Personalisation: 3D printing offers exceptional precision, creating patient-specific designs that closely match individual anatomy. This accuracy enhances surgical outcomes, reduces operative times, and improves overall patient comfort[3].
Reduced Material Waste: Unlike traditional subtractive manufacturing, which removes material from larger blocks, 3D printing uses only the material needed. This often includes hollow or internally structured designs, resulting in less waste and a more resource-efficient process[1].
These benefits, supported by advancements in digital scanning and CAD technology, make 3D printing a game-changer. However, it’s not without its challenges.
Challenges and Limitations
Material Strength Issues: Plastic prototypes often lack the mechanical durability of metal alternatives[2]. This makes material selection critical, depending on the clinical use.
High Initial Costs: Adopting 3D printing requires substantial investment in equipment, software, and staff training. For smaller clinics, these upfront costs can be a significant hurdle unless there’s a clear financial return.
Complex Post-Processing: Although printing itself is quick, the additional steps – like cleaning, finishing, and ensuring thread accuracy – require specialised tools and expertise. These processes can reduce the overall time savings.
Regulatory Compliance: In Australia, the Therapeutic Goods Administration (TGA) oversees 3D-printed medical devices. Meeting these stringent standards often requires in-house testing or third-party certification, adding another layer of complexity.
Material Limitations: Not all materials used in 3D printing are suitable for final implants. Gaining regulatory approval for new materials can be a lengthy process, making it essential to carefully match materials to clinical needs[2].
Comparison Table: 3D Printing vs Conventional Prototyping
Here’s a side-by-side comparison of 3D printing and traditional prototyping methods:
| Factor | 3D Printing | Conventional Prototyping |
|---|---|---|
| Production Time | 24 hours to 1 week [2][3] | Several days to weeks [2][3] |
| Cost per Prototype | ~$13 AUD (metal)[2] | ~$225 AUD[2] |
| Success Rate | 85%[2] | 50%[2] |
| Customisation Level | High, patient-specific[3] | Limited, manual adjustments needed |
| Material Waste | Low[1] | High |
| Precision | Micron-level accuracy[3] | Lower, more manual error prone[3] |
| Initial Investment | High (equipment/training)[2] | Lower for small-scale operations[2] |
| Material Strength | Variable by material choice | Consistently strong with metals |
| Post-Processing | Complex but standardised[1] | Required but often less technical |
While 3D printing offers clear advantages in areas like speed, cost, and precision, dental practices must carefully weigh these against the challenges of upfront costs, regulatory requirements, and post-processing demands. In Australia, clinics like Complete Smiles Bella Vista (https://completesmilesbv.com.au) have successfully integrated 3D printing into their workflows, offering same-day provisional restorations and improved treatment accuracy while maintaining high-quality standards.
Conclusion
3D printing is revolutionising dental implant prototyping by delivering unmatched precision, efficiency, and personalisation compared to older methods. With the ability to achieve micron-level accuracy, it slashes production costs dramatically – from approximately $225 AUD to just $13 AUD per unit[2].
The integration of digital scanning, computer-aided design (CAD), and post-processing workflows streamlines the entire process for both dental professionals and patients. Each stage – scanning, designing, and printing – plays a critical role in reducing production times to just 24 hours while achieving an 85% success rate[2][3].
This shift towards patient-specific solutions aligns perfectly with the growing emphasis on personalised medicine in healthcare[5]. 3D printing’s ability to produce intricate geometries and internal structures that are impossible to create manually unlocks new possibilities for dental implant design and functionality[1][3].
For Australian dental practices considering this technology, the benefits are clear. Lower waste, improved treatment outcomes, and enhanced patient satisfaction make 3D printing a forward-thinking investment. Clinics that adopt digital scanning, CAD workflows, and advanced printing materials can position themselves as leaders in modern dentistry.
As materials and printing technologies continue to evolve, the advantages of 3D printing over traditional methods will only grow. For practitioners committed to providing the best possible care with state-of-the-art techniques, 3D printing is no longer optional – it’s a vital part of the future of dental practice.
FAQs
What makes 3D printing a better option for creating dental implant prototypes compared to traditional methods?
3D printing has transformed how dental implant prototypes are created, offering a level of precision and accuracy that ensures a better fit for patients. This technology speeds up the process dramatically, enabling dental professionals to produce prototypes in just hours instead of days – a game-changer for timely treatment planning.
What’s more, 3D printing proves to be cost-efficient over time. By reducing material waste and cutting down on the need for repeated adjustments, it helps save both resources and effort. It also excels in personalisation, allowing each implant to be customised to match a patient’s unique dental structure. These factors make 3D printing a practical and forward-thinking approach in today’s dental care.
How do intraoral scanners and CBCT technology work together in creating 3D-printed dental implant prototypes?
Intraoral scanners and CBCT (Cone Beam Computed Tomography) technology work hand-in-hand when creating 3D-printed dental implant prototypes. Intraoral scanners are used to capture detailed digital impressions of a patient’s teeth and gums, providing precise measurements and an accurate view of the oral cavity. On the other hand, CBCT scans offer 3D imaging of the underlying bone structure, nerves, and surrounding tissues, delivering essential insights into the patient’s anatomy.
When these technologies are combined, dental professionals can construct a detailed digital model that serves as the foundation for designing and 3D printing customised implant prototypes. This seamless integration not only boosts precision but also enhances treatment planning, leading to improved outcomes for patients.
What should you consider when choosing materials for 3D-printed dental implant prototypes, and how do these choices affect the outcome?
When choosing materials for 3D-printed dental implant prototypes, several key factors come into play: biocompatibility, strength, and precision. These materials need to be safe for use in the human body, resilient enough to endure chewing forces and daily use, and capable of producing high-resolution prints to ensure the implant design is replicated with accuracy.
Take titanium, for instance – it’s a popular choice because of its durability and compatibility with oral tissues. Similarly, certain medical-grade resins are favoured for their ability to balance strength and safety. The material you select significantly influences the prototype’s performance, longevity, and fit, all of which are essential for a successful dental implant.
Related Blog Posts
- 3D Bioprinting in Dental Implants: How It Works
- Titanium vs. Biodegradable Implants: Comparison
- What Is Digital Guided Implant Surgery?
- Bone Quality in Osseointegration: Research Insights
Important Notice: Any surgical or invasive procedure carries risks. Before proceeding, you should seek a second opinion from an appropriately qualified health practitioner.
Individual results may vary. The information provided in this article is for educational purposes only and does not constitute medical advice.
Checkout Related Blogs


Get in touch with us
For more information, call us now to start feeling better. Or fill the form below to make appointment
The Latest News from Complete Smiles
How to Clean Clear Plastic Retainers
Checklist for Choosing Wearable Dental Devices
Checklist for Choosing Cloud AI Platforms in Dentistry
Complete Smiles Bella VistaAccepts All Major Health Funds, Including


